

Guides
How to install
Section titled “How to install”This is the recommended way to install either the free or the Patreon JB2A module.
Free module
Section titled “Free module”The free module could be considered a demo of our module on Patreon. We’re working hard to ensure that the module has all the animated assets we’ve made, minus their colour variations and a few exceptions to comply with licensing requirements.
It’s a good place to start, if you want to discover the whole FoundryVTT effects environment before committing yourself to our Patreon module. Simple to install, and can be updated directly on FoundryVTT.
The installation process may differ depending on your hosting method. Select the corresponding tab below.
-
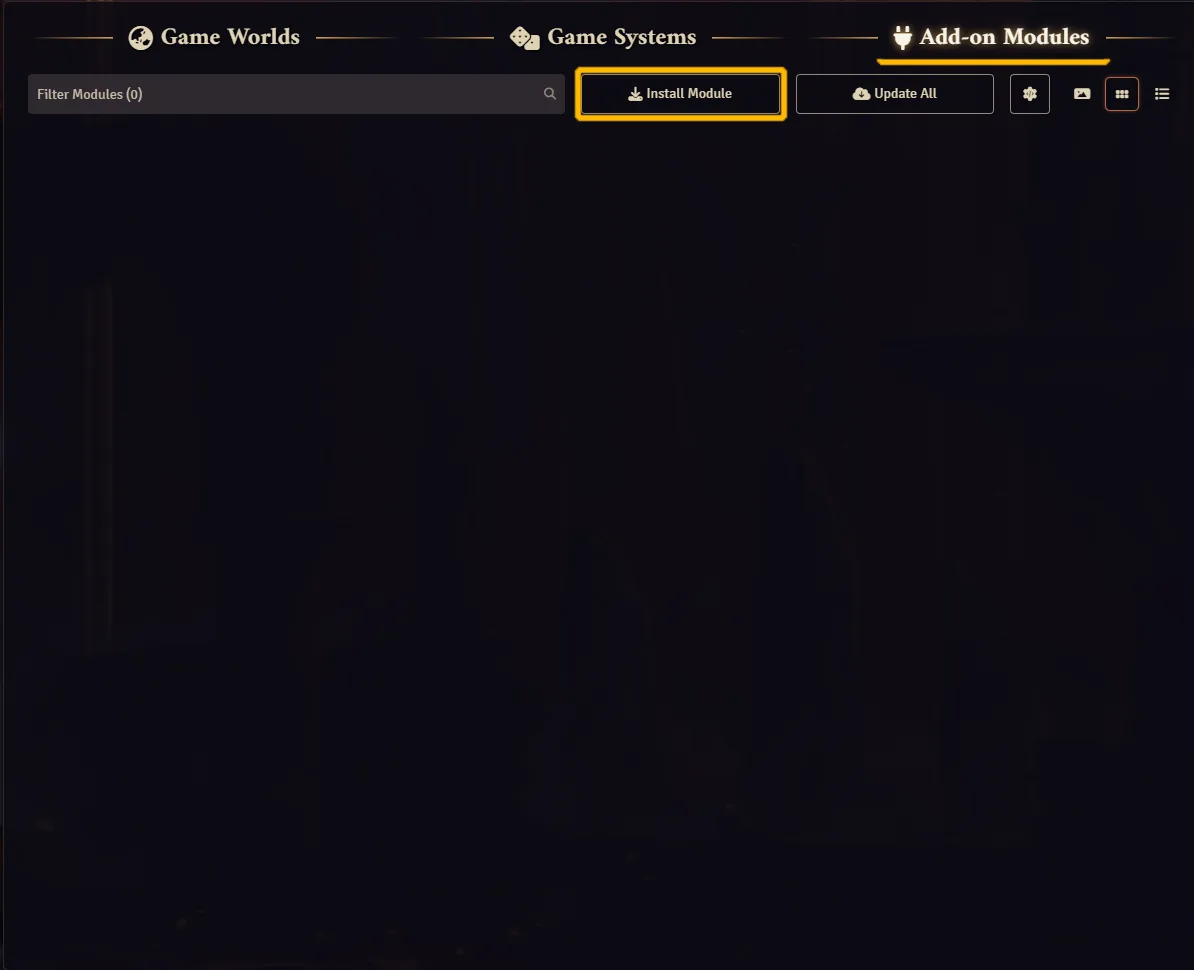
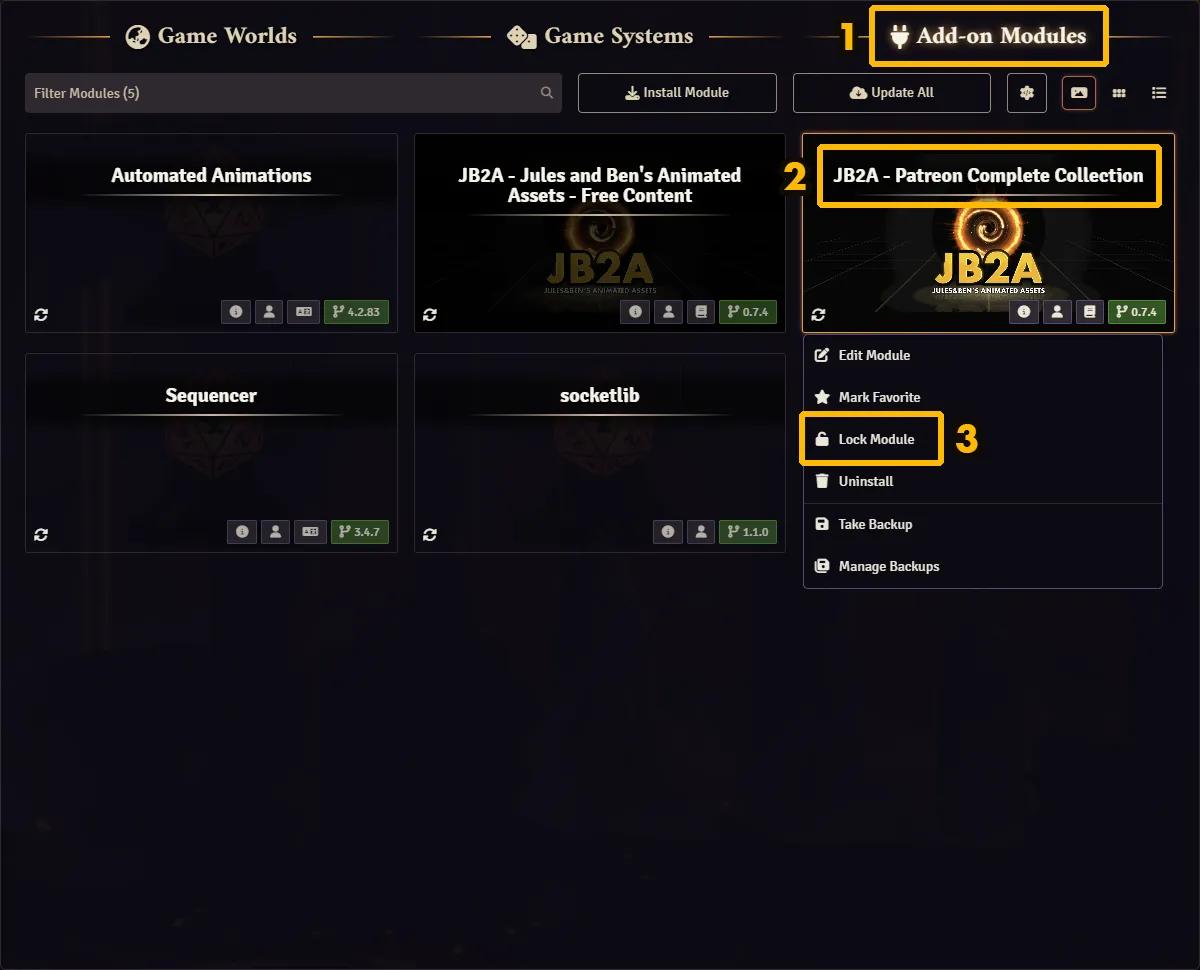
Go to the FoundryVTT landing page and click on the “Add-On Modules” tab.
-
Click on the “Install Module”
-
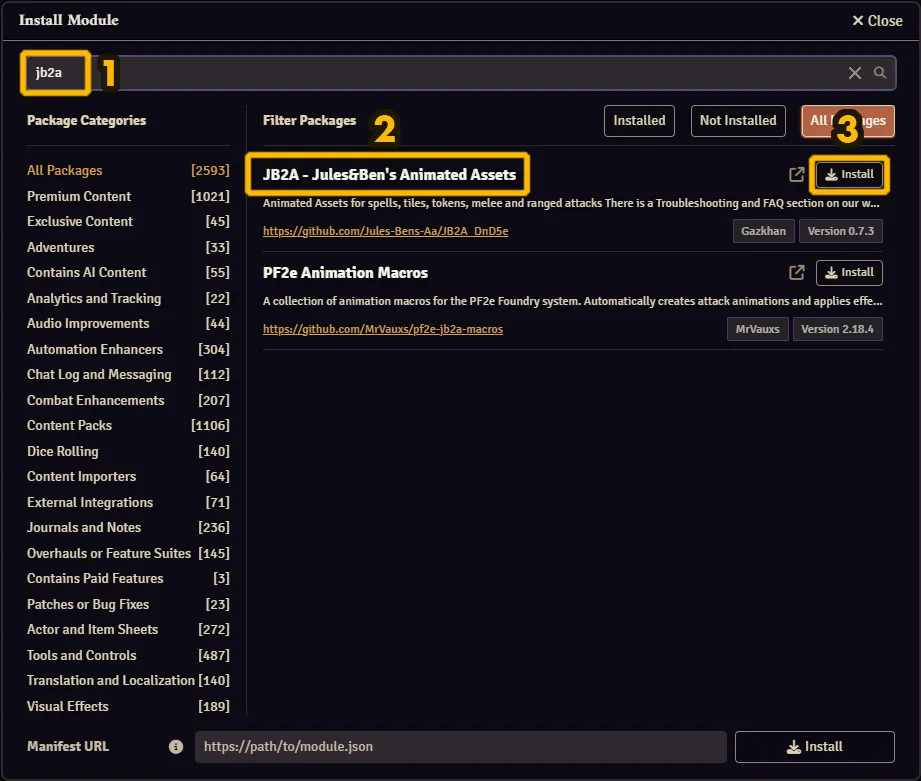
Search for JB2A and click “Install” and the installation process will occur.
-
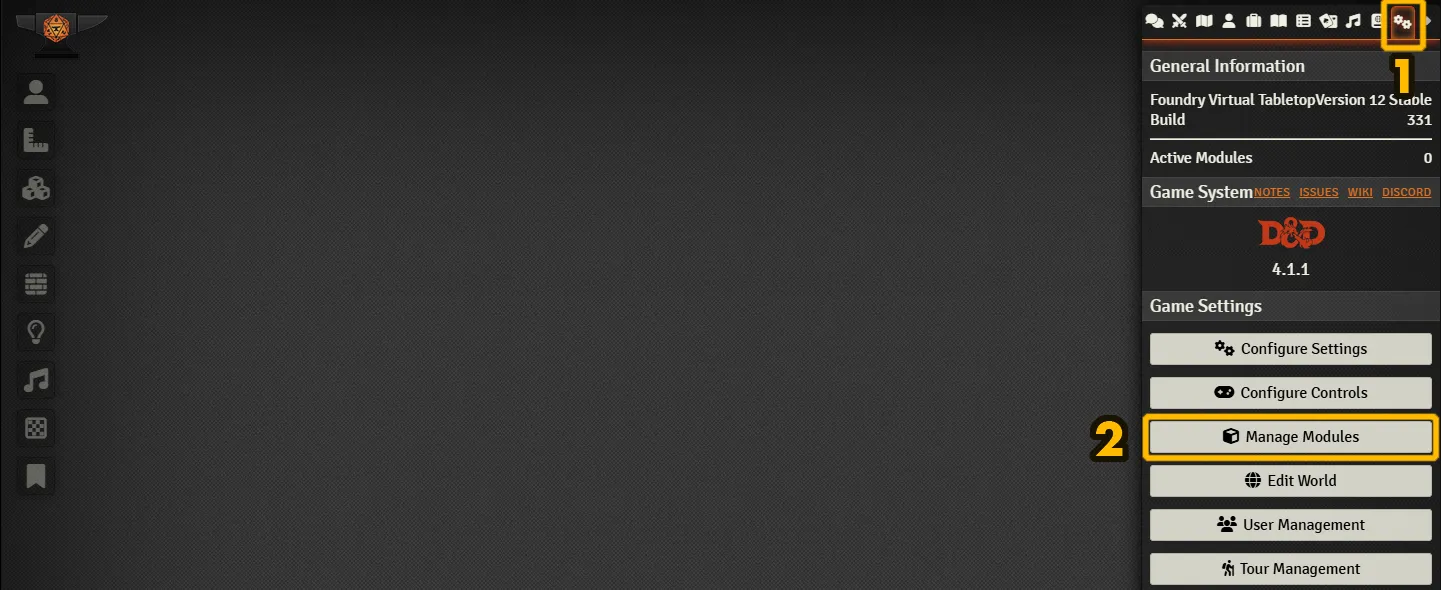
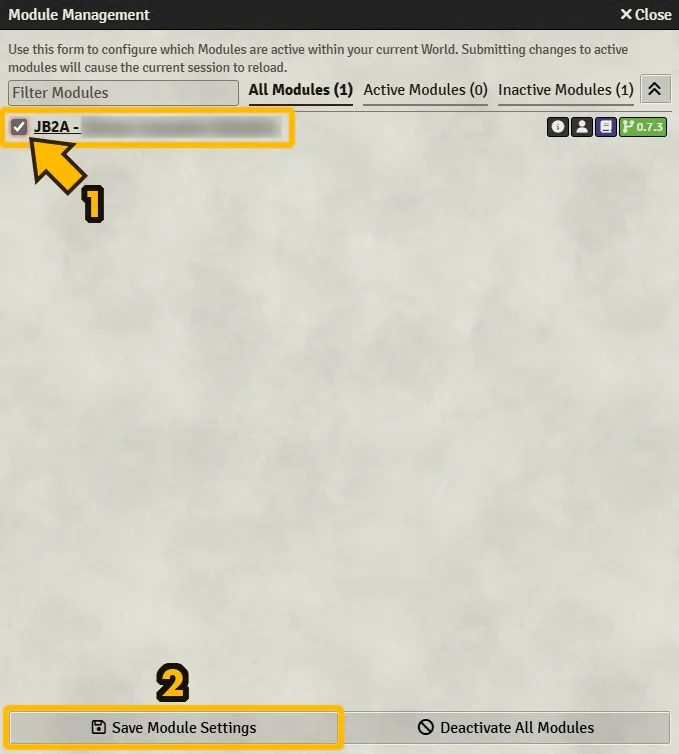
Once installed, you need to enable our module in your world. Start your world and click on “Manage Modules” in the Settings tab.
-
Finally find our module and enable it. That’s it, our free module is ready for you to use.
Our free module is 1.2GB in size. (as of october 2024) As long as you have enough space from the tier you’ve subscribed to on Foundry Server, you can find and install our free module from the list from within FoundryVTT
-
Go to the FoundryVTT landing page and click on the “Add-On Modules” tab.
-
Click on the “Install Module”
-
Search for JB2A and click “Install” and the installation process will occur.
-
Once installed, you need to enable our module in your world. Start your world and click on “Manage Modules” in the Settings tab.
-
Finally find our module and enable it. That’s it, our free module is ready for you to use.
-
We’ll assume you already know the basics about The Forge. If not read their documentation
-
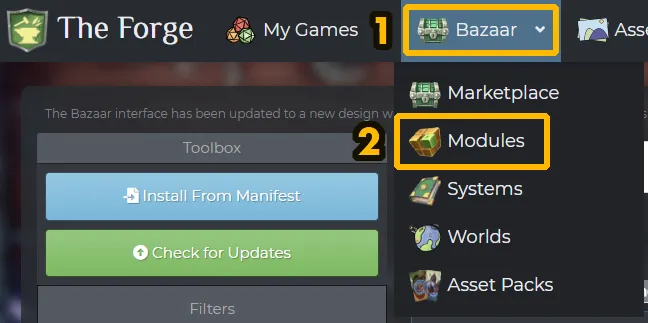
To install the module, go to “The Bazaar” tab and click on “Modules”.
-
Search for
jb2ain the search bar and select “JB2A - Jules&Ben’s Animated Assets”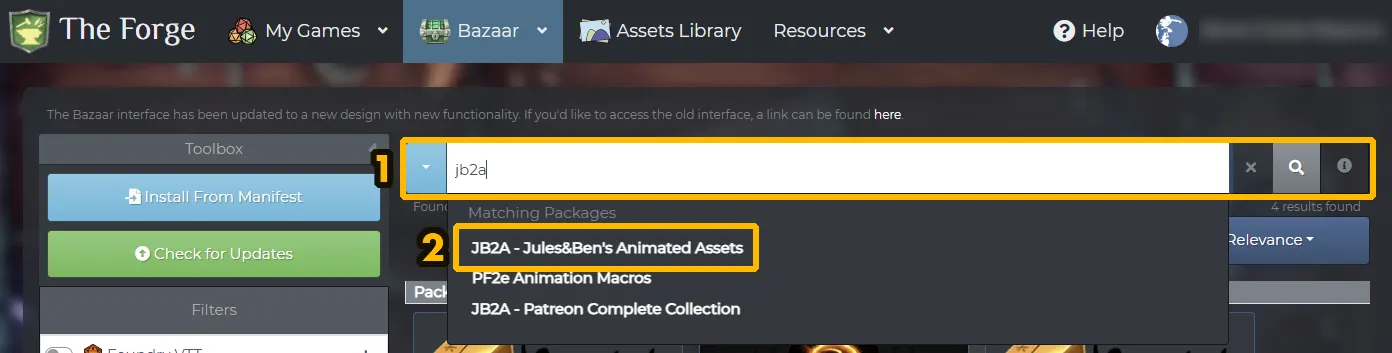
-
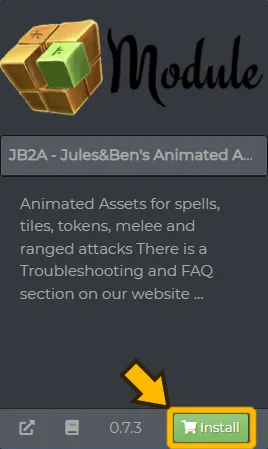
Then install the module.
-
Once installed, you need to enable our module in your world. Start your world and click on “Manage Modules” in the Settings tab.
-
Finally find our module and enable it. That’s it, our free module is ready for you to use.
Our free module is 1.2GB in size. (as of october 2024) As long as you have enough space from the tier you’ve subscribed to on Molten Hosting, you can find and install our free module from the list from within FoundryVTT
-
Go to the FoundryVTT landing page and click on the “Add-On Modules” tab.
-
Click on the “Install Module”
-
Search for JB2A and click “Install” and the installation process will occur.
-
Once installed, you need to enable our module in your world. Start your world and click on “Manage Modules” in the Settings tab.
-
Finally find our module and enable it. That’s it, our free module is ready for you to use.
Patreon module
Section titled “Patreon module”Our Patreon module has all the assets we’ve produced since the early days of JB2A, with a few exceptions to comply with licensing requirements. Currently, the zip file size is around 6.5GB (as of october 2024).
The installation process may differ depending on your hosting method. Select the corresponding tab below.
-
You must have an account and subscribe to any tier on our Patreon. They all have access to the same module. To find out more about how our Patreon works, click here.
-
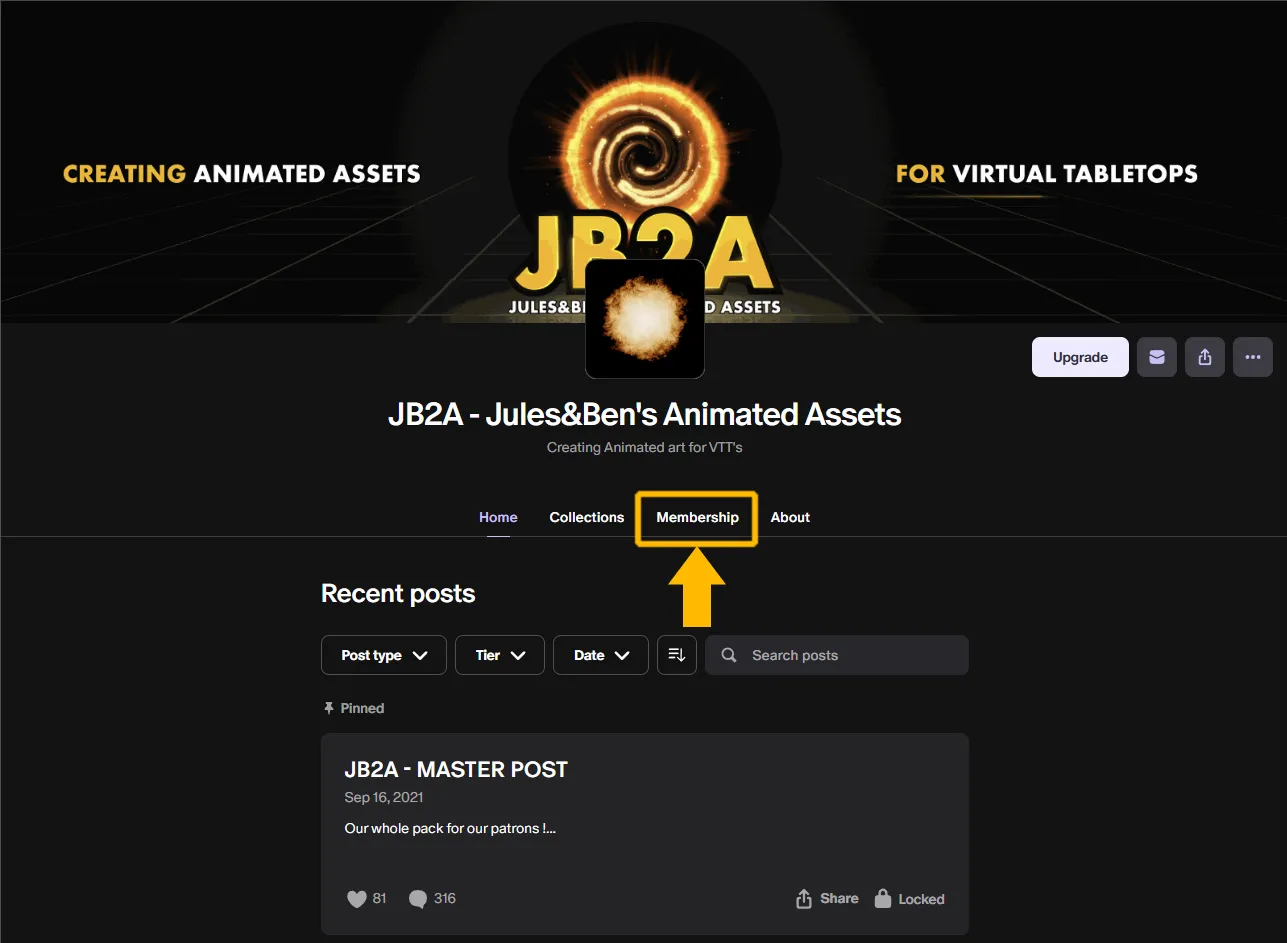
Find the Master Post, it’s a pinned post in the “Home” section. It will always be at the top of the list of recent posts.
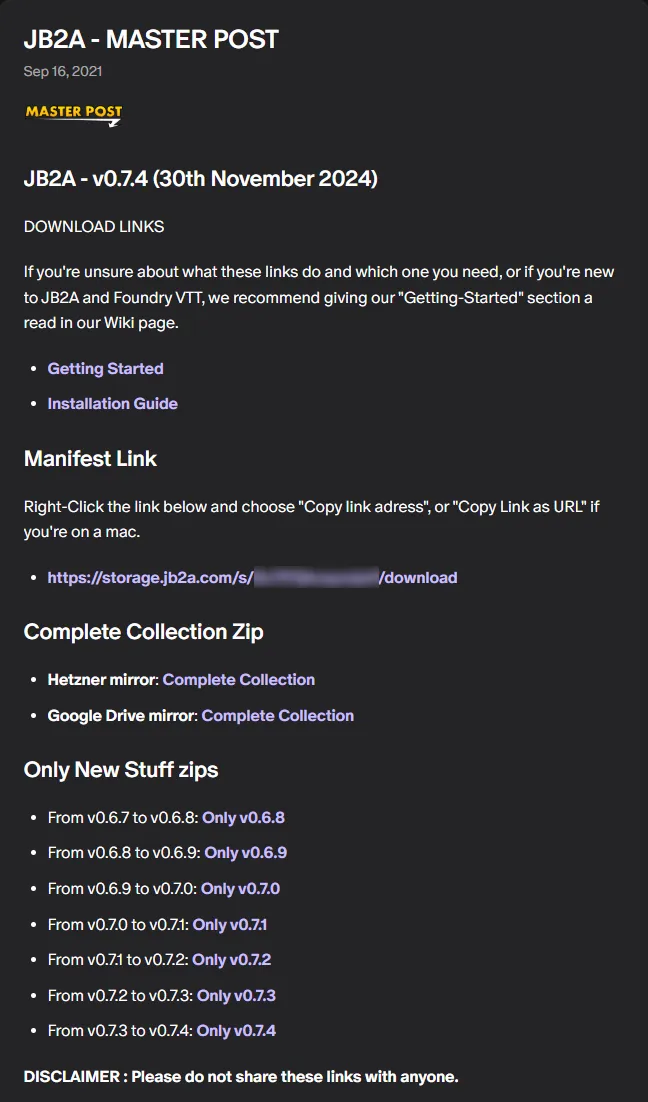
-
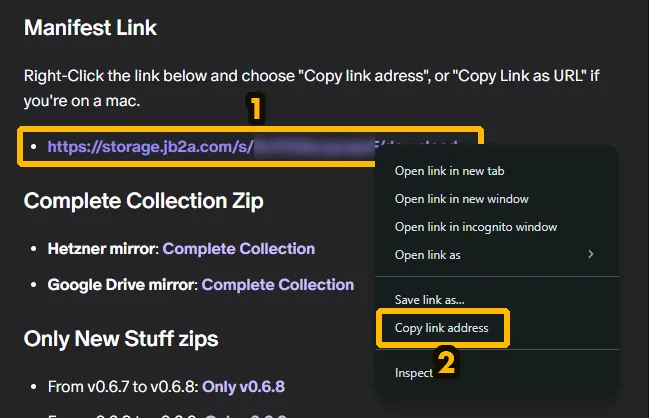
Consult the Master Post section called “Manifest Link”.
-
Right-click on the link and “Copy Link Address”.
-
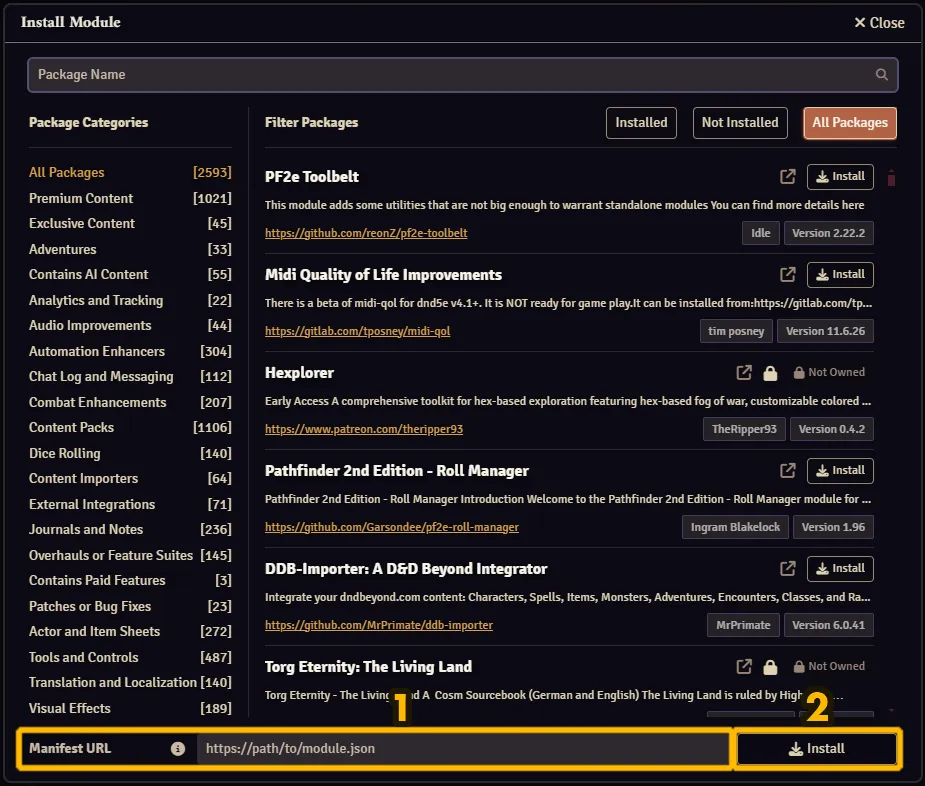
Start FoundryVTT, go to the FoundryVTT landing page.
-
Click on the “Install Module”.
-
Paste the manifest link inside the field named “Manifest URL”. Click “Install” and the installation process will occur.
-
Once installed, you need to enable our module in your world. Start your world and click on “Manage Modules” in the Settings tab.
-
Finally find our module and enable it. That’s it, our Patreon module is ready for you to use.
To avoid having this error every time FoundryVTT tries to update our module, we advise you to lock it like this:
Credits and thanks to WWQuicksilver (Rob) on Discord for this guide!
This post is to assist anyone using the Foundry Server hosting site and Digital Ocean (or similar S3 bucket service for asset storage). It assumes you’re NOT using the manifest option because you don’t want to eat up ~6GB directly on Foundry Server, and are instead uploading the entire package to your S3 bucket.
-
Create a folder on the root (easiest option) of your S3 bucket called
jb2a_patreon(case sensitive). -
From wherever you’ve unzipped the contents of the complete JB2A package, go into the
jb2a_patreonfolder and copy the entire Library folder over to yourjb2a_patreonfolder on your S3 bucket. Because the Library folder and its subfolders are large in size and the number of files, you quite likely will need to upload it in smaller chunks…while maintaining the directory structure AND making sure to mark the files as public during the process. Attention to detail here will save you time and frustration later. 😉 -
Check that you can access/view some of the webm files via the tile browser
-
Install just the free version of JB2A on your Foundry Server instance of FoundryVTT and then shut the FVTT instance down so you can safely update some files (Hit the red Game Control button on Foundry Server).
-
Using your SFTP tool of choice (e.g. FileZilla), find the
/Data/modules/JB2A_DnD5efolder and rename it tojb2a_patreon. Then replace the contents of every subfolder (except Library) with the files from your JB2A package. -
Restart FVTT, launch your world, and enable JB2A.
-
In Configure Settings select JB2A and in the JB2A - location field enter the full path of your S3 bucket, including
https://, as in this example (no slash at the end):https://mygame123.sfo3.digitaloceanspaces.com -
If you’re using Automated Animations, in its settings for the JB2A Asset Location field enter the same thing, plus this at the end
/jb2a_patreon. example:https://mygame123.sfo3.digitaloceanspaces.com/jb2a_patreon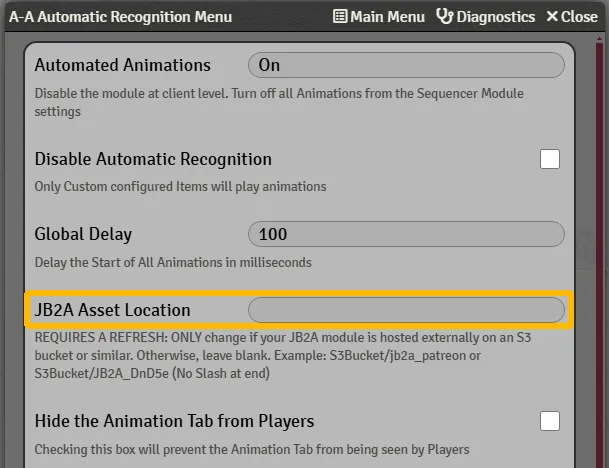
-
We’ll assume you already know the basics about The Forge. If not, read their documentation.
-
You must have an account and subscribe to any tier on our Patreon. They all have access to the same module. To find out more about how our Patreon works, click here.
-
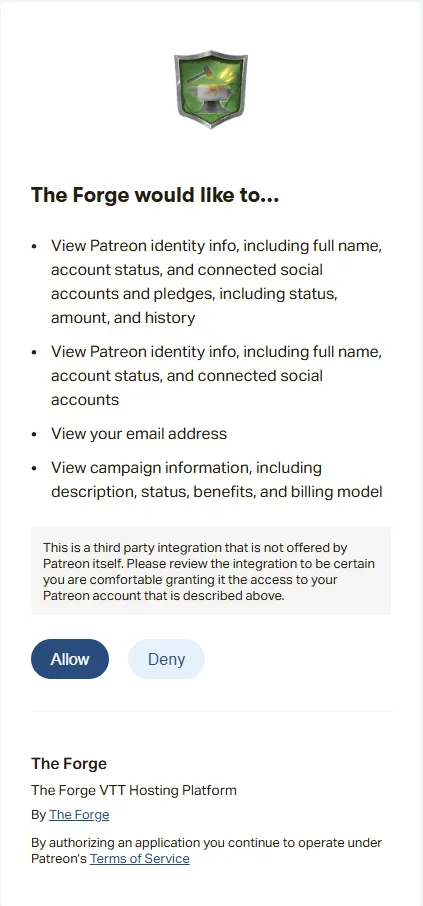
In the My Account section of The Forge, link your Patreon account in the “Linked Account” tab.

-
The Forge will ask you to allow them to look for your personal info. Click on the “Allow” button.
-
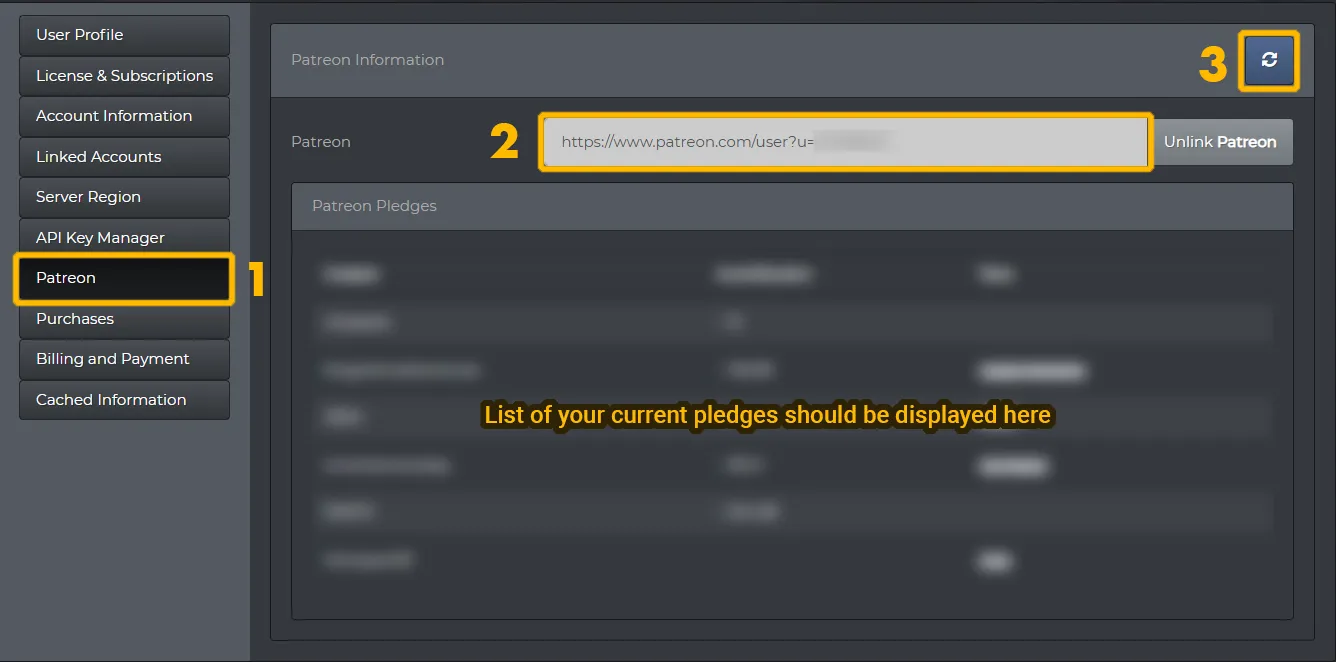
Then, still on The Forge, in the My Account section, go to the “Patreon” tab and click on the “Refresh Pledges” button on the right of your screen.
-
To install the module, go to “The Bazaar” tab and click on “Modules”.
-
Search for
jb2ain the search bar and select “JB2A - Patreon Complete Collection”.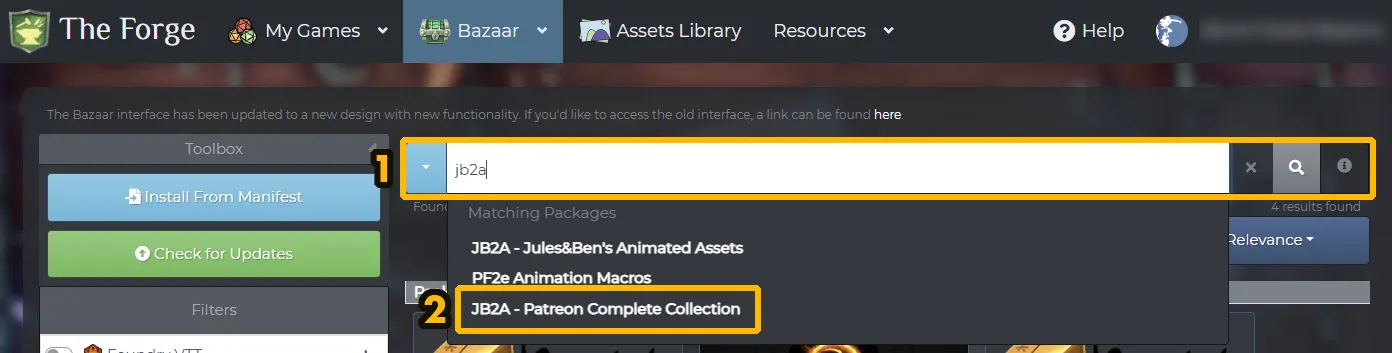
-
Then install the module.

-
Once installed, you need to enable our module in your world. Start your world and click on “Manage Modules” in the Settings tab.
-
Finally find our module and enable it. That’s it, our free module is ready for you to use.
Credits and thanks to Tyreal2012 on Discord for this guide!
Depending on what tier/plan you opt for in Molten Hosting (MH), you may not have enough space to host all the files, the module being 9GB+ in size! On top of this, if you use the manifest link like in the Self-Hosting section, you will need twice that amount, temporarily, as FoundryVTT downloads the zip and installs the module and only once the install goes through does it delete the zip.
This means the “Basic Plan” or “Pro plan” will not be enough, you’ll need the “Elite Plan”, or you could alternatively use Digital Ocean or an AWS bucket to host only the Library folder. See the steps for Foundry Server to see how that’s done.
-
Download the “Complete Collection” zip from the Master Post on the JB2A Patreon.
-
Extract it on your local hard drive.
-
Open up the File Browser.
How to access the File Browser -
In File Browser, navigate to the
Data/modulesfolder. -
Create a folder inside called
jb2a_patreon(case-sensitive) and open it. -
Drag all files except the
Libraryfolder from the extracted zip (Step 2) into the File Browser. -
Create a folder called
Library. TheLibraryfolder is very large and needs to be uploaded little by little. So, this means upload the1st_Level,2nd_Levelfolders one by one. File Browser, for whatever reason, seems to have issues with large quantities of files in one go. -
The Generic folder is also very large at around 5GB in size, so create a folder called
Genericand upload in small batches into this folder. -
Once you have uploaded all of the files, restart your Foundry instance.
-
You’re done! You can activate our module in your world and browse the assets using the Sequencer Database Viewer!
Manual Install
Section titled “Manual Install”FoundryVTT Data Folder
Section titled “FoundryVTT Data Folder”You need to know the location of FoundryVTT’s data folder. If you know where it is, you can skip to the next section.
There are two ways to locate it:
-
If you have the App installed, you can right-click the FoundryVTT icon in your taskbar and choose
Browse to User Data. -
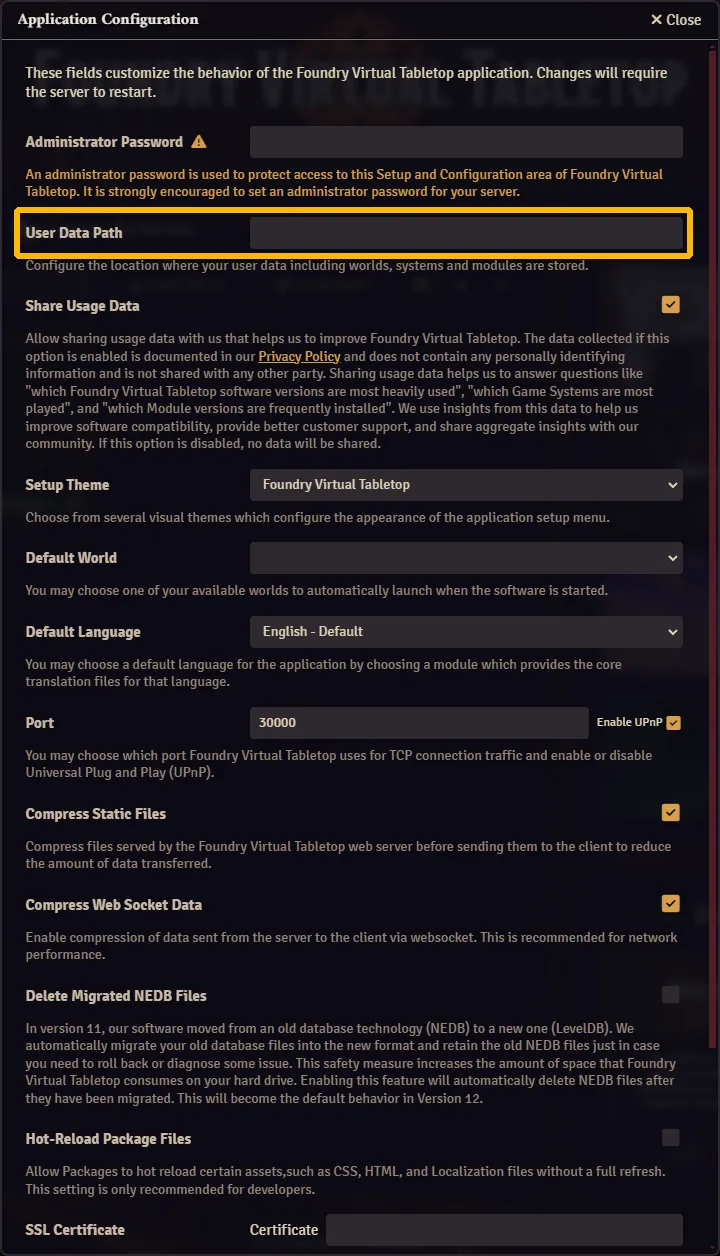
Otherwise, on the home page of FoundryVTT,
-
click the gear icon to change the configuration settings,
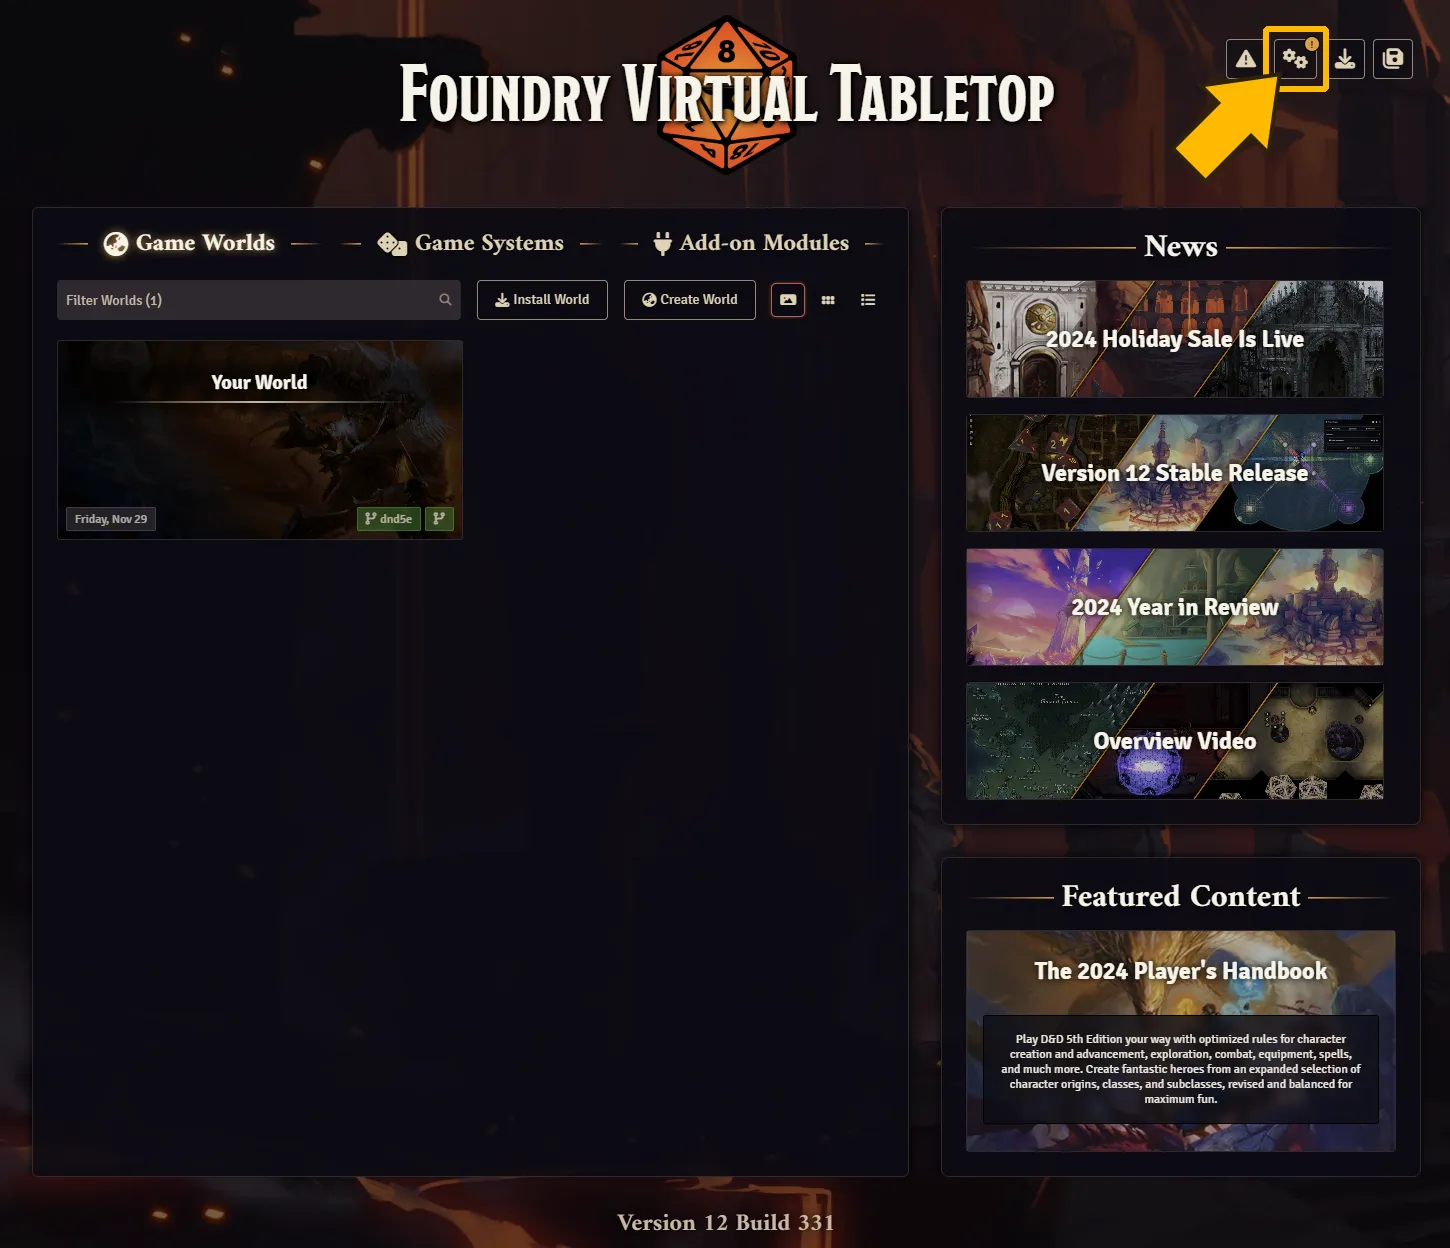
-
and the User Data folder path will appear there.
-
If you’re having issues with the manifest link for whatever reason or you have downloaded the “Complete Collection” zip as a backup and need to re-install our module, here’s how.
-
Download and Extract the “Complete Collection” zip somewhere on your hard drive.
-
Inside the Data folder, open the
modulesfolder. -
Create a new folder called exactly
jb2a_patreon. It’s case-sensitive. -
Back to our extracted zip, we want to drag the files inside over to the newly created
jb2a_patreonfolder. The file transfer might take a while, it’s a large amount of data! Once finished, it should look like this:Directorydata
Directorymodules
Directoryjb2a_patreon
Directoryartwork/
- …
DirectoryLibrary/
- …
Directorypacks/
- …
Directoryscripts/
- …
- module.json
Directorysystems/
- …
Directoryworlds/
- …
-
Restart your FoundryVTT server.
-
That’s it! Don’t forget to enable our module in any of your worlds!
How to update
Section titled “How to update”Free module
Section titled “Free module”Select the corresponding tab.
Unlike the Patreon module, you can update the free module directly from FoundryVTT.
-
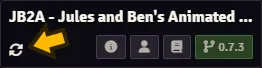
Go to the FoundryVTT landing page, and click on the “Add-On Modules” tab.
-
Like any other module, you should be able to hit the update button.
Follow the instructions in the Self-Hosting tab.
-
We’ll assume you already know the basics about The Forge. If not read their documentation
-
To install the module, go to “The Bazaar” tab and click on “Modules”.
-
Search for
jb2ain the search bar and select “JB2A - Jules&Ben’s Animated Assets” -
Then update the module.
Follow the instructions in the Self-Hosting tab.
Patreon module
Section titled “Patreon module”Select the corresponding tab.
There are two ways of updating our module:
Method 1
Section titled “Method 1”The first is simple but has its drawbacks.
-
First, shutdown your FoundryVTT Server.
-
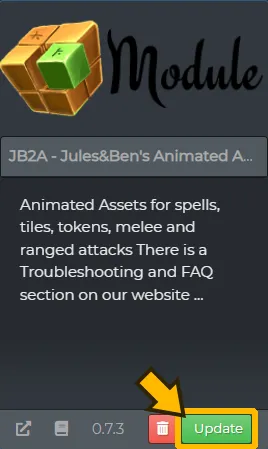
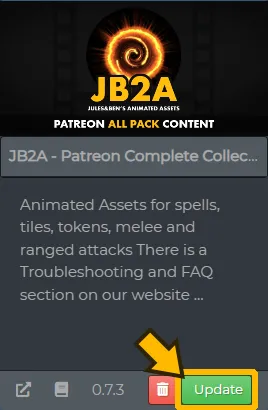
Delete the old version of our module.
-
Then follow the installation steps described in this section.
Method 2
Section titled “Method 2”The second method requires a little more handling. But it’s quicker because you only download what’s been added to the old version. This method is the most efficient in terms of download time and bandwidth usage.
-
First, shutdown your FoundryVTT Server and go to our Master Post.
-
Look for the
Only New Stuffsection. -
Download the
.zipfile(s) you need, to catch up with the latest version of our module. -
Repeat the following steps depending on the number of
.zipfiles you have just downloaded. In the order of publication:-
Open the zip file.
-
Extract the contents of the
.zipfile into our module located in the FoundryVTTdatafolder. By default our module should be located indata/modules/jb2a_patreonand inside it should look like this:Directorydata
Directorymodules
Directoryjb2a_patreon
Directoryartwork/
- …
DirectoryLibrary/
- …
Directorypacks/
- …
Directoryscripts/
- …
- module.json
Directorysystems/
- …
Directoryworlds/
- …
-
Overwrite all the files when you are asked to do so.
-
-
Start your FoundryVTT server. Our module should now be up to date.
Follow the instructions in the Self-Hosting tab. We recommend method 2, but we don’t know the exact details. You will need to adapt the steps accordingly.
If you know the steps and would like to help us complete this information:
- You can contact us on our Discord server in the
#suggestions-n-feedbackchannel. - Or you can write us the precise details directly on Github.
-
We’ll assume you already know the basics about The Forge. If not read their documentation
-
To install the module, go to “The Bazaar” tab and click on “Modules”.
-
Search for
jb2ain the search bar and select “JB2A - Patreon Complete Collection”. -
Then update the module.
-
If you’re having trouble updating our module on The Forge, try refreshing your pledge in the
My Accountsection. Most of the time this solves the problem.
Follow the instructions in the Self-Hosting tab. We recommend method 2, but we don’t know the exact details. You will need to adapt the steps accordingly.
If you know the steps and would like to help us complete this information:
- You can contact us on our Discord server in the
#suggestions-n-feedbackchannel. - Or you can write us the precise details directly on Github.
How to use
Section titled “How to use”JB2A + FoundryVTT core
Section titled “JB2A + FoundryVTT core”What is described in this subsection applies to any game system and without additional modules. In other words, with the FoundryVTT core.
Assets Location
Section titled “Assets Location”Free Module
Section titled “Free Module”Select the corresponding tab.
Our assets are in the Library folder in our modules. Once in the FoundryVTT data folder, you’ll find them in this location:
Directorydata
Directorymodules
DirectoryJB2A_DnD5e
Directoryartwork/
- …
DirectoryLibrary/
- …
Directorypacks/
- …
Directoryscripts/
- …
- module.json
Directorysystems/
- …
Directoryworlds/
- …
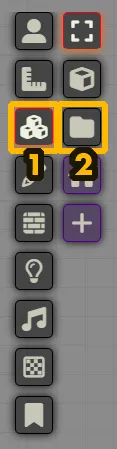
You can also browse our assets once your world is loaded. In the toolbar on the left of your screen, click on the Tile Control button, then on Tile Browser to open the file picker window.
By default, you can find all our assets using this path:
data/modules/JB2A_DnD5e/Library/You cannot access our assets via The Forge interface but you can browse our assets once in your world, on FoundryVTT.
-
In the toolbar on the left of your screen, click on the
Tile Controlbutton and thenTile Browserto open the file picker window. -
Once the file picker is open, go to
The Baazartab and all our assets are listed in themodules/jb2a_patreon/Libraryfolder.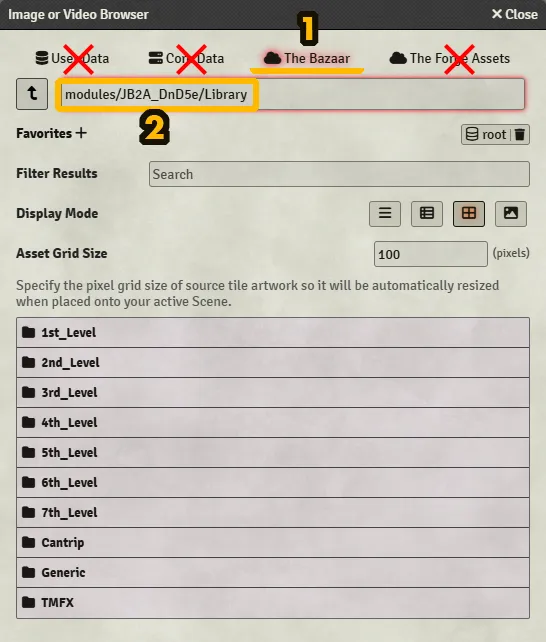
Patreon Module
Section titled “Patreon Module”Select the corresponding tab.
Our assets are in the Library folder in our modules. Once in the FoundryVTT data folder, you’ll find them in this location:
Directorydata
Directorymodules
DirectoryJB2A_DnD5e
Directoryartwork/
- …
DirectoryLibrary/
- …
Directorypacks/
- …
Directoryscripts/
- …
- module.json
Directorysystems/
- …
Directoryworlds/
- …
You can also browse our assets once your world is loaded. In the toolbar on the left of your screen, click on the Tile Control button, then on Tile Browser to open the file picker window.
By default, you can find all our assets using this path:
data/modules/jb2a_patreon/Library/You cannot access our assets via The Forge interface, nor download them directly from The Forge.
You can browse our assets once in your world, on FoundryVTT.
-
In the toolbar on the left of your screen, click on the
Tile Controlbutton and thenTile Browserto open the file picker window. -
Once the file picker is open, go to
The Baazartab and all our assets are listed in themodules/jb2a_patreon/Libraryfolder.
FoundryVTT Tools
Section titled “FoundryVTT Tools”Select the corresponding tab.
To use an animated asset as a tile to a FoundryVTT canvas, follow the instructions on the official website. FoundryVTT Tiles Documentation
To use an animated asset as a token on FoundryVTT, follow the instructions on the official website. The information you need can be found in the ‘Token Configuration Options -> The Appearance Tab’ section. FoundryVTT Token Documentation
This method requires a good knowledge of javascript to be able to do just about anything with our assets. To find out more about what a macro is on FoundryVTT and how to use them, read the documentation provided on their official website. FoundryVTT Macros Documentation
Depending on the game system you’re using, you won’t necessarily have to use macros to do the most basic automation, such as triggering an animated effect when a player takes an action on their character sheet.
JB2A + Sequencer
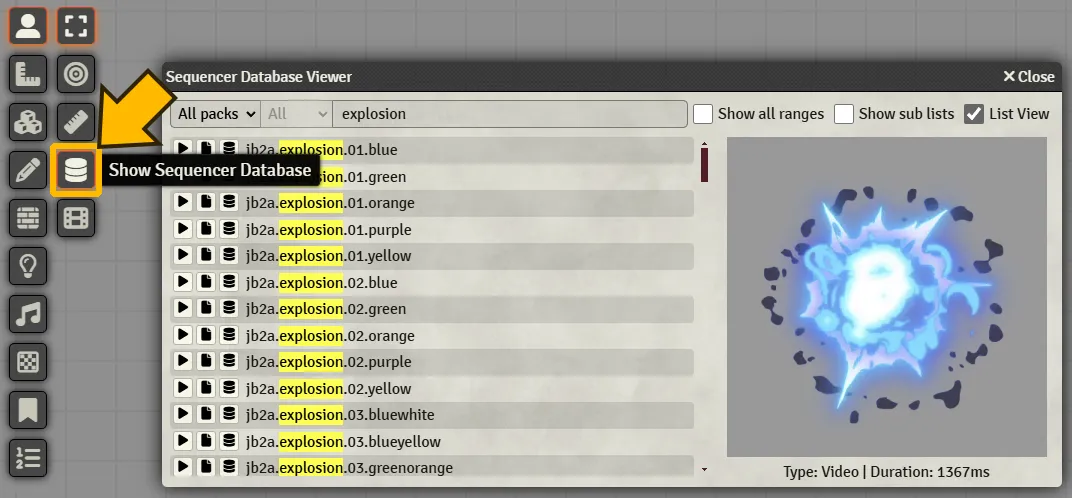
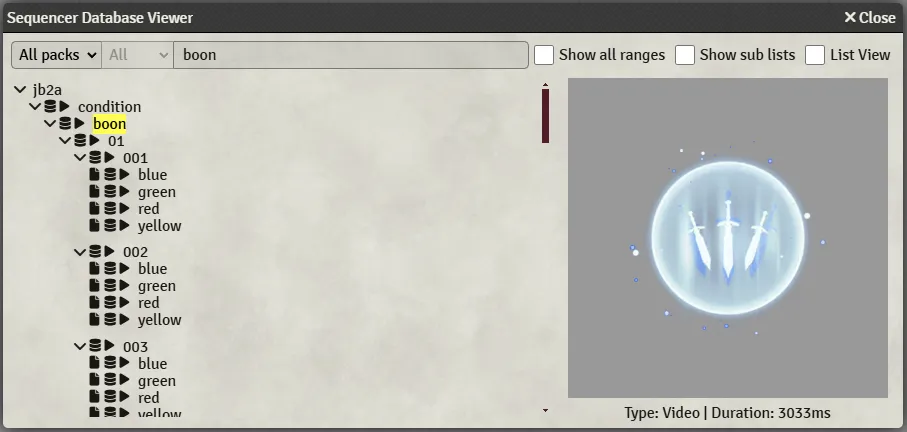
Section titled “JB2A + Sequencer”Database Viewer
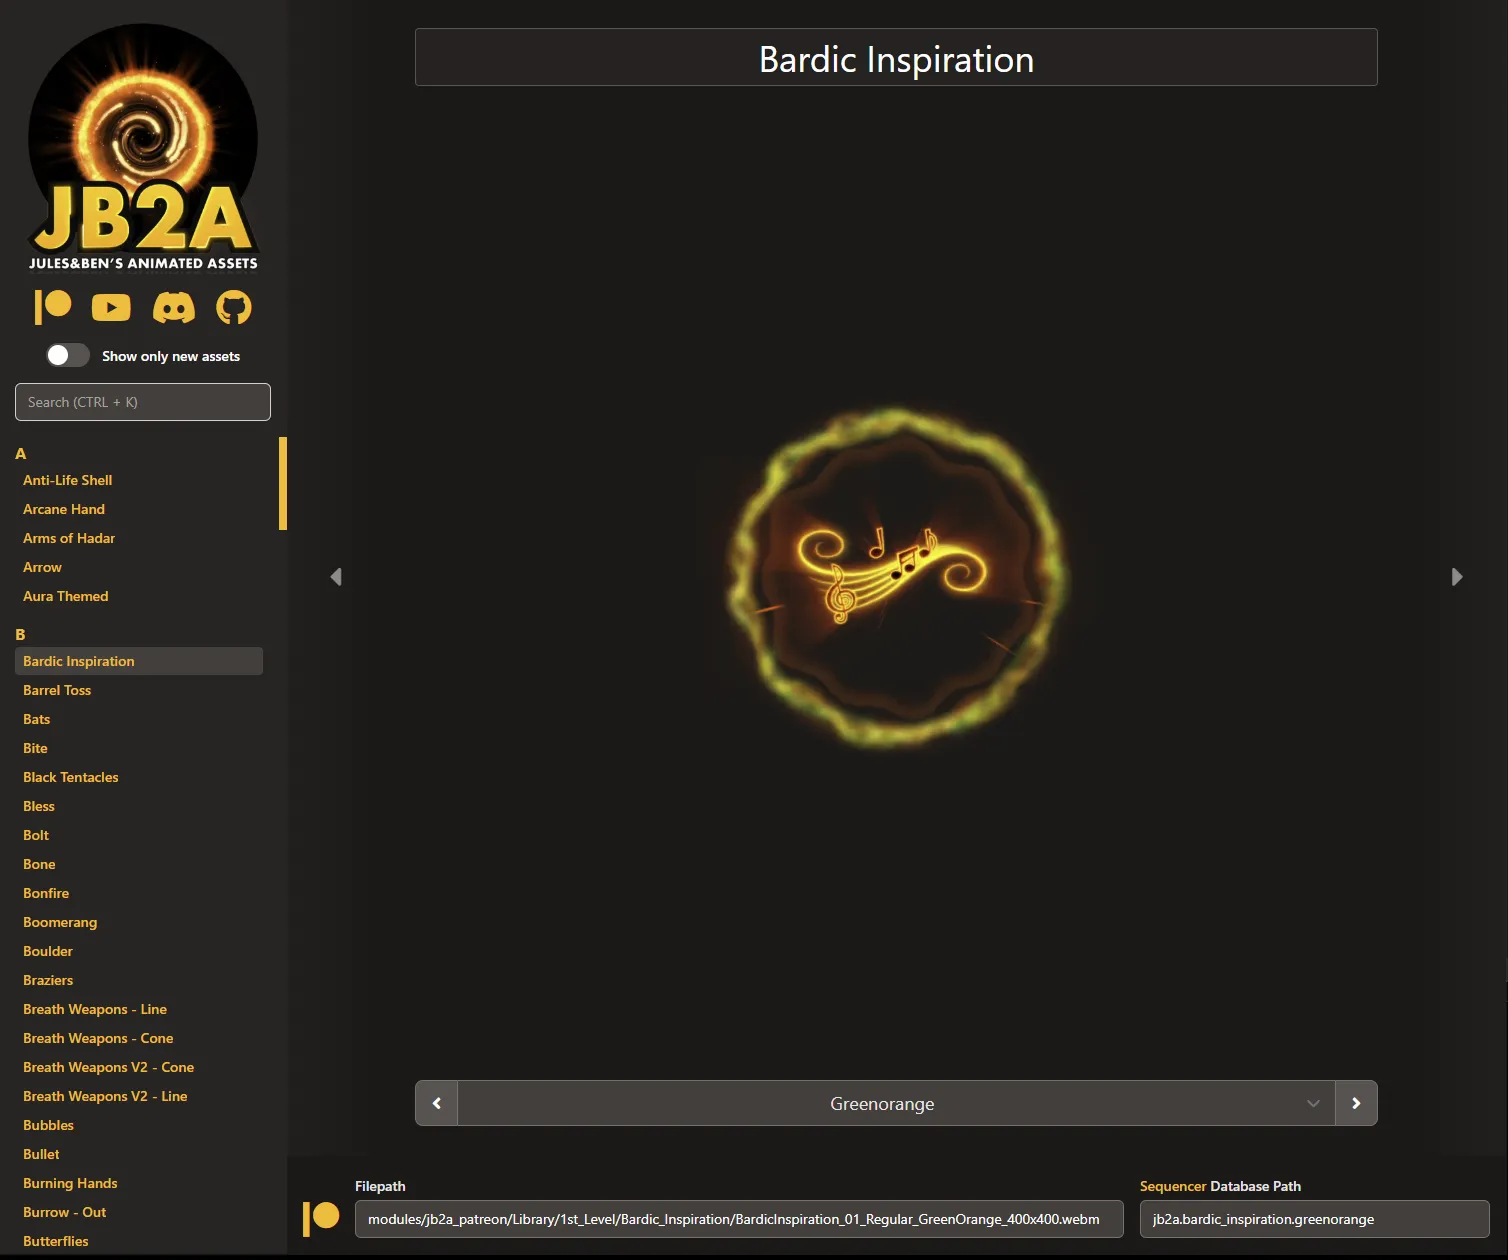
Section titled “Database Viewer”Click on this button, in the Token Tools on the left-hand side toolbar to open the Sequencer Database Viewer.
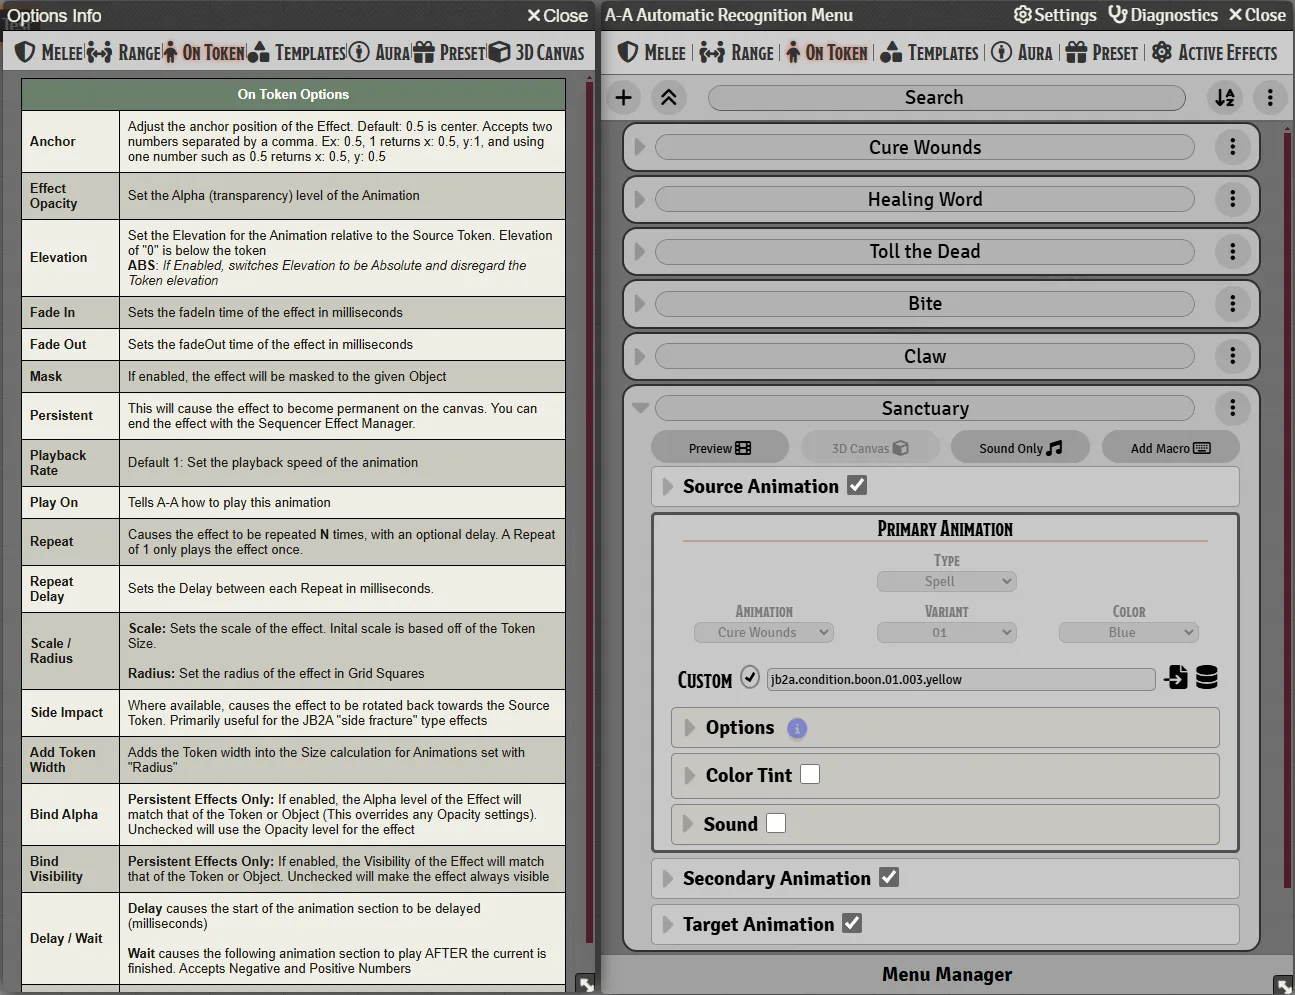
| Icons | Description |
|---|---|
 | Preview the animation |
 | Copy the full Filepath to the animation |
 | Copy the Datapath to the animation(s) |
You can now browse through all our animations, search for a specific one, preview it and copy the Filepath or database path, also called Datapath .
Randomisation of animations
Section titled “Randomisation of animations”Using Sequencer’s Datapath allows for some randomisation.
For example, jb2a.condition.boon.01.001.blue refers to one specific animation.
If you remove the color at the end of it and only have jb2a.condition.boon.01.001, Sequencer will pick one of 4 different animations, corresponding to the blue, green, red and yellow existing animations.
Furthermore, if you remove the 001 part and paste jb2a.condition.boon.01 instead, Sequencer will pick at random in the 68 existing animations under that particular Datapath! To better understand this, untick the “List View” option of the Sequencer Database Viewer. If you press the preview button on a category a few times, you’ll see that the animation is picked at random!
In theory, you could just write jb2a and it would pick at random from ALL our animations but we do not advise you to try as there are too many animations to handle and it could be very costly for your computer!
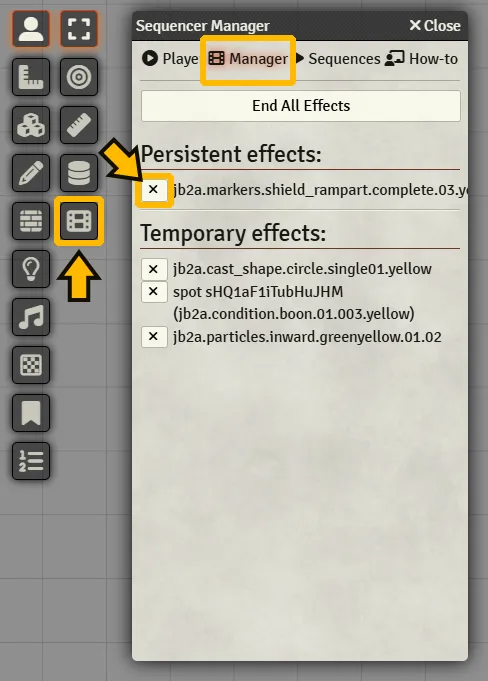
Sequencer Manager
Section titled “Sequencer Manager”The Sequencer Effect Manager can be used to stop any persistent animation on the FoundryVTT Canvas. However, in order for the animation to appear in the Sequencer manager, persistent animations must be created using the .persist() Sequencer function.
JB2A + Automated Animations
Section titled “JB2A + Automated Animations”Trigger your first effect
Section titled “Trigger your first effect”Before embarking on this step, read the “Prerequisites” and “Understanding Animation” secions first or you’ll be missing the basics to understand what you’re doing.
This step-by-step guide is for the DnD5e gaming system. Some things may be different depending on the game system you wish to use. If Automated Animations is compatible with your game system, only the character sheet part will need to be adapted.
List of compatible game systems for Automated AnimationsRequirements
Section titled “Requirements”To follow this guide, here’s what you need:
- FoundryVTT
- A world for the DnD5e game system.
- Modules
- Sequencer from Fantasy Computerworks.
- Automated Animations from Otigon.
- Our Free or Patreon module.
These modules must be installed with their dependencies. FoundryVTT will alert you when this is the case. Make sure they are all updated. Then all these modules must be activated in your world.
Versions
Section titled “Versions”Here are the different versions used to produce this guide. You don’t need to have exactly the same versions. However, you should be aware that there may be some differences depending on the versions you use.

Scene setup
Section titled “Scene setup”-
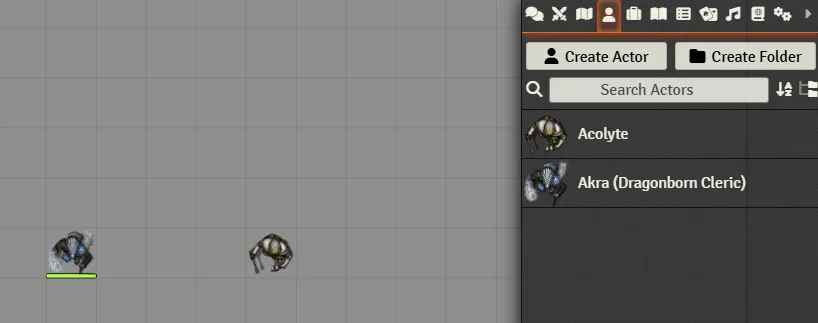
First, import two actors from the SRD compendium and drag and drop them onto the canvas. We’ll use
Akraas the Player Character and anAcolyteas the Non-Player Character.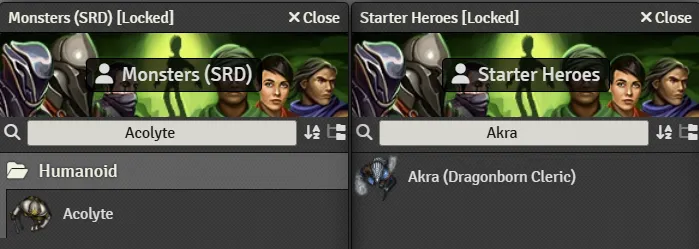
-
Automated Animations has a number of animated effects already configured. There are only a few of them and they serve as a reference. To access the Automated Animations menu, which we’ll call the Autorec menu from now on:
-
Go to the
Settingstab. -
Click on
Configure Settings. -
Then select Automated Animations in the sidebar.
-
And click on
Launch Menu.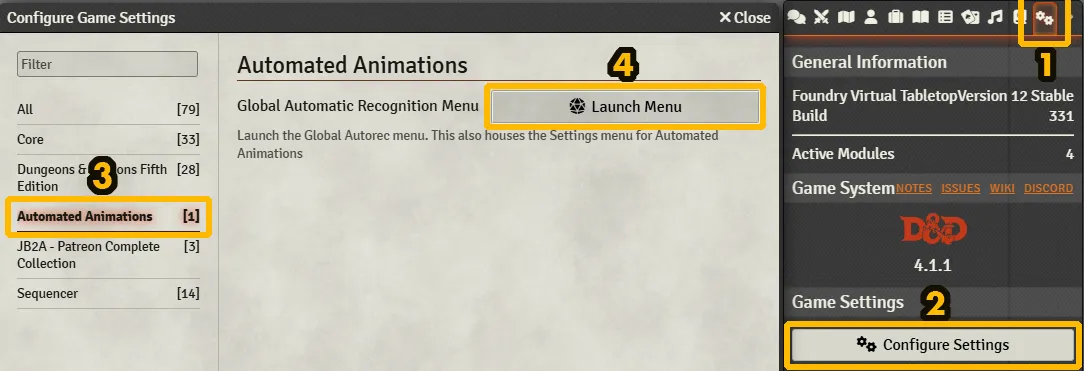
-
-
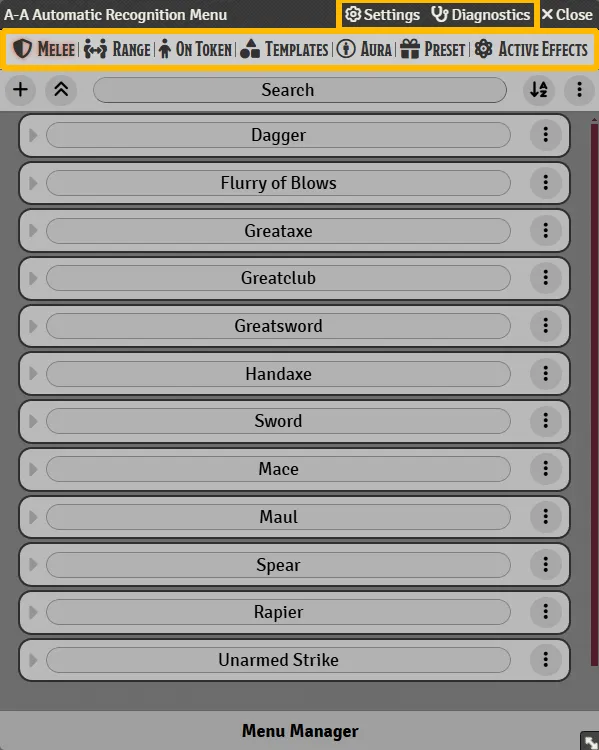
Explore the Autorec Menu. There are various tabs for creating or customising effects (Melee - Active Effects), Settings, and Diagnostics (to help you troubleshoot any problems).
-
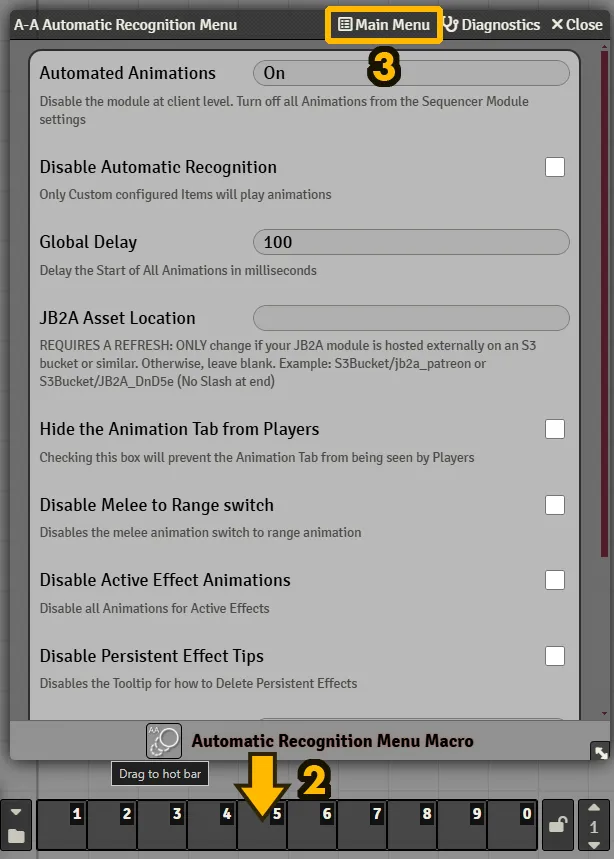
Quick Tip: To simplify access to the menu, Automated Animations provides a macro allowing you to open this window directly from the hot bar.
-
At the top of the Autorec Menu window, click
Settings. -
At the bottom of this window, there is an area called
Automatic Recognition Menu Macro, click on the area and drag the macro into the hot bar. -
To return to the Autorec Menu, you can now either:
- Close the window and use the macro,
- or click on
Main Menu.
-
-
Back on the canvas, with
Akra, we’re going to attack theAcolytewith his mace.-
First, target the Acolyte,
-
then, select Akra.
-
Finally, trigger the attack from his character sheet.
-
The animation should be triggered after rolling the dice. You’ve just triggered your first animated effect!
-
-
But why stop there? Now, move
Akraa few dozen feet away from theAcolyte, check that he still has his target and make an attack with the light crossbow. An animation should be triggered when you roll the dice. -
Then try Fog Cloud. The animation should be triggered after you place the template on the canvas.
In this case, there are two options for deleting the template: Click on the Template tool in the FoundryVTT left-hand toolbar and delete the template.
Alternatively, go to the Sequencer Manager, the button on the left-hand bar of FoundryVTT. This is where you’ll find all the persistant animation on the Canvas. Then go to the template tool to remove the template from the canvas.
-
Finally do the same thing with Inflict Wounds. Normally, if you have exactly the same setup, there are no animations after triggering the attack. This is perfectly normal!
-
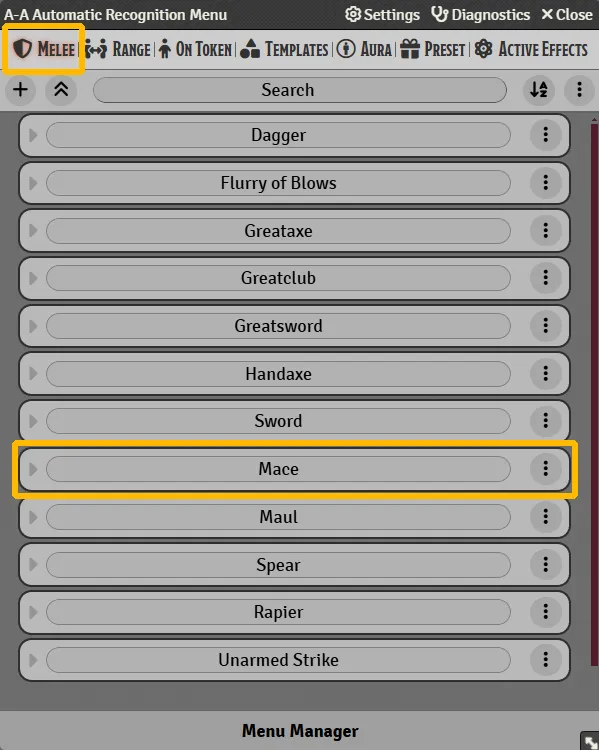
Open the Autorec menu and look at the melee tab. You’ll see that the Mace is there. All our melee attack animations must be configured in this tab to work correctly.
-
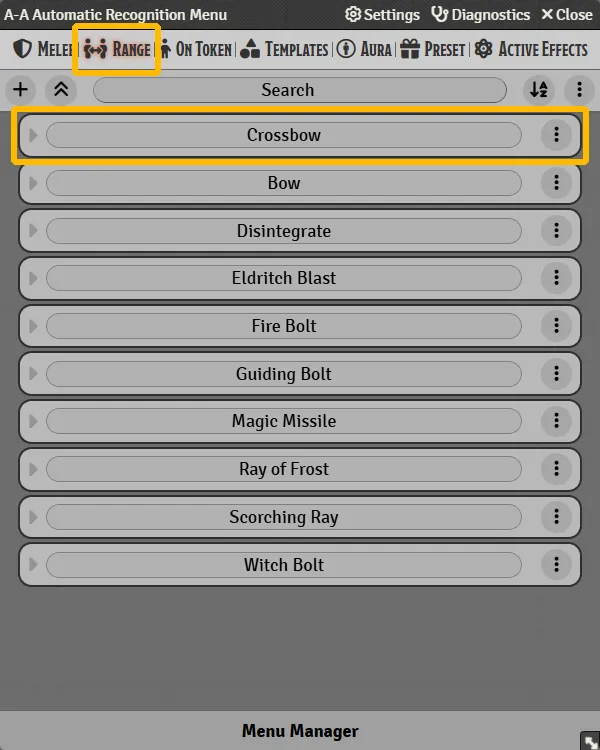
Then go to the Range tab, and you’ll see that there’s only the Crossbow preset and not Light Crossbow. This is because Automated Animations has recognised part of the name of the weapon and used this effect. All our ranged attack animations must be configured in this tab to work correctly.
-
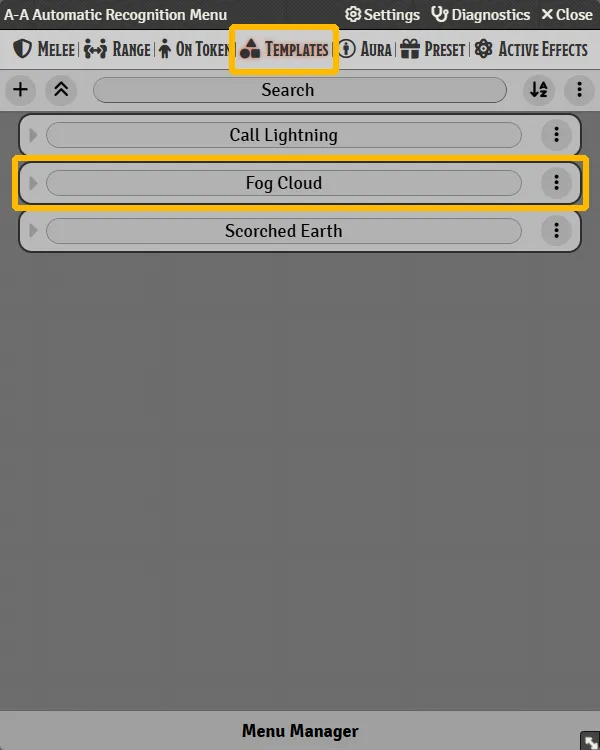
In the Template tab, you’ll find Fog Cloud. This is where all spells/abilities similar to it must be configured. Whether it’s a square, circular, conical template, etc…
-
Inflict Wounds is a bit special. It could be possible to configure it in the melee tab but also in the On Token tab, depending on the animations you want to use. This was simply to illustrate what follows.
-
Automated Animations has very few pre-configured animated effects. These are generally called Effects. Depending on the game system you are using, there are several options available to you:
-
If you are using D&D5e, you can install the D&D5e animations module made by Vauxs among others. It can be downloaded and installed via FoundryVTT directly.
-
If you are using PF2e, you can install the PF2e Animations module or the PF2e Graphics module, which is currently under development. They can be downloaded and installed via FoundryVTT directly.
-
For other game systems, you can join our Discord server, in the channel #aa-autorec-sharing, where people may have shared their presets. For example Cyberpunk and Warhammer.
Join our Discord
-
-
This is where the guide ends. To go further with Automated Animations, we recommend that you read its documentation. Otigon has explained everything in more detail. For example :
How to configure an Effect About persistent Effects
Customize your effect
Section titled “Customize your effect”Since the dropdown menus don’t include all of our assets, there’s a handy Custom Field in each Autorec menu effect so you can copy and paste any Datapath.
In the next example, we will reuse concepts explained in the previous section and setup the Sanctuary spell as an On-Token effect.
Creating a new effect
Section titled “Creating a new effect”-
The actor called
Akrafrom the previous section already has theSanctuaryspell in its list.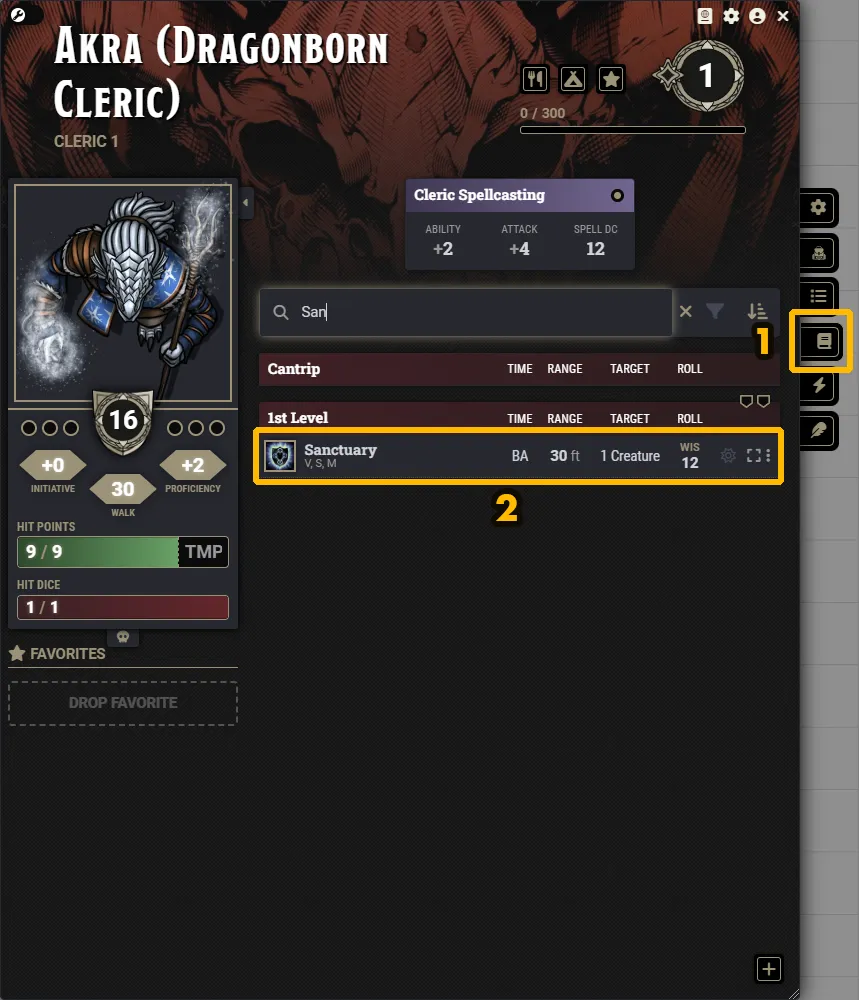
-
In the Autorec menu, under the On-Token tab, create a new effect called
Sanctuary.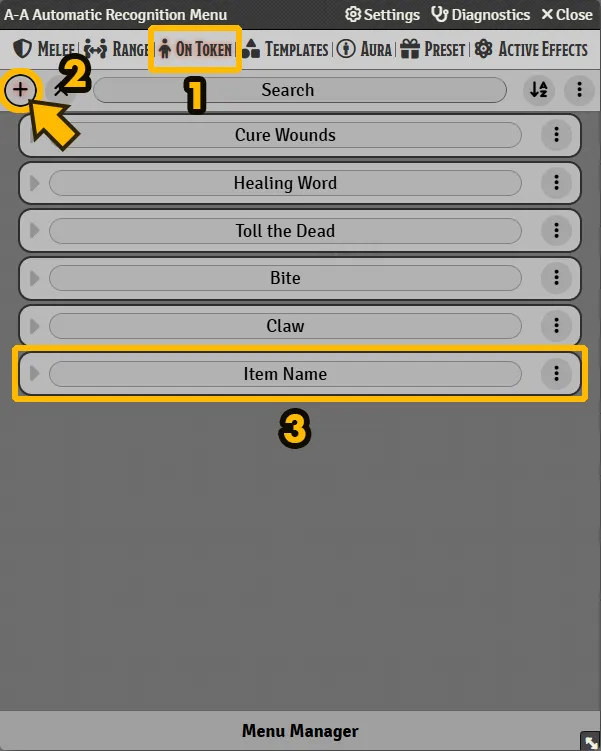
Setting up the Source Animation
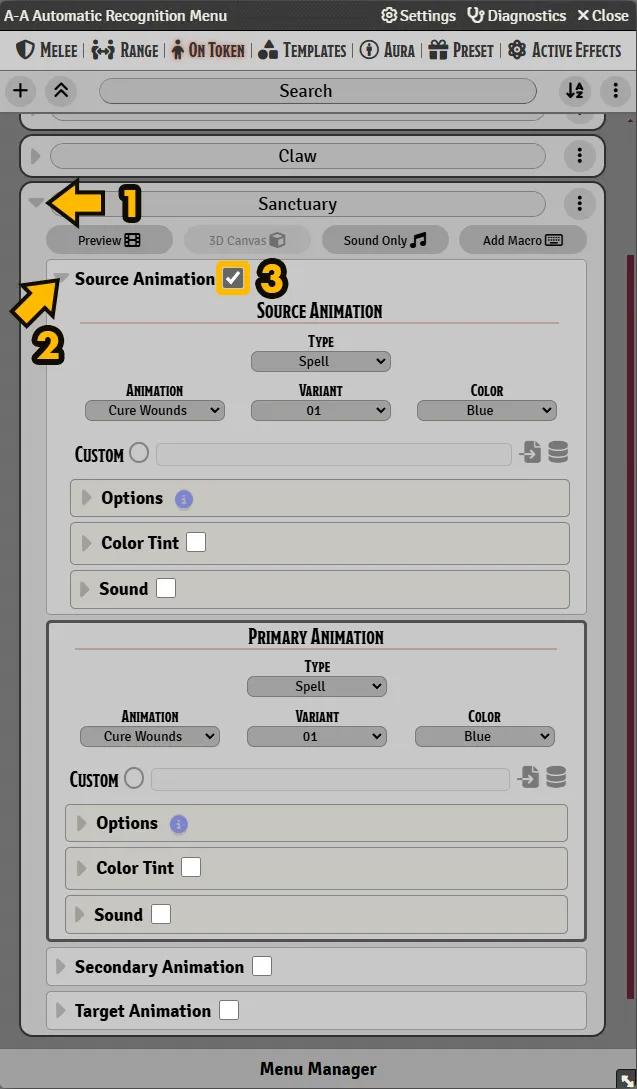
Section titled “Setting up the Source Animation”Let’s create the Source Animation checkbox so we can add an animation on Akra, the source token, the one casting the spell.
-
Tick the Source Animation Checkbox.
-
Open the Sequencer Database Viewer and search for:
cast shape circle singleClick on the little Datapath icon to copy it in your clipboard.
jb2a.cast_shape.circle.single01.yellow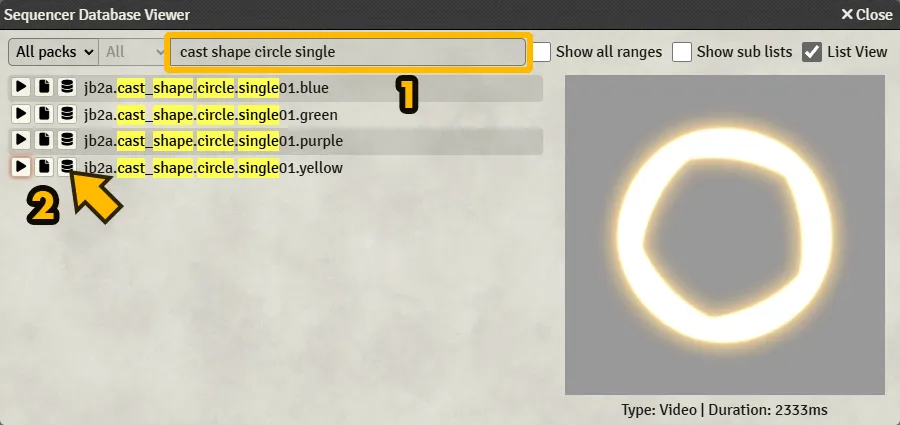
Alternatively, you can as easily use our Asset Library online for the same results. If you click on the database path at the bottom right, it will copy it in your clipboard.
-
Enable the custom field and paste the Datapath for the source animation.
By default, all the subsequent effect sections will wait for the end of this source animation section in order to start. For this example, let’s set the
Waitsection at the bottom to be-2000, which means the next section will start 2000 milliseconds before the end of this current effect section, so almost at the same time.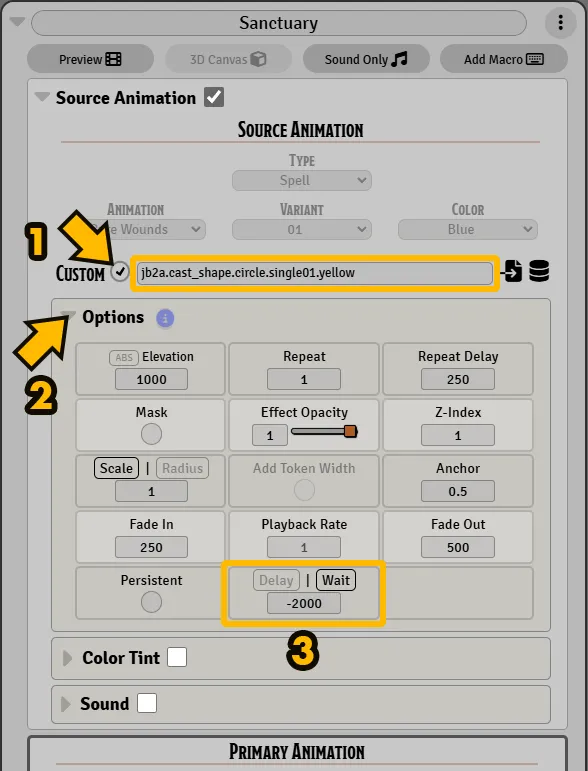
By the way, there are many settings to explore here, and the little round blue i button will give you more information about what each setting does.
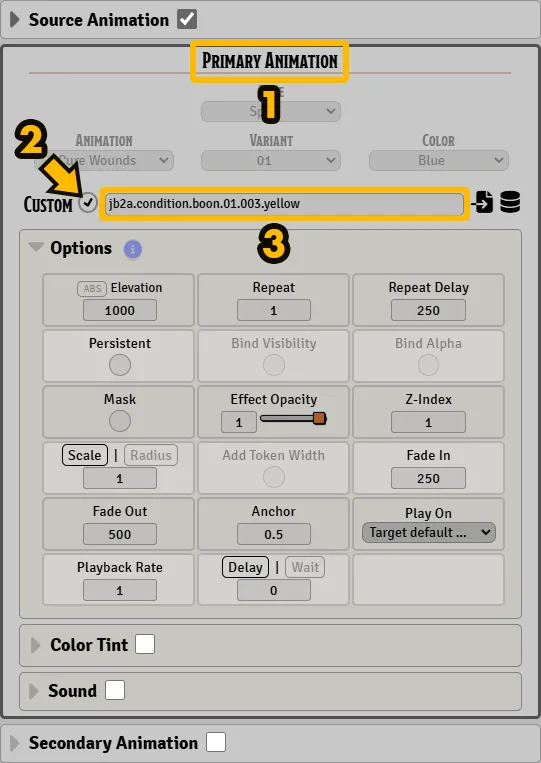
Setting up the Primary Animation
Section titled “Setting up the Primary Animation”Now the Primary Animation. We’ll use a boon condition for this one.
-
Open the Sequencer Database Viewer and search for:
condition boon yellow 003Click on the little Datapath icon to copy it in your clipboard.
jb2a.condition.boon.01.003.yellow -
Enable the custom field and paste the Datapath for the source animation.
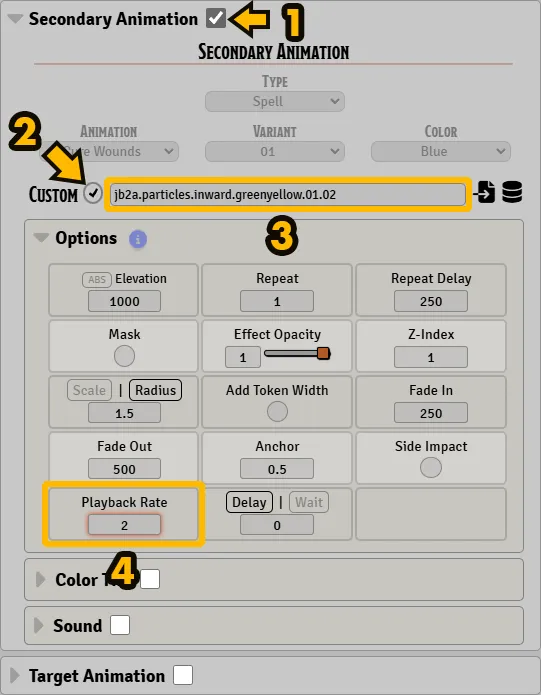
Setting up the Secondary Animation
Section titled “Setting up the Secondary Animation”You can add a Secondary Animation, like a particle animation, perfect for adding little more details.
-
Open the Sequencer Database Viewer and search for:
particles inward greenyellowClick on the little Datapath icon to copy it in your clipboard.
jb2a.particles.inward.greenyellow.01.02 -
Enable the custom field and paste the Datapath for the source animation. Changing the playback rate to 2 in this case adds a little bit more dynamism to the overall feel.
Setting up the Target Animation
Section titled “Setting up the Target Animation”Now, finally, the Target Animation. The animation from this section needs to stay on the target, looping, until we dismiss it. For this, we’ll use one of the “complete” animations.
These complete animations have extra timing information saved in the Sequencer Database, so using the Datapath will let Sequencer know how to handle the intro, loop and outro sections.
-
Open the Sequencer Database Viewer and search for:
markers shield rampart complete yellowClick on the little Datapath icon to copy it in your clipboard.
jb2a.markers.shield_rampart.complete.03.yellow -
Enable the custom field and paste the Datapath for the source animation.
In the options, make sure you tick the
Persistentsetting, and we can tick theBind VisibilityandBind Alphasettings too, so that the animation turns invisible in case the token becomes invisible.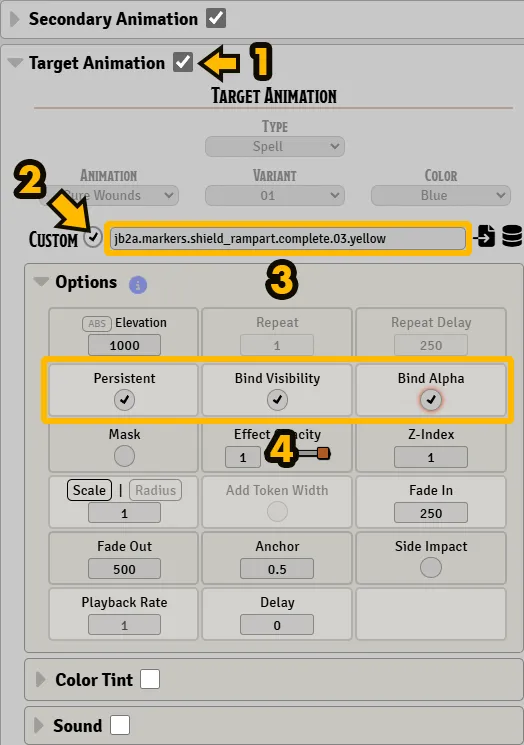
Trigger your newly created effect
Section titled “Trigger your newly created effect”It’s done! Let’s target the token of an ally and cast the spell!
As per the Sanctuary spell, if the ally makes an attack and we need to dismiss the spell, we can just click on the Sequencer Effect Manager and end it there as shown in the video above.
This was only one way to setup and customize a spell. There are plenty of different ways to approach this.
Some prefer to use the Active Effects tab to setup persistent animations, so that the animation is dismissed automatically when the active effect is turned off. It can be beneficial if you decided to go with a fully automated game using MIDI and the like.
You can also use macros and plug them into an Autorec effect in order to go beyond what A-A’s user interface has to offer. It really comes down to preference and how far you want to take things, and how much time you want to invest!