

Token Animator Guide
Introduction
Section titled “Introduction”This is a guide for our Token Animator tool made with the 3D software Blender. Blender is free, you can download it on the official website. It was developped for version 3.1, so we can’t guarantee it’ll work properly for later versions of Blender. We recommend downloading this specific version on the release page.
Blender Release PageIf you are currently pledged to the Epic Tier on our Patreon, you can find and download our project file on the Epic Master Post
Its purpose
Section titled “Its purpose”With this tool, you’ll be able to create your own animated token by using your favorite artist’s splash-art or topdown token and adding multiples animated effects to it. It has limited options to edit an artwork. It is recommended to use an editing software to make specific changes on an artwork, like Photoshop, for example, or GIMP (free alternative).
The Token Animator tool is only useful if you want to add animated effects made by us and provided with the tool on a specific artwork such as splash-arts and topdown tokens.
Examples
Section titled “Examples”Here are a few examples of what you can do with it.
- Duration : 4sec
- Fps : 24.
Here are a couple of creators providing topdown tokens. It is non-exaustive, please contact us on discord if you want us to add your favorite Creator to the list.
You can also create your own topdown token with HeroForge and Photoshop. Here is a step-by-step guide on Youtube, made by us, showing how to do it.
Installation
Section titled “Installation”- You need to install Blender first if not already done.
- Then download the archive of the Token Animator. It contains the entire tool. You don’t need anything else.
- Extract the archive in your prefered location on your computer.
- Inside the archive you should see something like this :
DirectoryArchive
DirectoryExamples/
- …
DirectoryImageSequences/
- …
DirectoryPreviews/
- …
DirectoryUI/
- …
- TokenAnimationBorder_v0.x.blend
That done, the installation is complete. But before jumping right into the fun part, you might need to know a bit more about how to use Blender.
Things to know before the start
Section titled “Things to know before the start”First, I recommend you to watch at the very least the Part 1 of the tutorial series made by Andrew Price. This video is well-made, I personnally began to learn Blender thanks to him.
Blender Guru’s Beginner Tutorial seriesThe User Interface
Section titled “The User Interface”This section covers all you need to know to be able to navigate in the software and use different part of the tool.
Let’s open the tool and see what’s inside !
Understanding the UI
Section titled “Understanding the UI”You’ll notice that the UI layout is different than the Default UI of Blender. It is organised so only what’s useful for you is easily accessible to create your animated token.
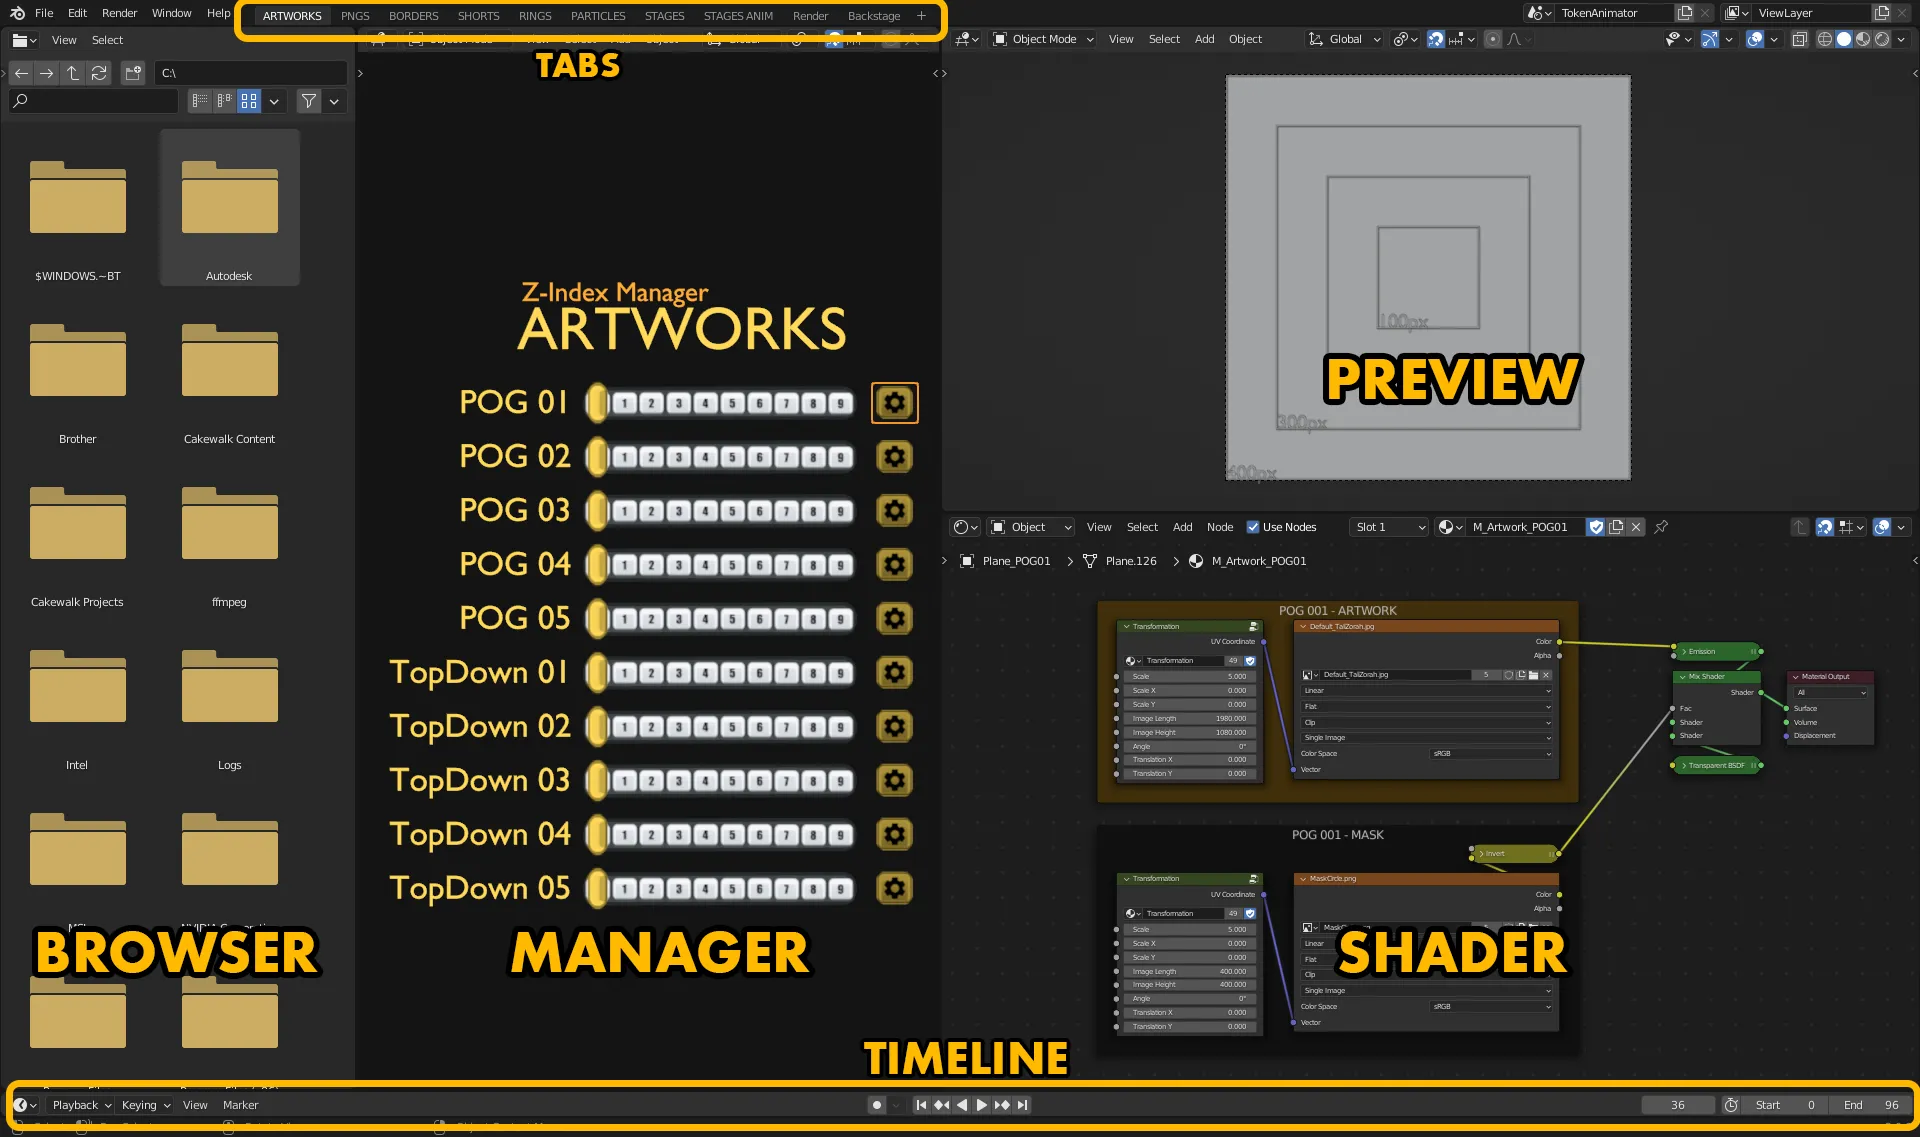
Panels descriptions
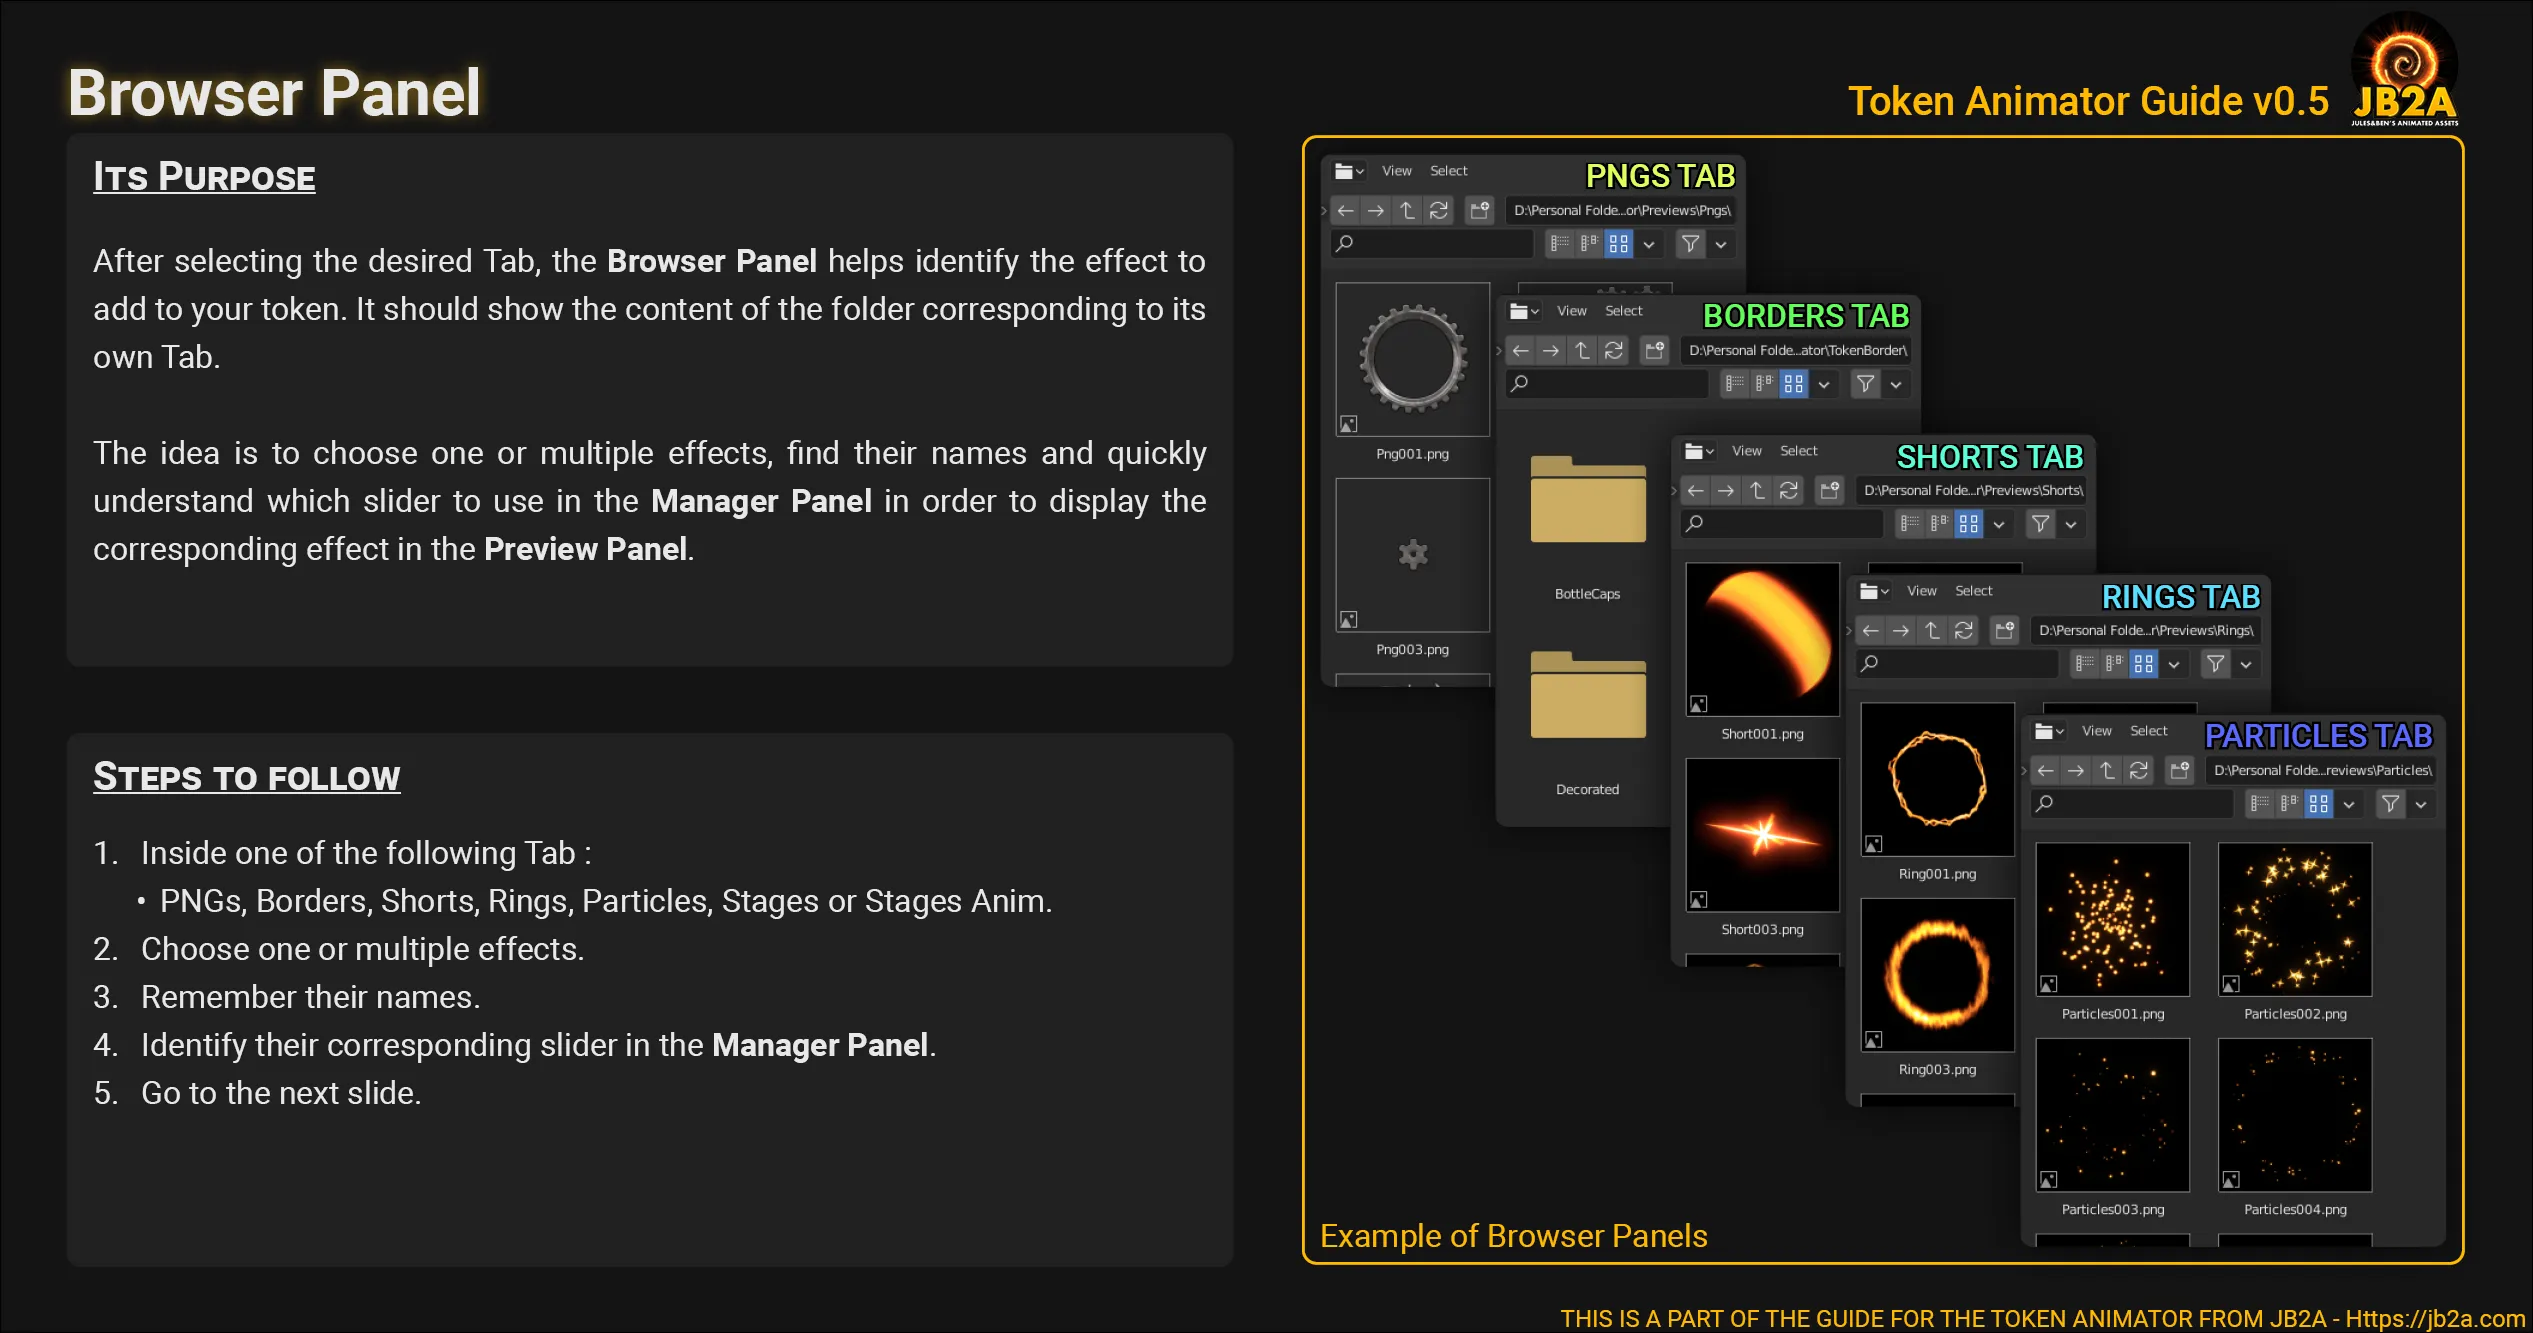
Section titled “Panels descriptions”It allows you to navigate between the project’s folders. It will help you to find artworks, effects, borders, etc … without having to rely on your OS’s browser. It is working very similarly to any other browser with features like :
- previous folder,
- next folder,
- parent folder,
- refresh,
- address bar and search bar.
Relative Paths
To avoid doing the same things each time you open the project, I recommend you to do the following instructions. As shown on the video below, copy the corresponding relative path for each available tab and paste it in the Browser Panel’s address bar. Then save the file with CTRL + S.
Relative Path List
//Previews\Artworks\//Previews\Pngs\//TokenBorder\//Previews\Shorts\//Previews\Rings\//Previews\Particles\//Previews\Stages\//Previews\StagesAnim\Video showing where to copy the paths
Fortunately, you don’t have to do this for each assets. As long as you don’t change the structure of the archive, Blender should be able to find them automatically.
Tabs in Blender are mostly used to have a different UI layout depending of you want to do, for example modeling, texture editing, sculpting, etc … But in this case I decided to use them to divide effects into groups. It should make it easier to navigate between type of effects and to allow you to go straight to what you want to achieve. They are located on the top part of Blender’s UI.
They are explained more in depth later in the guide.
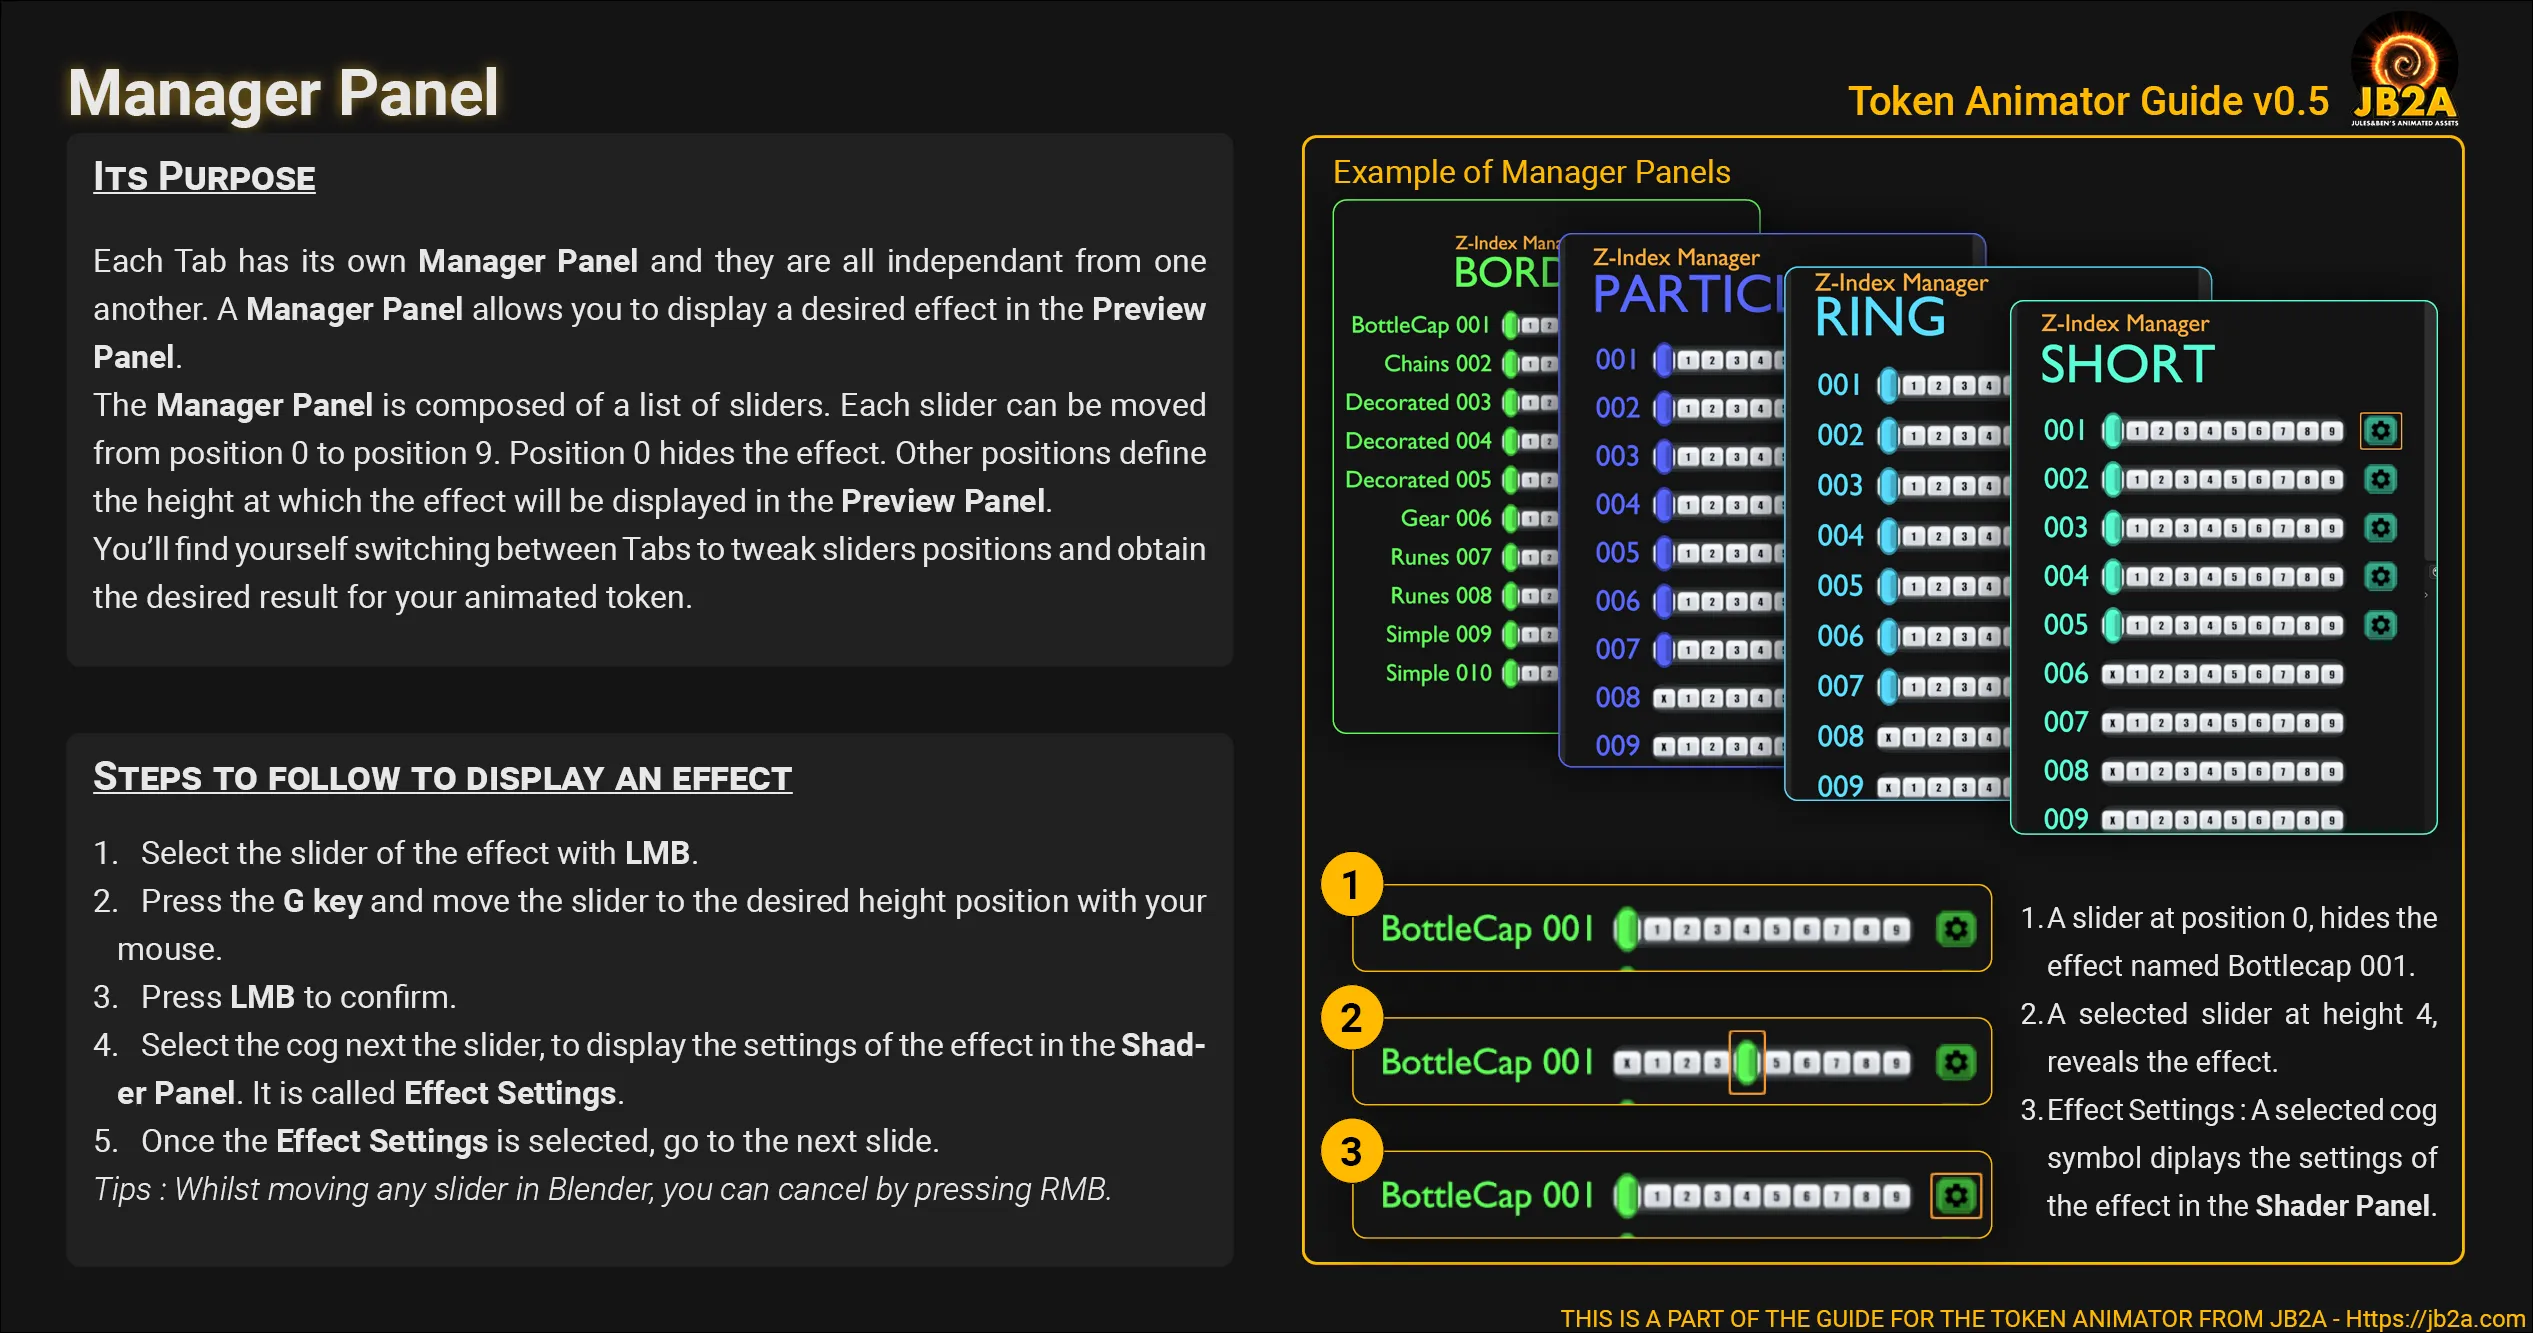
Each Tabs have their own Manager Panel. That means they are completely independant between each other. It will allow you to decide which effects you want to display in the Preview Panel and to choose the height of effect’s layer.
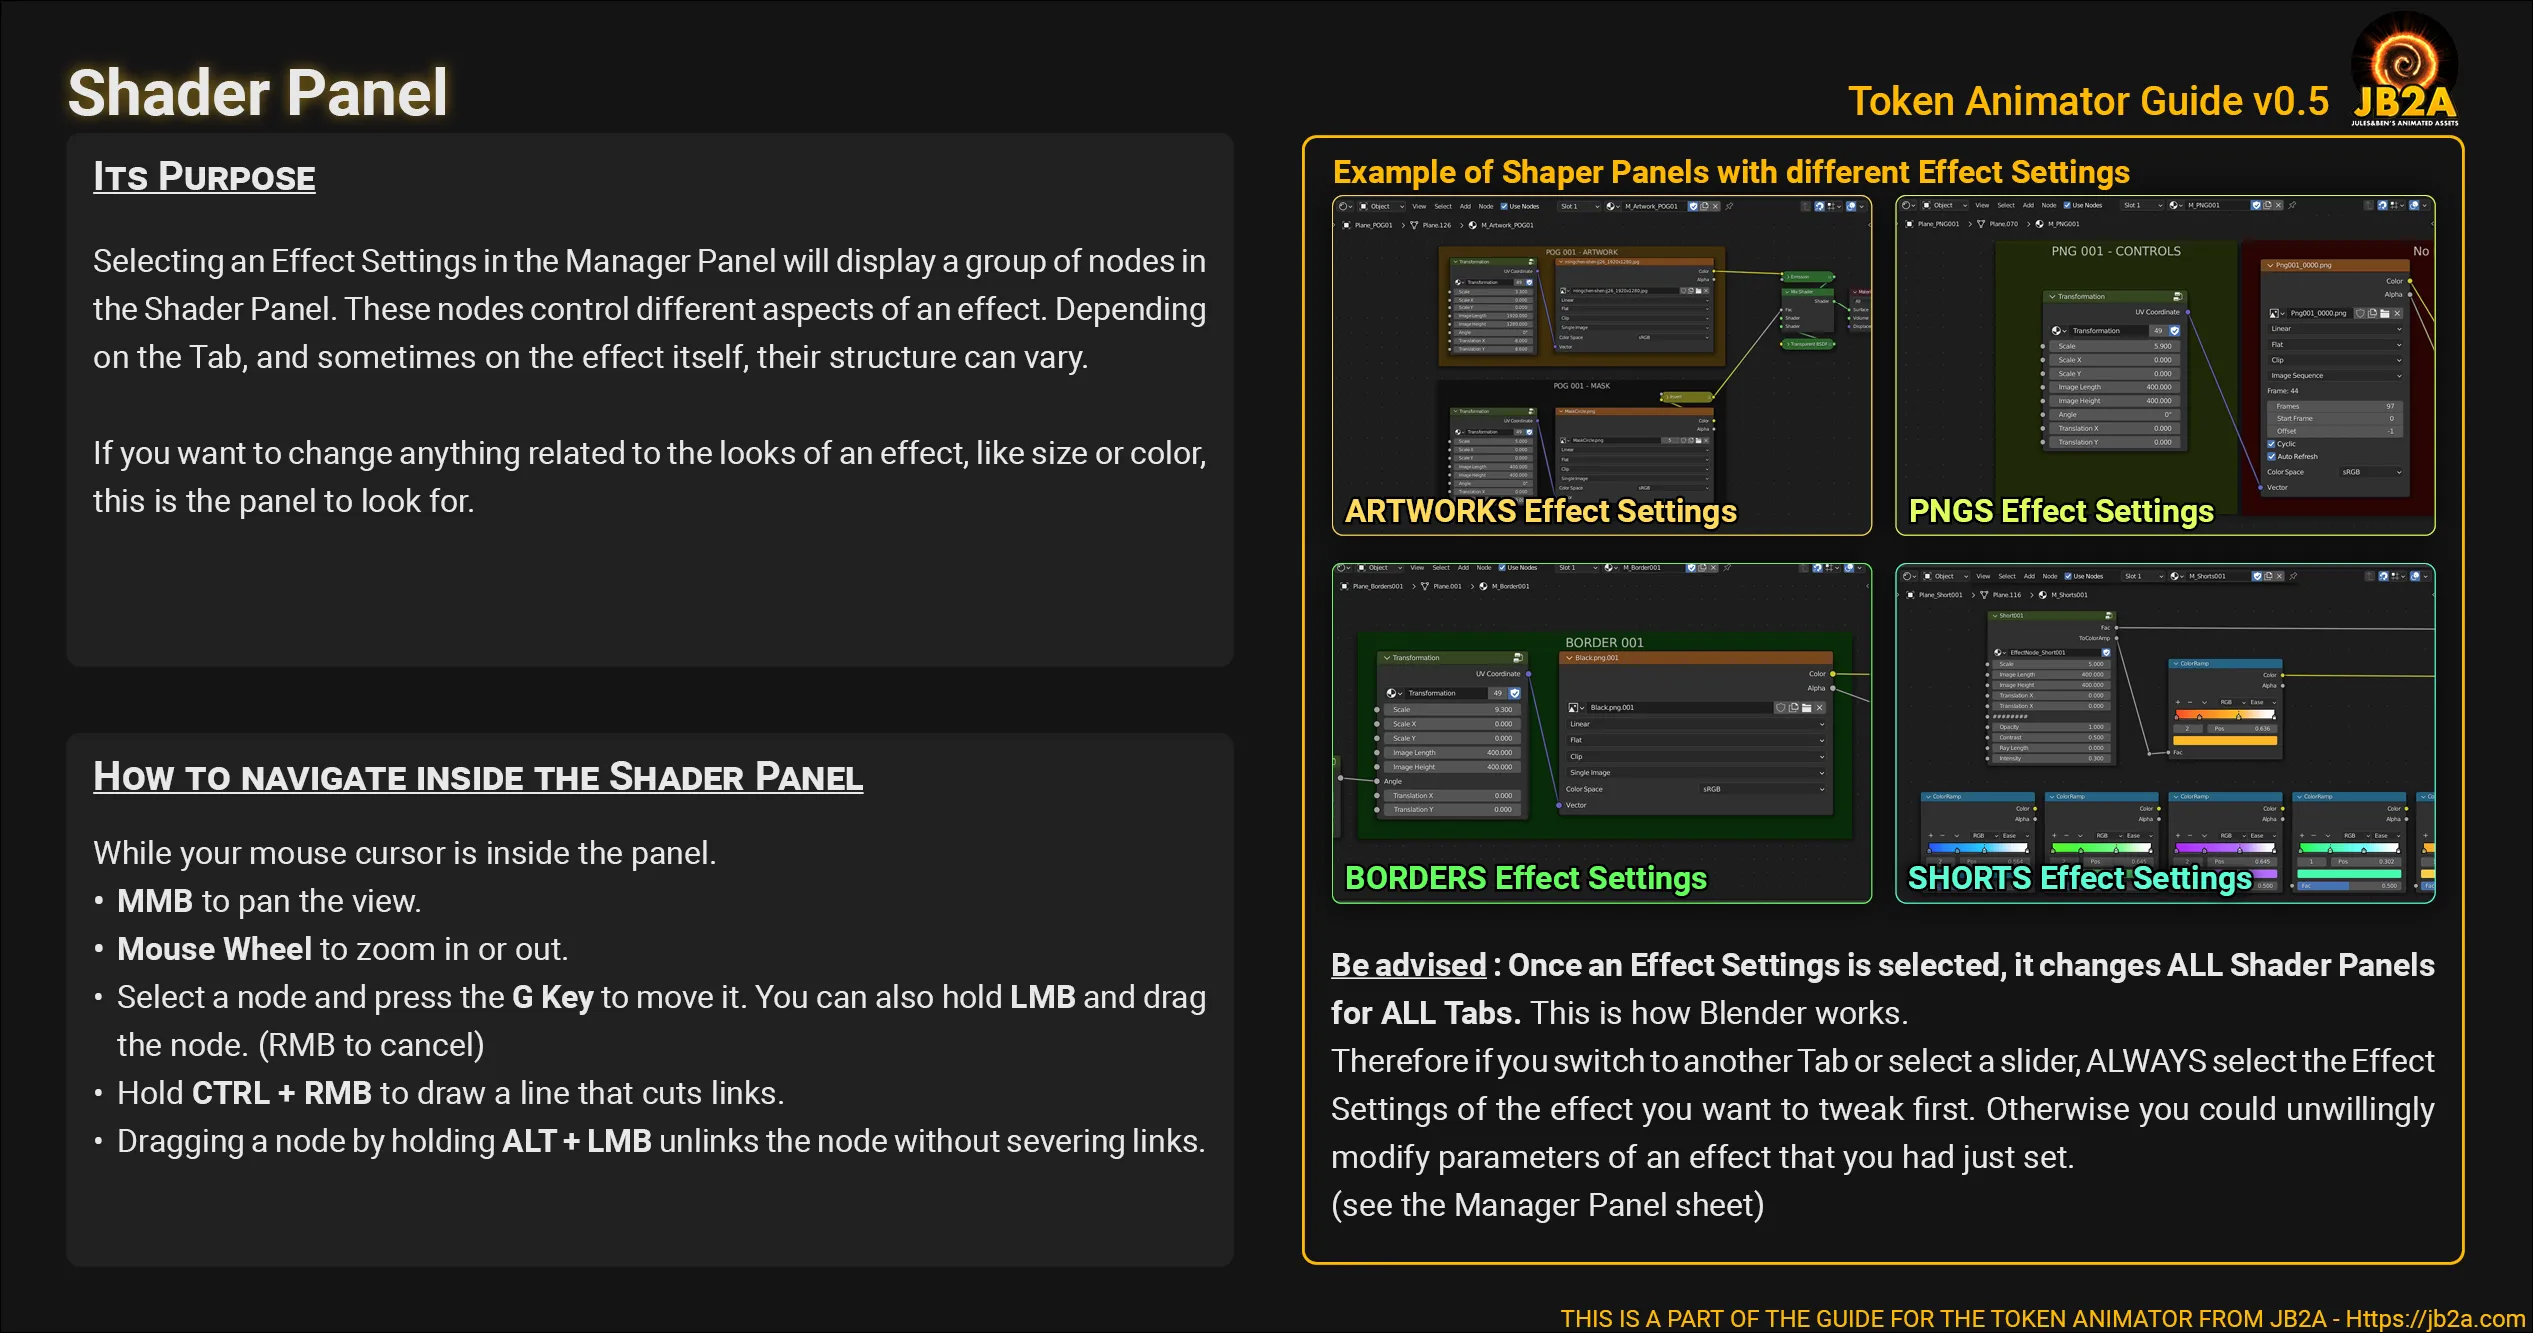
And when you want to edit the material of the effect, you can select it select its corresponding cog to display its material in the Shader Panel. And finally to select the corresponding material of the effect so you can edit its mask, scale, rotation, colors, etc…
Each effects have a name associated to them and it can be edited to allow a better organisation. An effect also have a slider going from position 0 to position 9. Position 0 means the effect is hidden in the Preview Panel and positions 1 to 9 represent the height of the layer. At the end of the slider there is a cog symbol. When selected, it will display the corresponding shader associated to the effect in the Shader Panel.
This is a 3D viewport of Blender but the point of view from a camera with an orthographic projection. The Grid shows you the size of an effect/png in pixels but it won’t be visible on the final render. Use the Spacebar to play or pause the animation in the Preview. Depending on your computer, Blender should need to play the entire animation once so you can preview it at the right speed.
Keep in mind that if you have a low-end computer, it is highly possible that the preview will always be slower than the final result
This is where you edit an effect or your artwork/top-down token. It is composed of nodes linked to each other to form a node tree going from left (branches) to right (trunk). The far right side of the node tree is the final result of the shader where every nodes converge to a single one, the Material Output. In this case it will an artwork, or an animated effect.
If you want to learn how nodes are working, you can read the documentation of Blender.
Blender DocumentationTo edit an artwork, a border or an animated effect in the Shader Panel, you must first select its corresponding cog in the Manager Panel. Only then the right shader will be displayed here and you’ll be able to edit it.
Useful in very few cases. It is collapsed at the botton of Blender’s window.
To expand the Timeline Panel
- Move your cursor until it reaches the separation between the Browser Panel and the Playback Panel.
- Your cursor should change to a “Two-side” arrow.
- Click and hold the
Left Mouse Buttonthen drag your mouse toward the top of your screen until the timeline appears. A light grey area going from frame 0 to frame 96 represent the timeline of the whole animation. - To hide the panel, same principle but drag your mouse toward the bottom of your screen instead.
Moving the Playhead
On the timeline, you should see a blue Playhead. You can move it to see specific frame in the animation.
To move the Play head, click and hold the Left Mouse Button on the playhead then use your mouse to drag it.
Tools Tabs Description
Section titled “Tools Tabs Description”Tabs in Blender are mostly used to have a different UI layout depending of what you want to do, for example modeling, texture editing, sculpting, etc … But in this case I decided to use them to divide effects into groups. It should make it easier to navigate between type of effects and to allow you to go straight to what you want to add to your token. They are located on the top part of Blender’s UI.
I divided them in two categories.
- Builder Tabs
- Utility Tabs
Builder Tabs
Section titled “Builder Tabs”Artworks
Section titled “Artworks”This tabs is where you’ll load your token image. It can be any artwork and you’ll be able to use a mask if necessary without having to edit it with another software.
Mostly composed of sequences of pngs representing artworks with effects embeded on top of them. For example, rotating cogs, shimmering borders, etc…
Borders
Section titled “Borders”If you want us to include specific borders you like be sure they are under a suitable license. Example of Borders

Shorts
Section titled “Shorts”Very brief effects, the final animation has 97 frames in total. These effects will be shorter than that. For example a glint or a shimmer.
Speaks by itself, these effects are in a ring shape will loop seamlessly.
Particles
Section titled “Particles”Same as for the Rings, pretty straight forward. This tab will gather all animated effects with particles and will loop seamlessly.
Stages
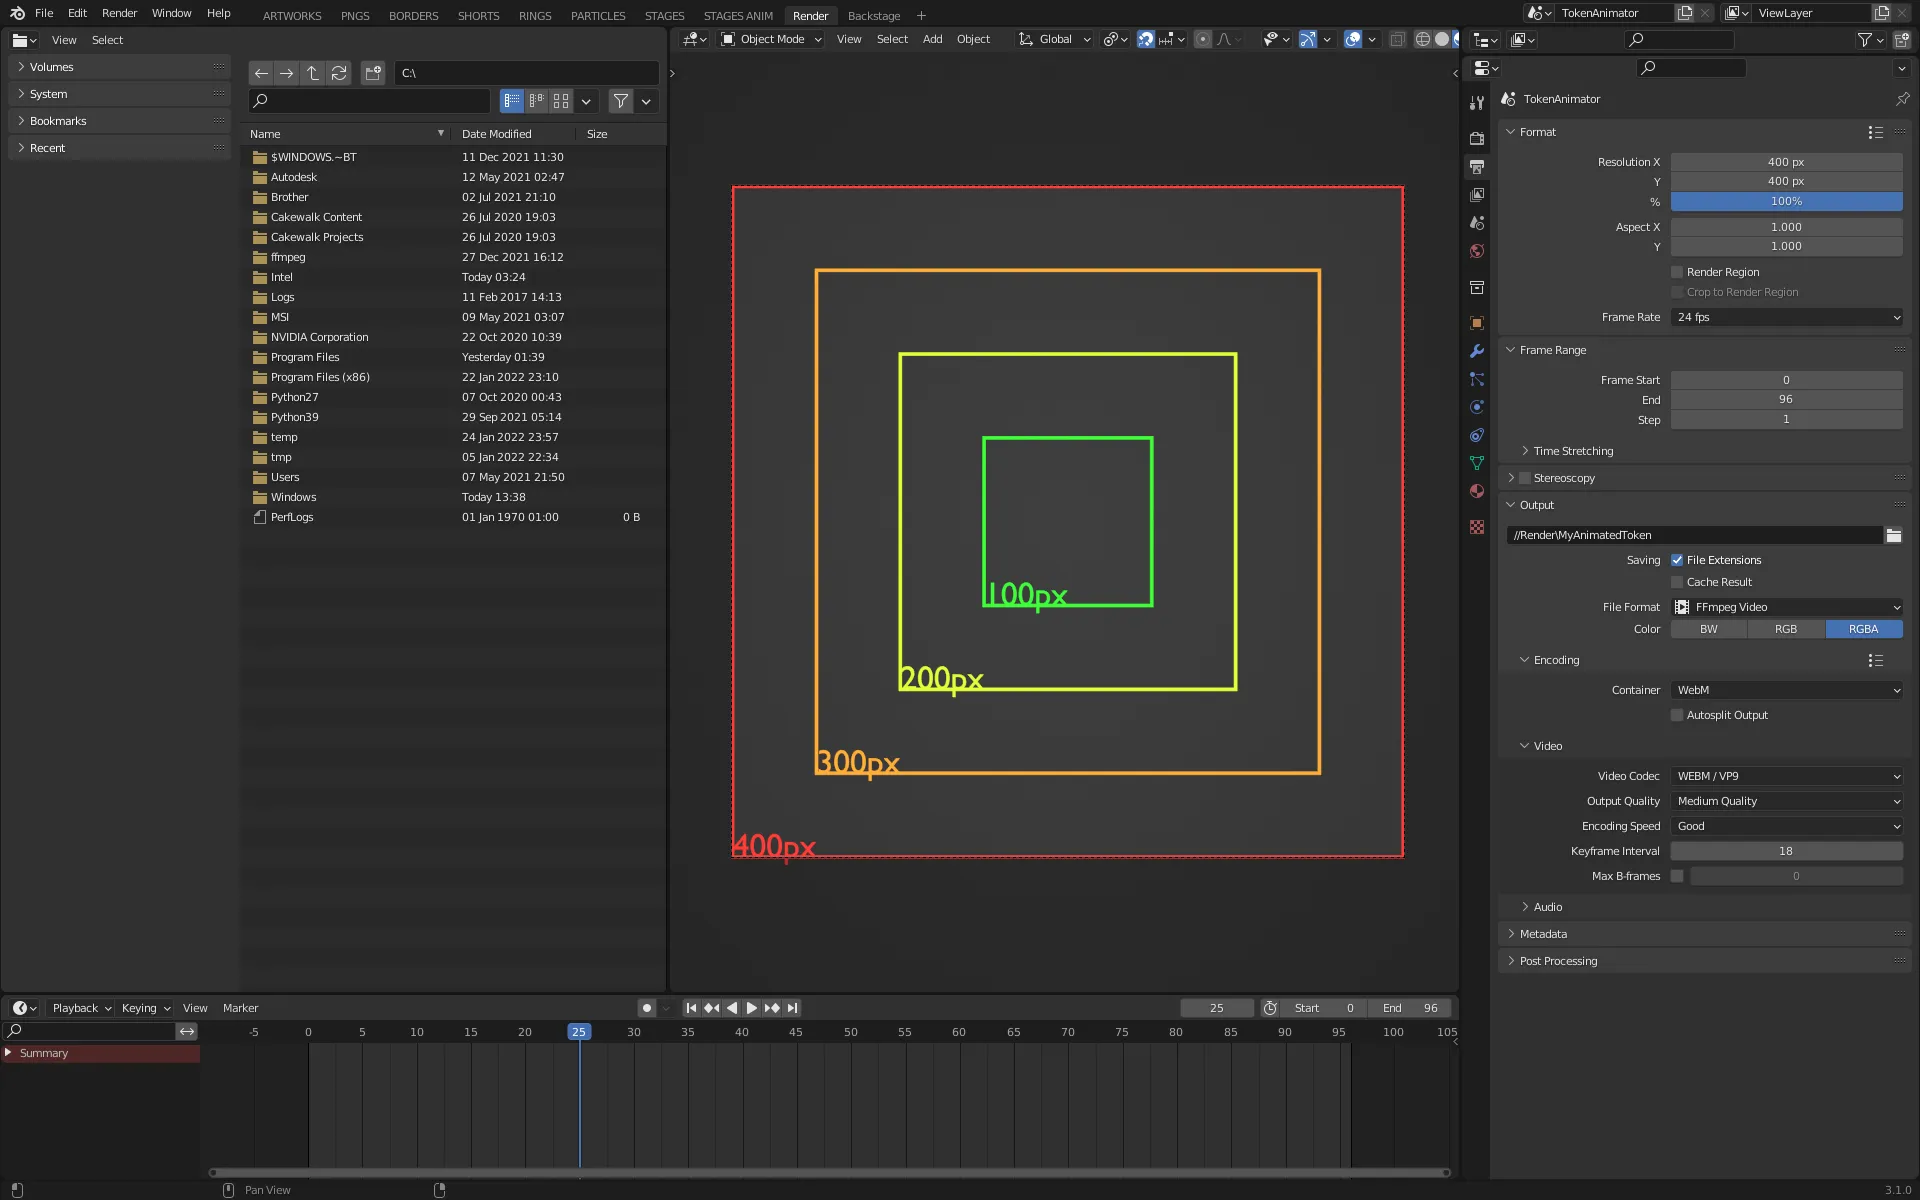
Section titled “Stages”This one is a bit an extra. I liked the idea of adding stages on topdown tokens. Like figurines when we play around a table. I don’t know if it will be popular.
Different shapes are available, and also different textures for the flat side of the stage. For example, Cobblestone, Woodplanks, etc …
Stage Anime
Section titled “Stage Anime”Related to the previous tabs, these are animations made to be added on top of the stages. Could be useful to simply highlight an imporant NPC.
Utility Tabs
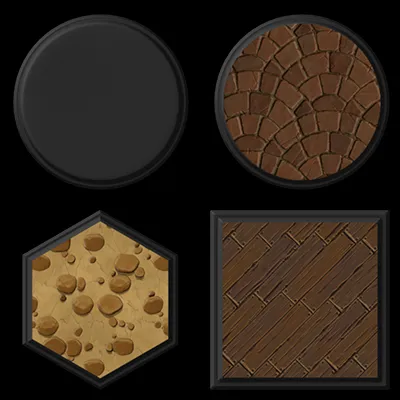
Section titled “Utility Tabs”Render
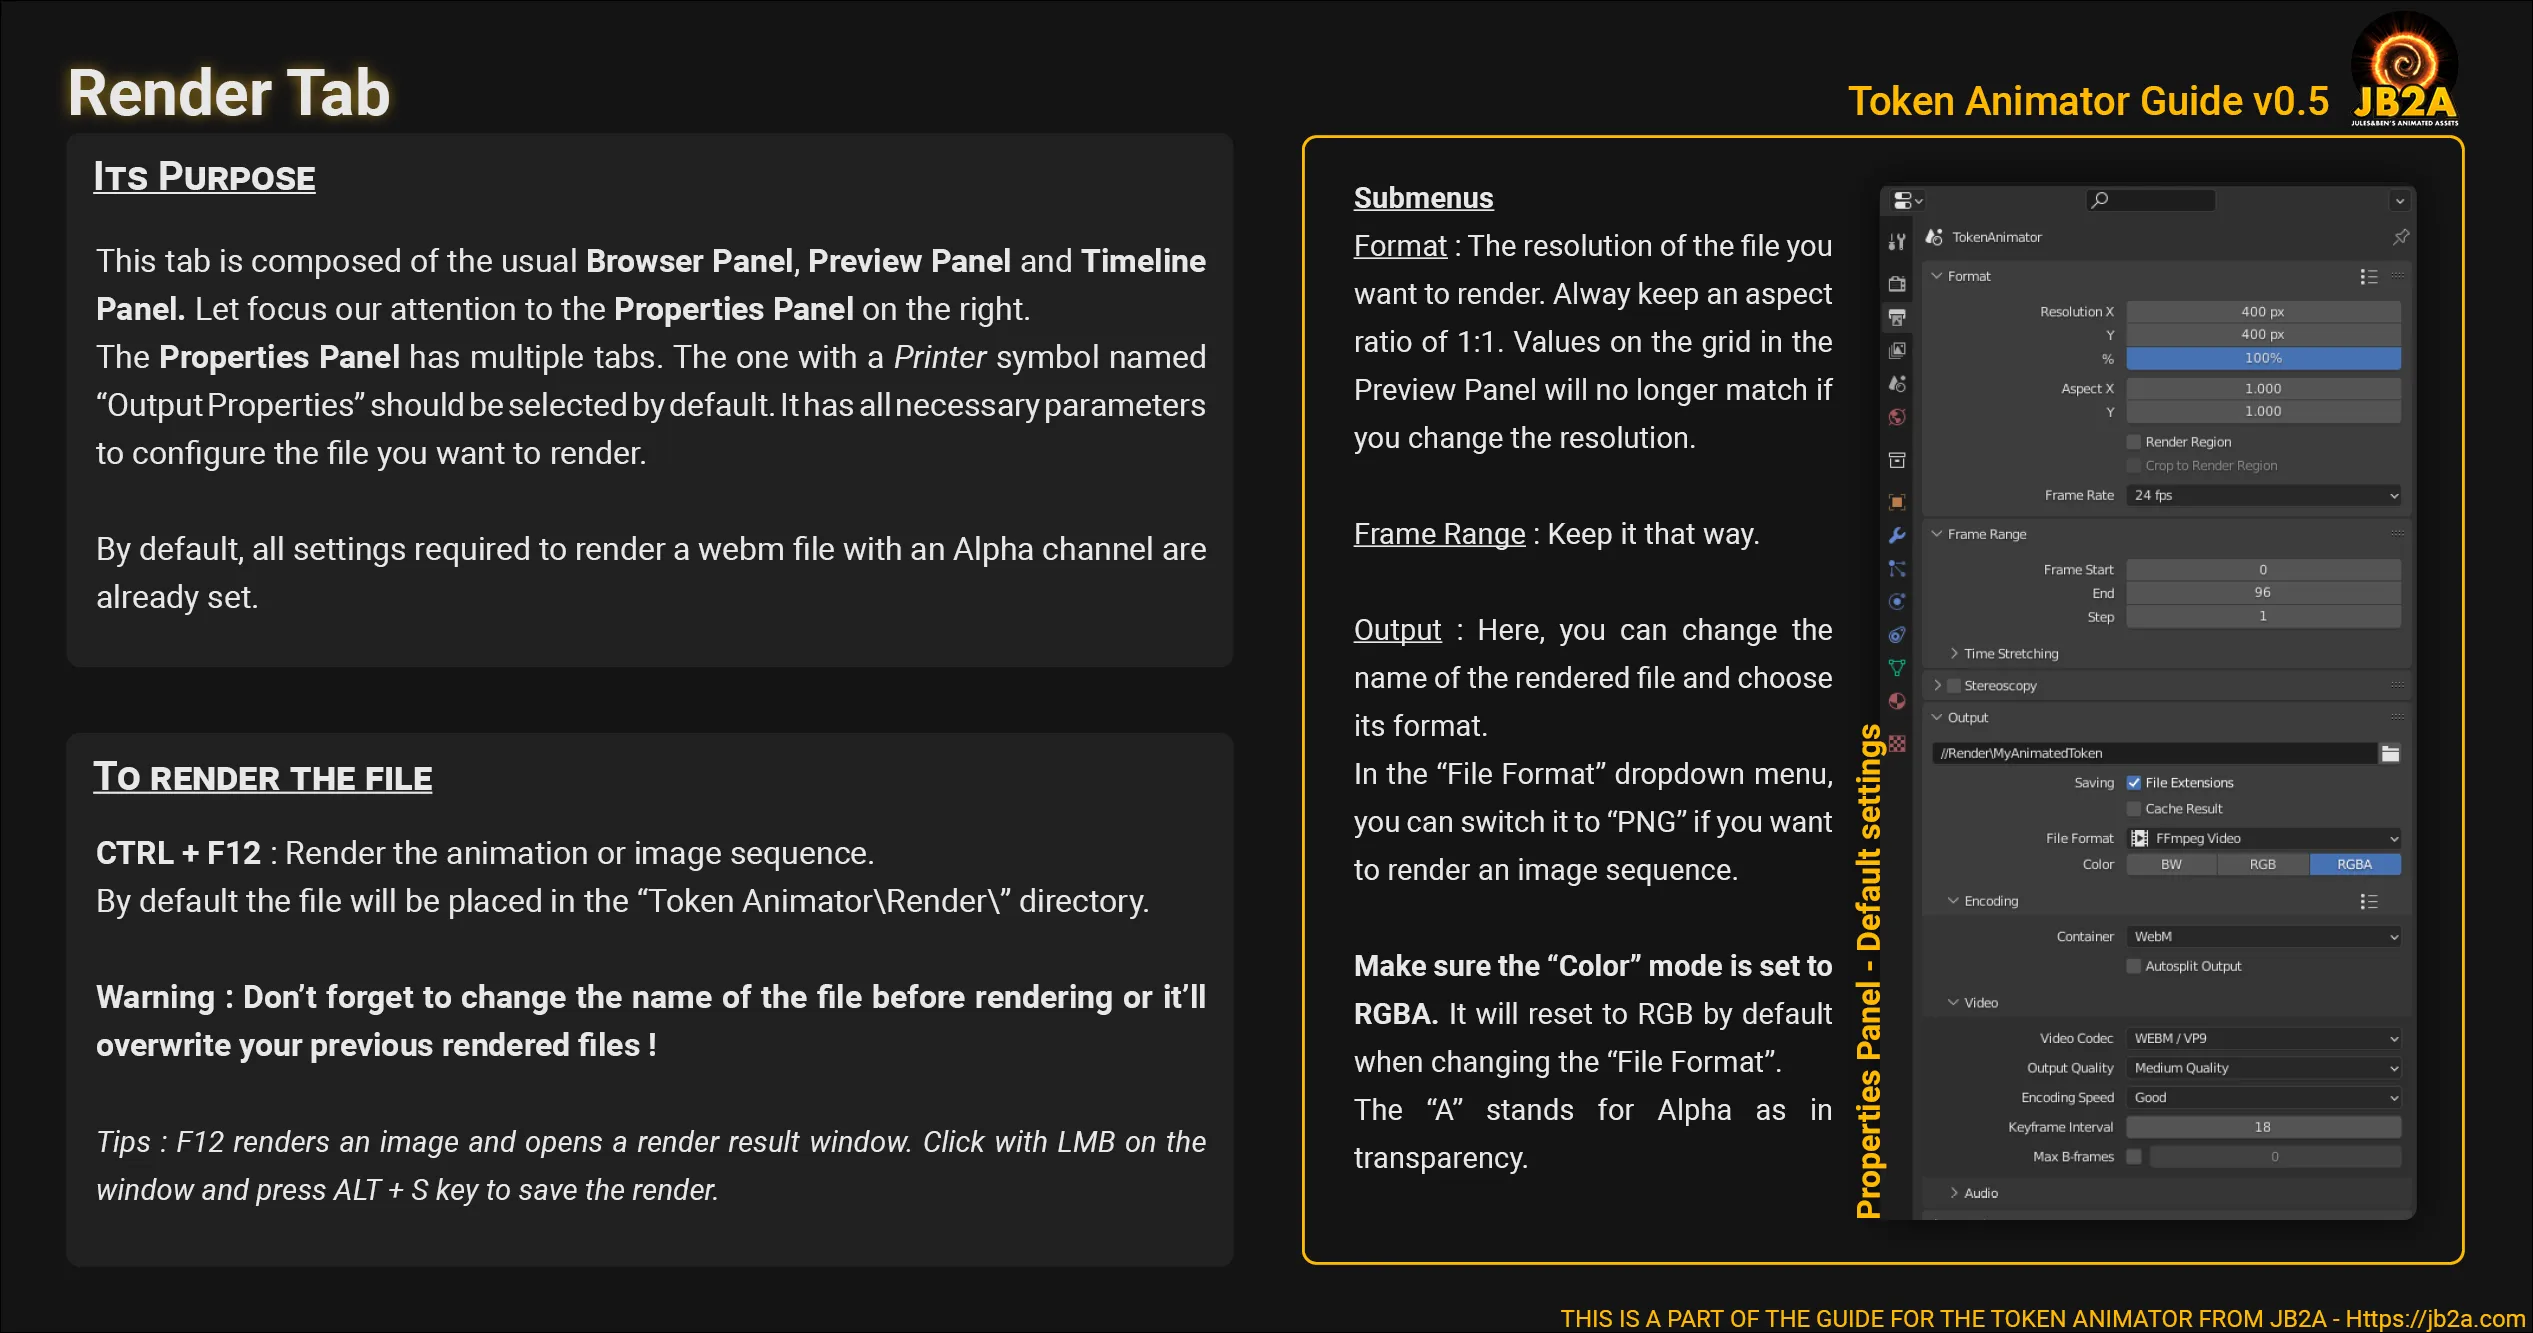
Section titled “Render”When your token is ready to render, you can hit CTRL + F12 to render your animated token in a webm format. Or you can use this tab to change the settings to render it to another format or an image sequence.
You can also change its resolution or the name of the rendered file.
Backstage
Section titled “Backstage”This is were I test things to keep other tabs tidy. I decided to leave it in the final file just in case some people want to do the same.
Guides
Section titled “Guides”Artwork
Section titled “Artwork”The video shows you how to load your artworks in the Token Animator.
Here are the steps to follow:
-
First, copy your artwork in the
//Previews\Artworksfolder located inside the project folder.DirectoryToken-Animator-Folder
DirectoryExamples/
- …
DirectoryImage-Sequences/
- …
DirectoryPreviews
Directory_Masks/
- …
DirectoryArtworks/
- …
- …
DirectoryRender/
- …
DirectoryUI/
- …
- TokenAnimationBorder_v0.x.blend
-
Then in the ARTWORKS tab, refresh the Browser Panel to confirm that Blender can properly see it.
-
In the Manager Panel:
Choose a slider and change its position to display the placeholder that will be replaced by your artwork.
-
In the Shader Panel:
-
Navigate the panel.
-
Loading your artwork.
You should see two frames with nodes inside, one orange and one black. Inside the orange one, you’ll need to load your artwork in the node on the right.
-
Click on the folder icon, it will open a window browser and select your artwork.
-
Then click on Open Image to confirm.
Now you might want to change the mask. By default your artwork will be inside a sharp round mask. To change the mask’s shape, inside the black frame, you’ll need to load another mask in the node on the right.
-
Click on the folder icon, it will open a window browser with a list of various masks.
-
Select the desired one and click on “Open Image” to confirm.
-
-
Loading a Top Down token.
It is slightly different. Since it should already have an alpha, you won’t need to load the mask separately.
-
Use one of the last 5 layers in the Manager Panel.
-
Move its slider to a desired position to display it on the Preview Panel.
-
Select its corresponding cog to be able to edit its material.
The nodes are a bit different. As you can see, there is only one node to load your token (the orange one).
-
Load your artwork in the orange node on the right.
-
Click on the folder icon, it will open a window browser and select your artwork.
-
Click on “Open Image” to confirm.
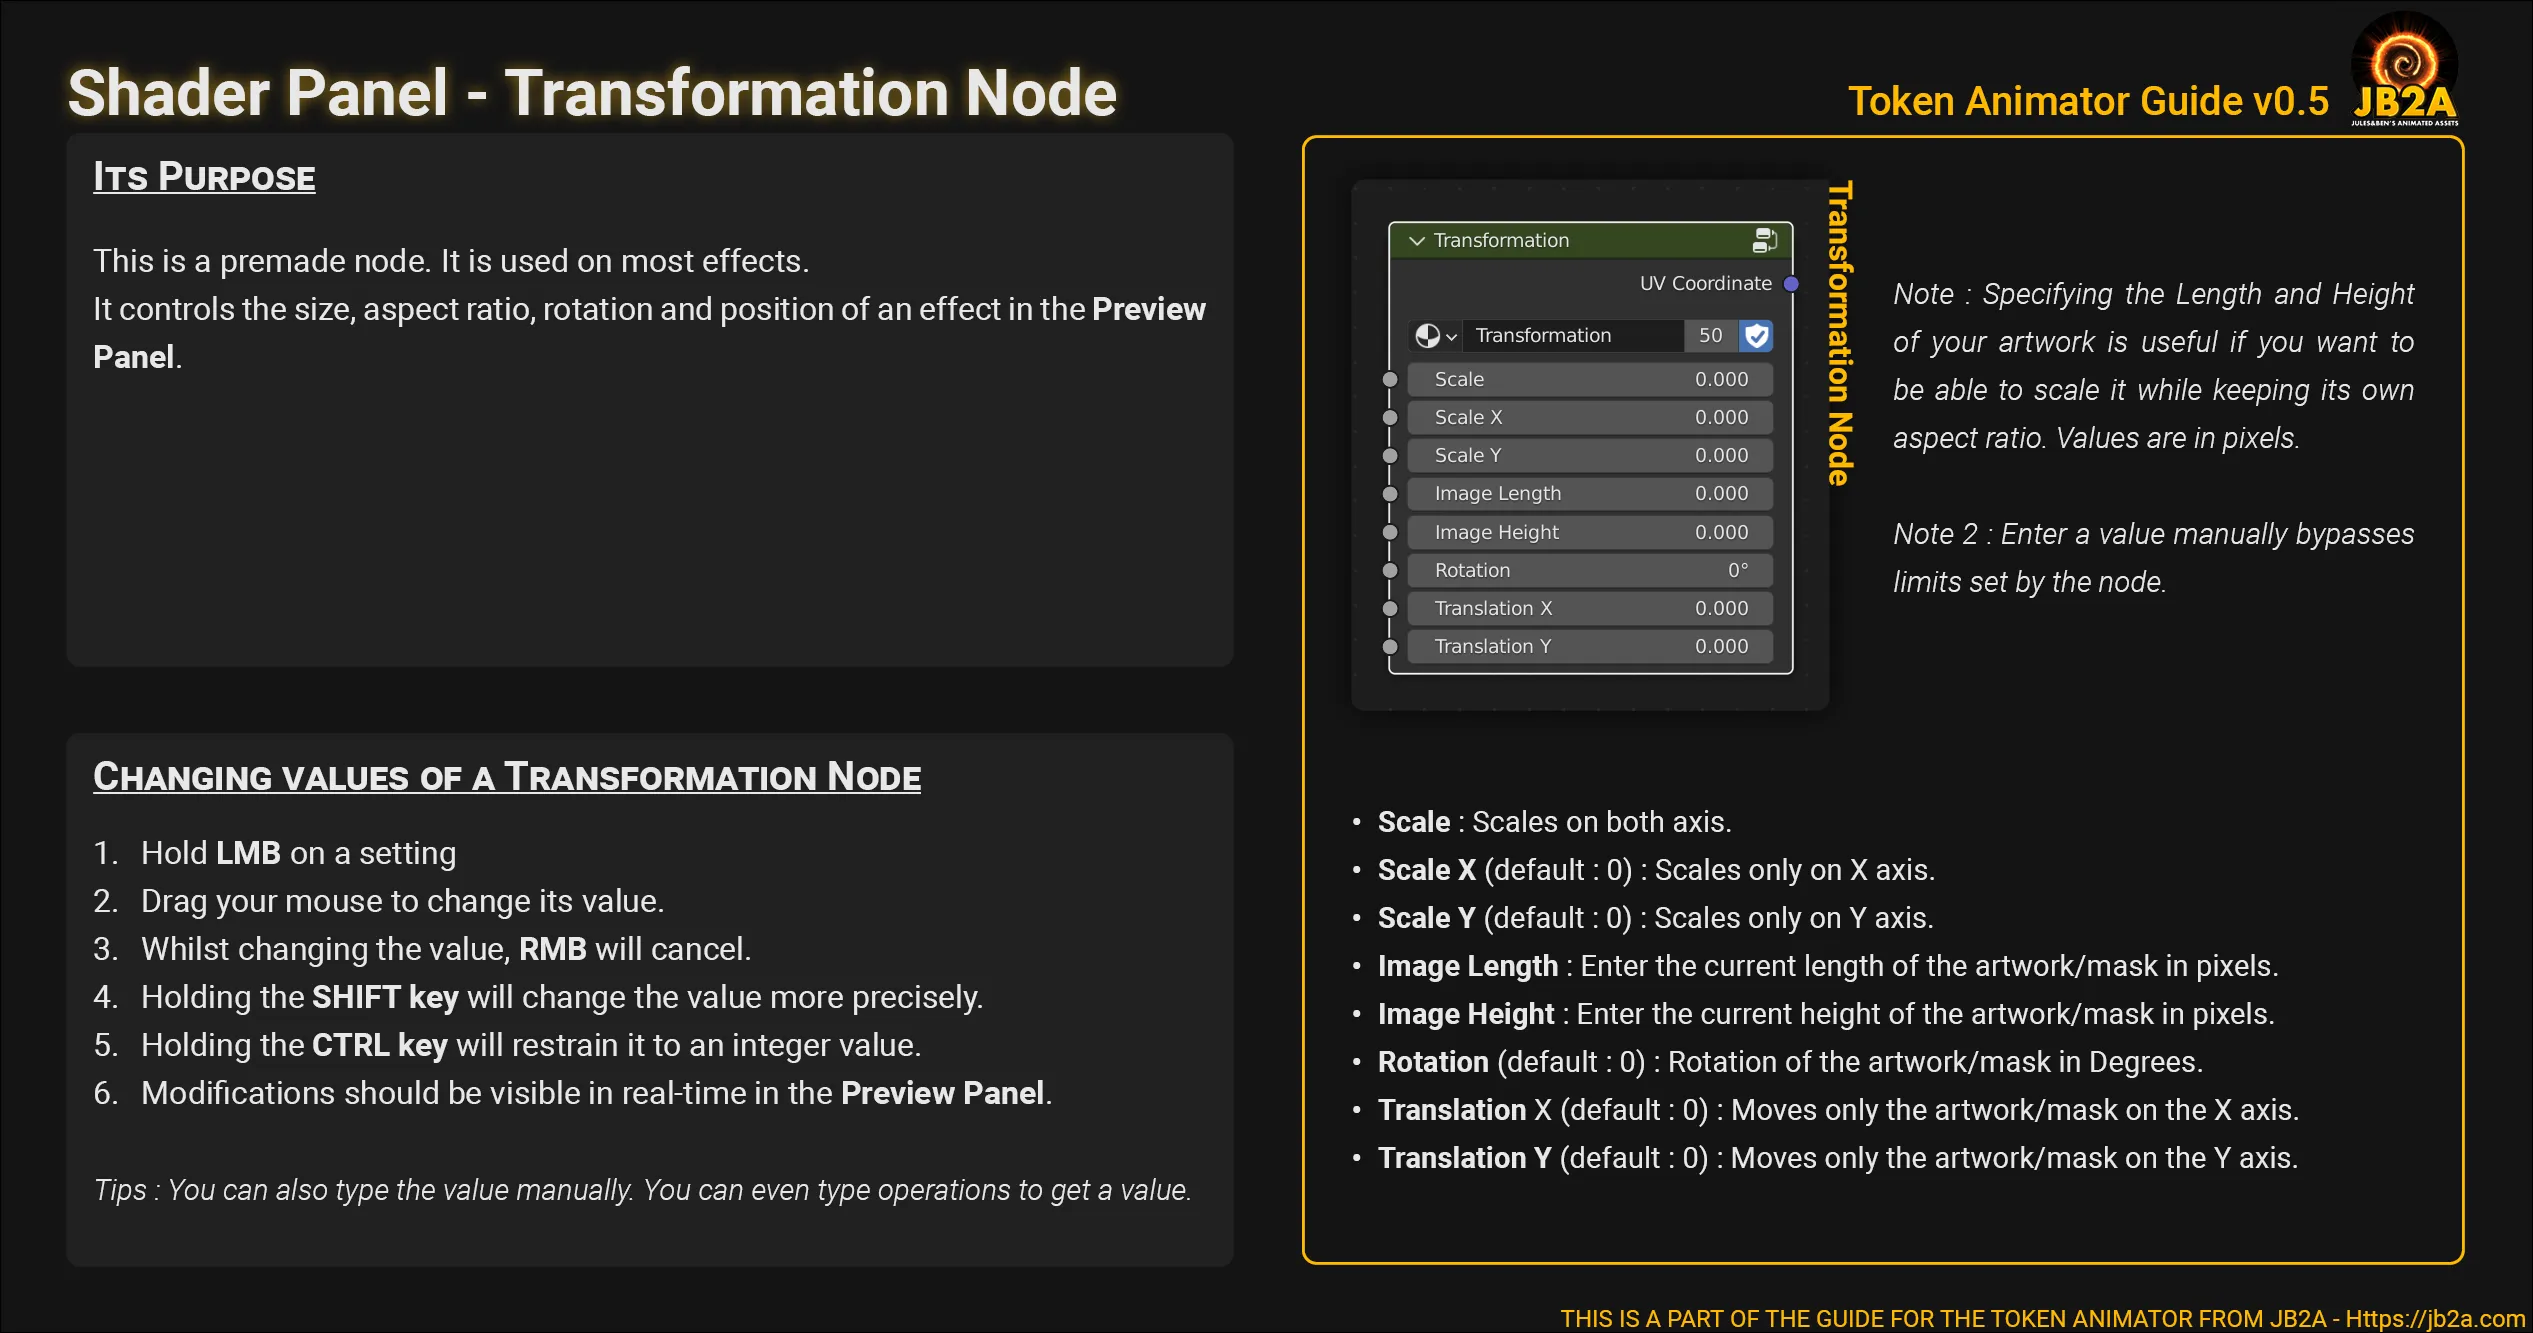
You should see your top-down token appear in the Preview Panel, if necessary use the node named “Transfomation” to resize, rotate and move it as you see fit.
-
-
Resize or edit the ratio of your artwork
-
These slides are available for download.
-
Browser Panel
-
Manager Panel
-
Shader Panel
Borders
Section titled “Borders”Steps shown in the video
-
Browser Panel
Inside of them are multiples token borders coming mostly from a github repository. I can’t find the address unfortunately.
Since there is more borders than layers in the Manager Panel. There is a relatively high chance that you’ll want to load a different one than those already set up. Browse folders until you find your desired token border.
-
Manager Panel
-
Shader Panel
-
Navigate in the panel
-
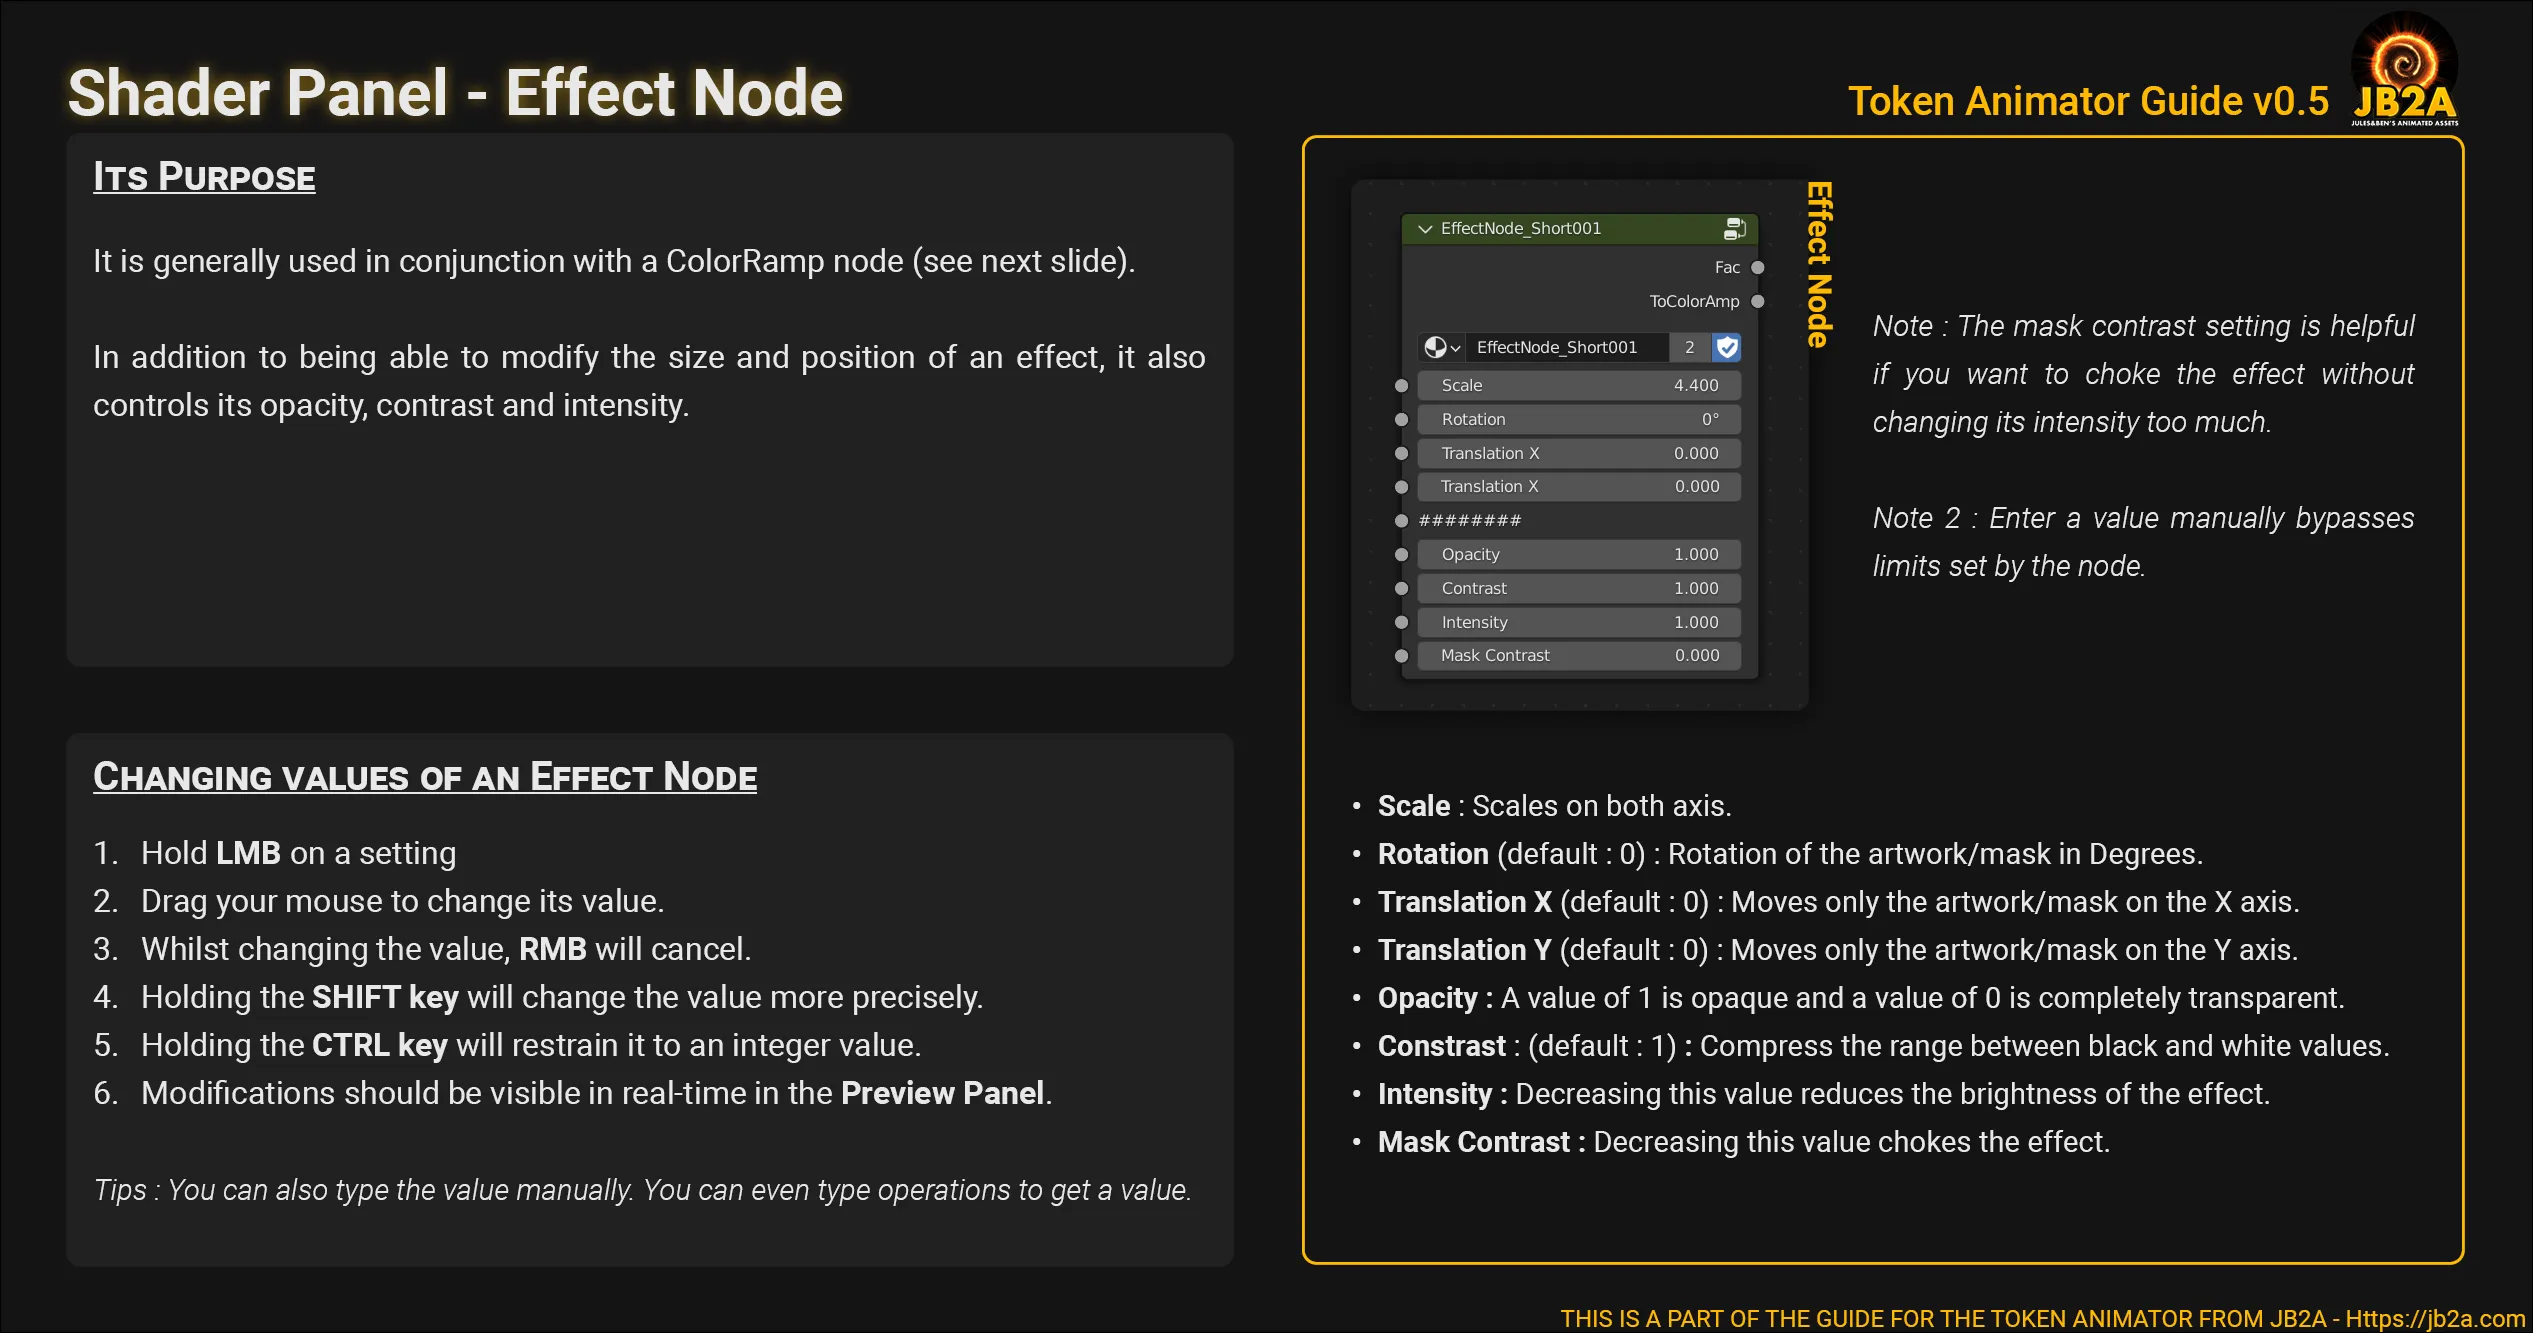
Resize,Transform and Tweak the effect
-
-
Additional Node
On the left of the green frame, you should see a node named “Degree to Radian”. You can edit its “factor” value to enable a rotation animation.
- The factor must be an integer for a seamlessly looped rotation.
- A positive value for a clockwise rotation, for example
1. - A negative value for an anti-clockwise rotation, for example
-1.
Shorts
Section titled “Shorts”Steps shown in the video
-
Browser Panel
-
Manager Panel
-
Shader Panel
-
Navigate in the panel
-
Resize,Transform and Tweak the effect
-
Change the color/tint of the effect.
-
Editing the timeline
This step is only useful if you want to change when the Short effect starts.
-
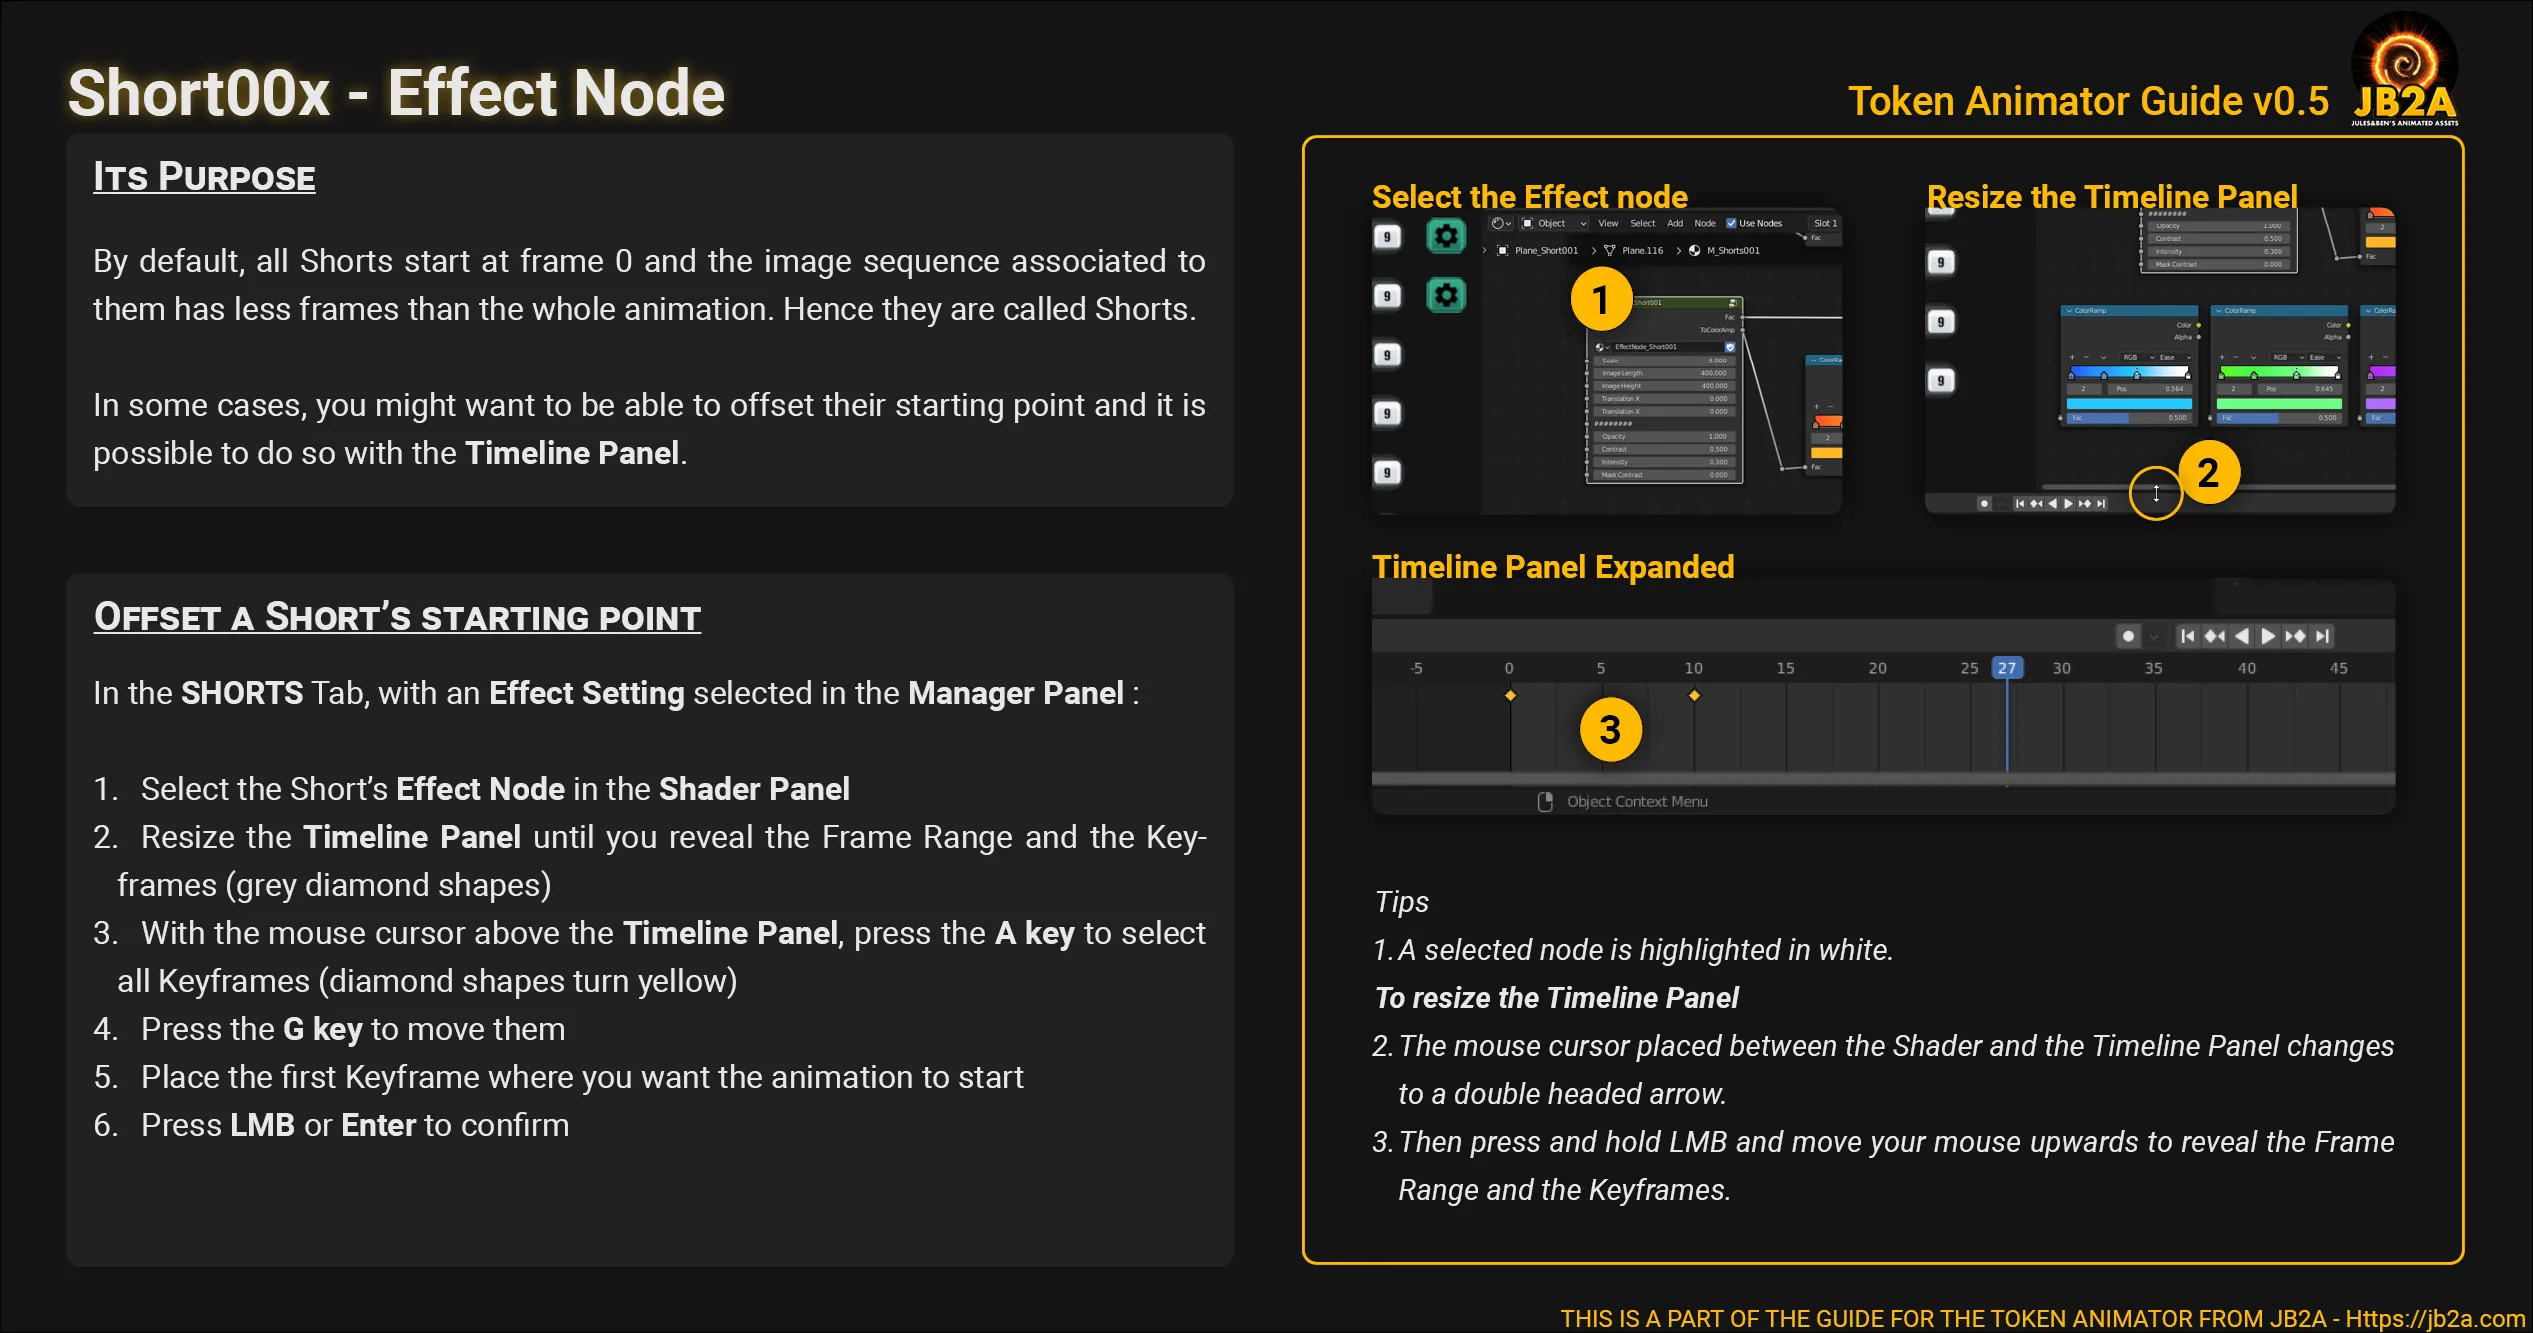
Advanced: Timeline editing
Section titled “Advanced: Timeline editing”By default, all Shorts start right at the beginning of the whole animation. You might want to tweak that. Unfortunately it requires to get a little bit more technical.
Changing the starting point of a Short
Section titled “Changing the starting point of a Short”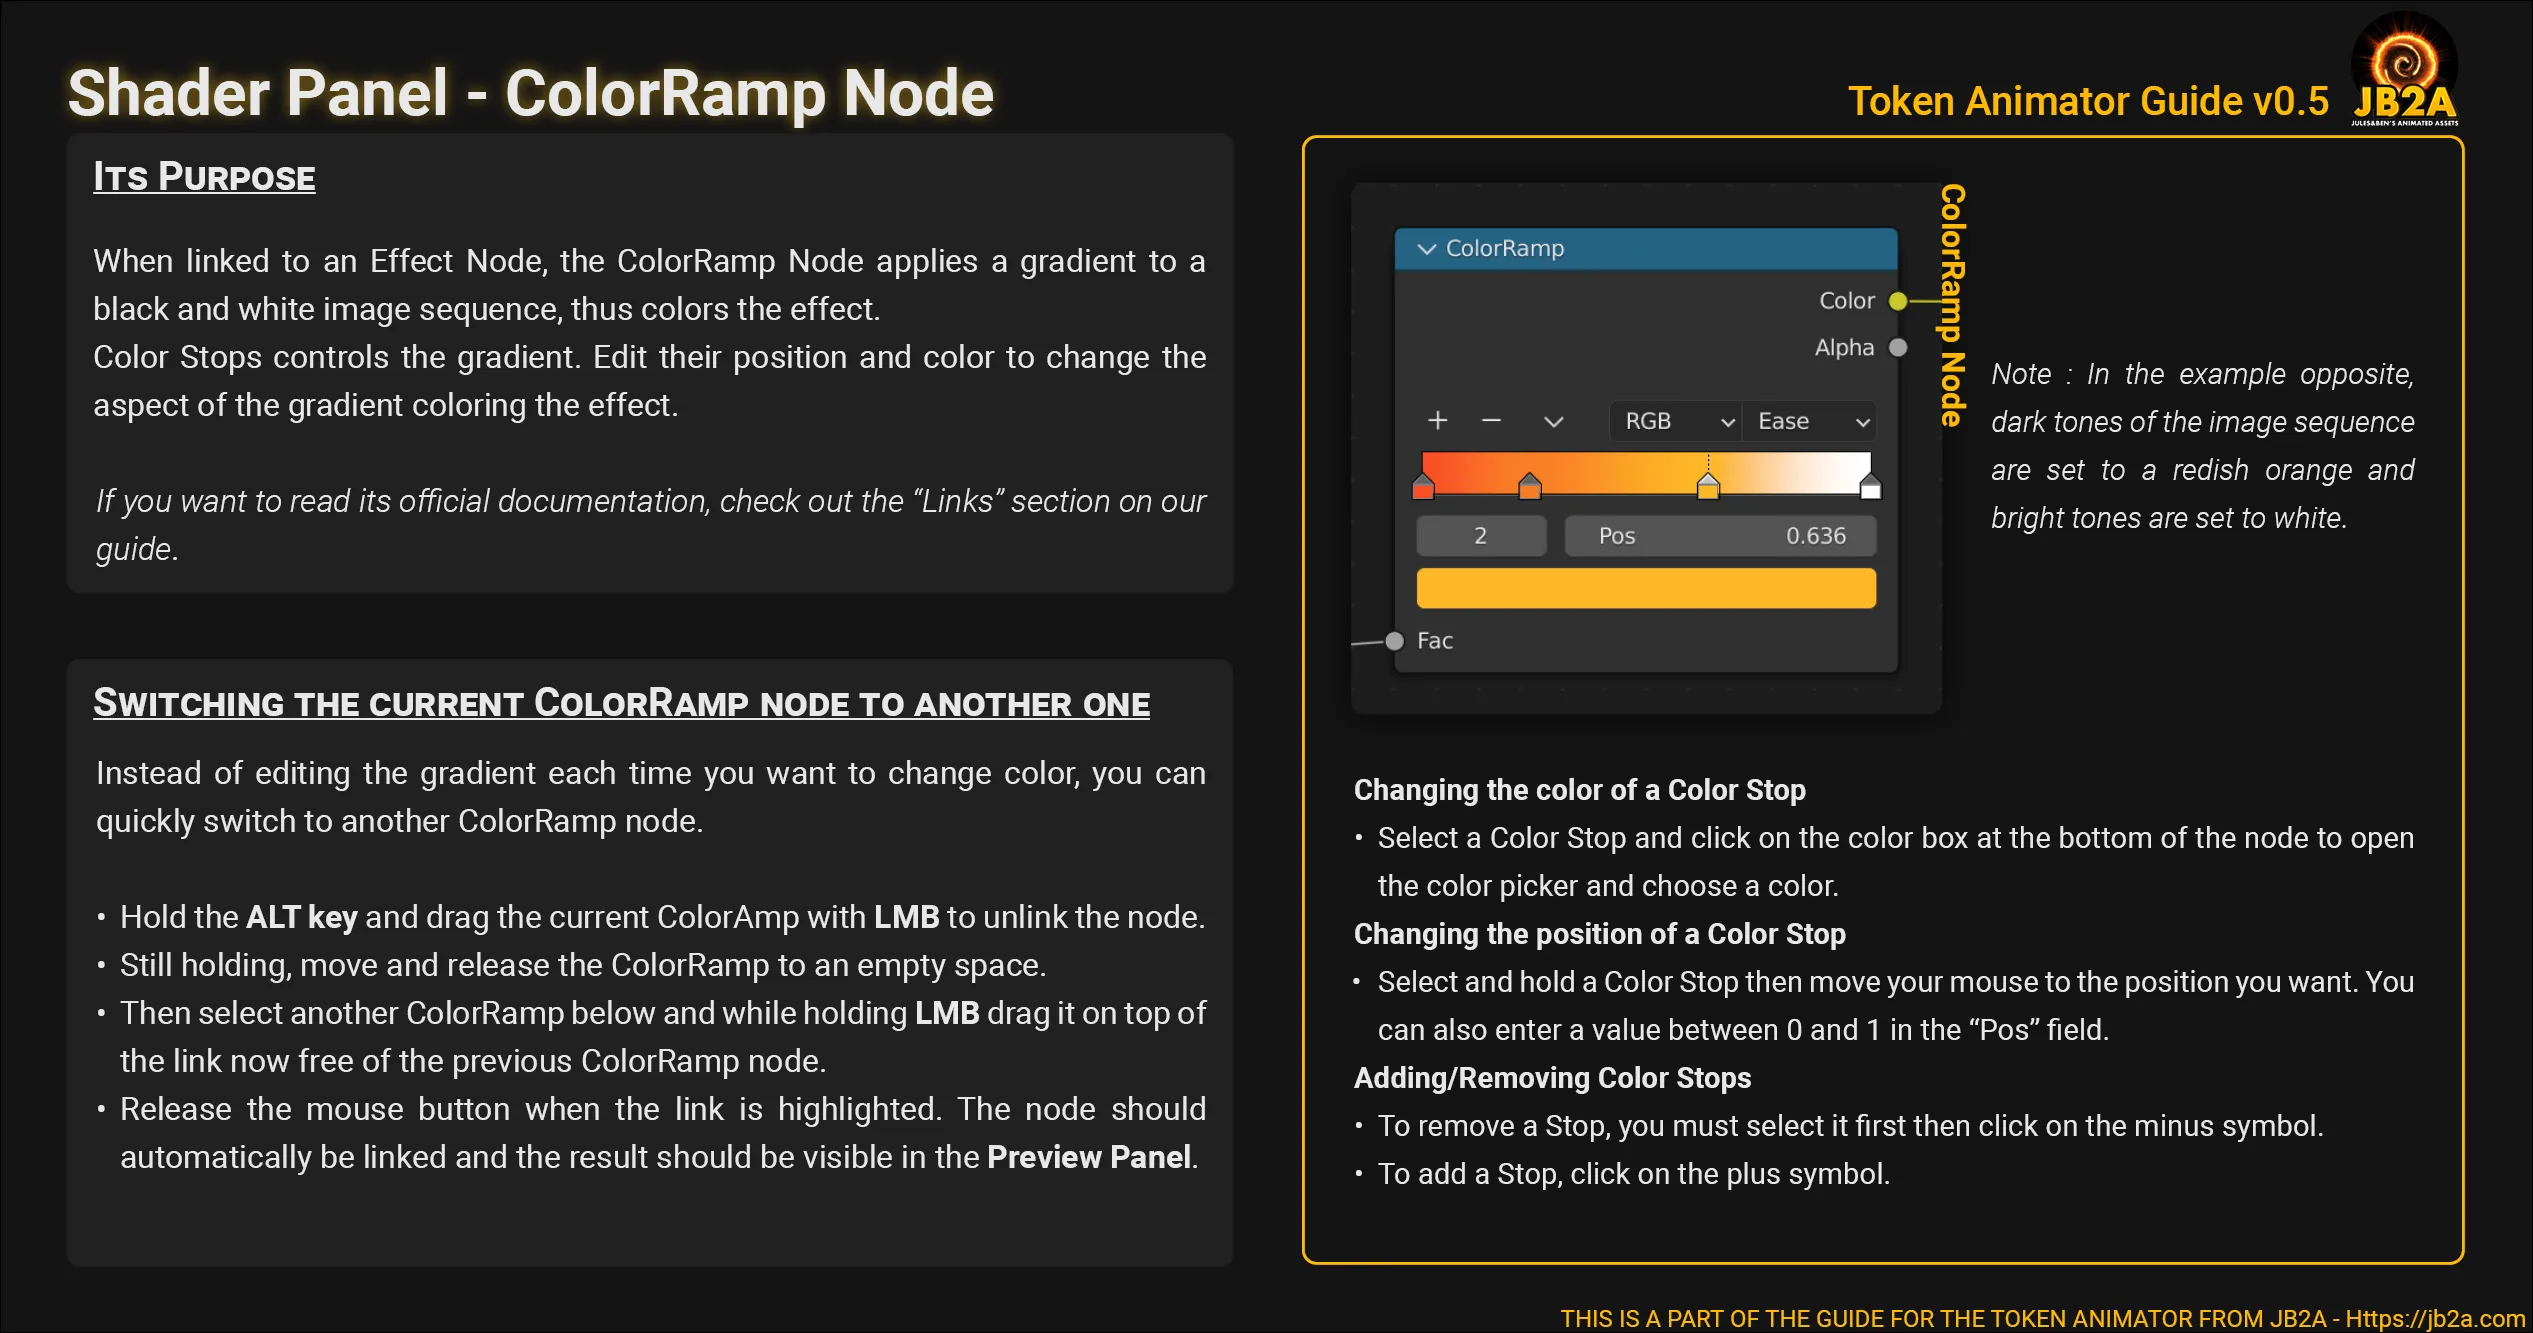
Steps shown in the video
-
Browser Panel
-
Manager Panel
-
Shader Panel
-
Navigate in the panel
-
Resize,Transform and Tweak the effect
-
Change the color/tint of the effect.
-
Particles
Section titled “Particles”Steps shown in the video
-
Browser Panel
-
Manager Panel
-
Shader Panel
-
Navigate in the panel
-
Resize,Transform and Tweak the effect
-
Change the color/tint of the effect.
-
Stages
Section titled “Stages”-
Browser Panel
-
Manager Panel
-
Shader Panel
-
Navigate in the panel
-
Resize,Transform and Tweak the effect
-
Stage Animations
Section titled “Stage Animations”-
Browser Panel
-
Manager Panel
-
Shader Panel
-
Navigate in the panel
-
Resize,Transform and Tweak the effect
-
Change the color/tint of the effect.
-
Render the final result
Section titled “Render the final result”In the second part of the video above, I’m showing you how to Render an Image Sequence instead of a Webm.
VP9 Issues
Section titled “VP9 Issues”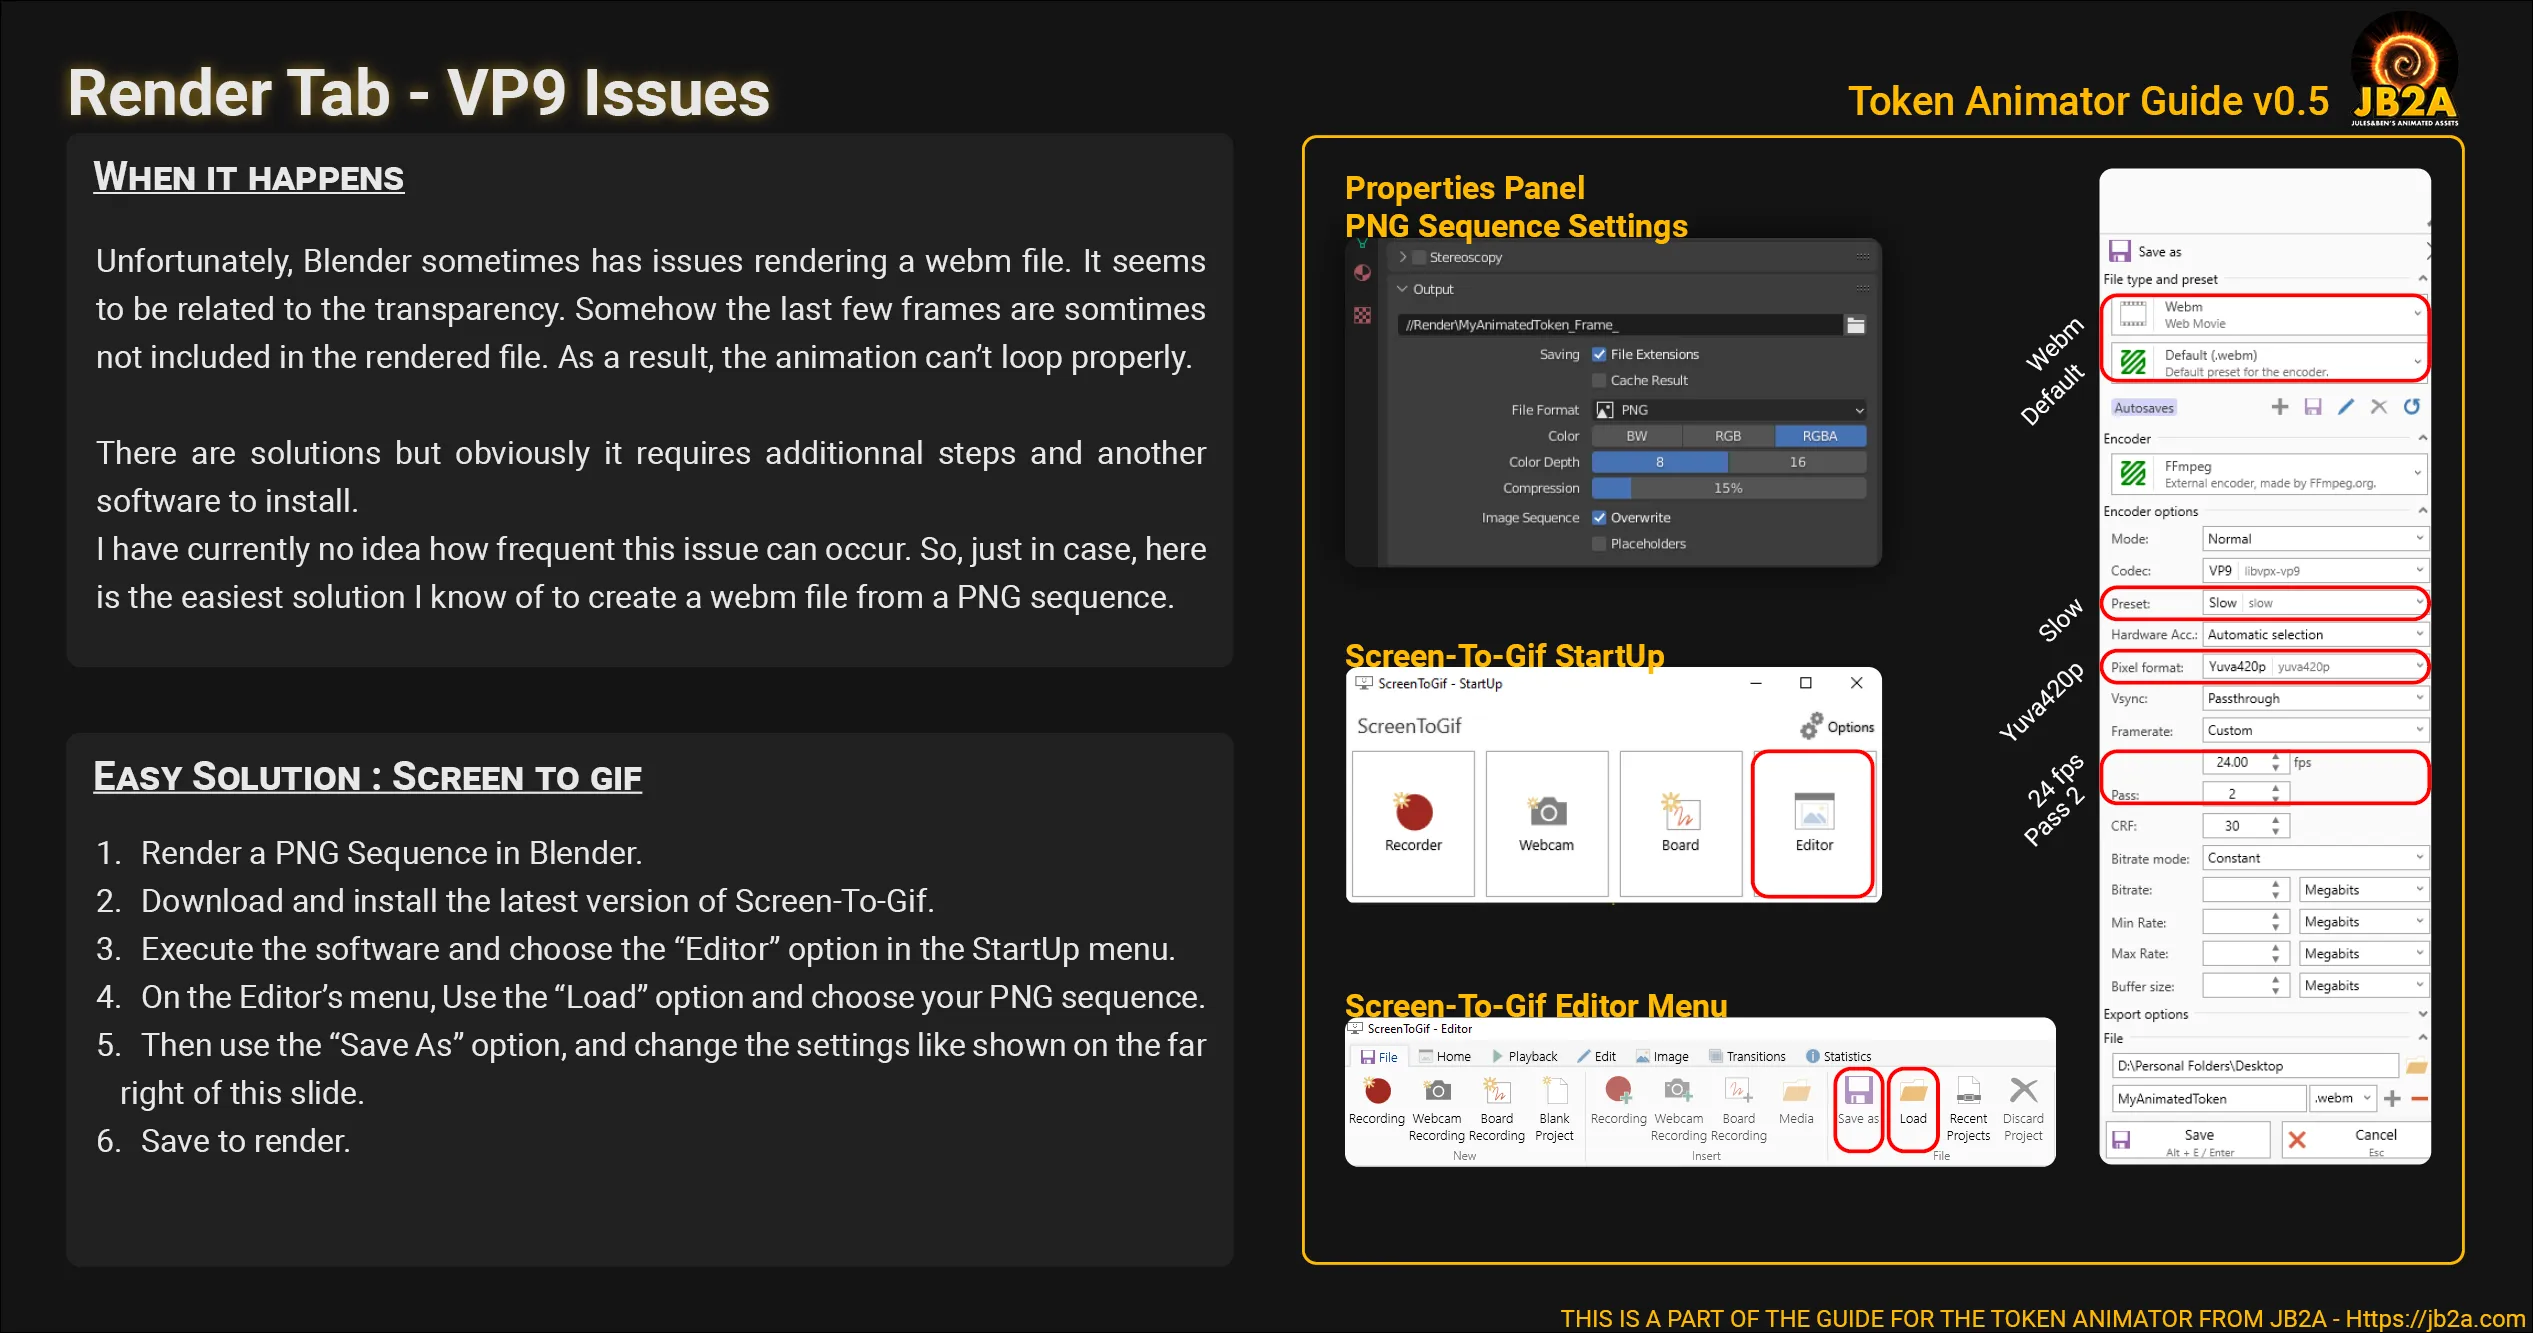
Conclusion
Section titled “Conclusion”This is the end, beautiful friend!
This is the end of this guide. If you have questions, don’t forget to check out the FAQ at the end of this guide. And if you don’t find your answer, please join our Discord server and I’ll be happy to assist you.
I hope this tool isn’t to complicated and this guide provides enough information to help you to create awesome animated tokens!
Don’t hesitate to share your work on our Discord, just be careful to avoid any license issue. And in doubt, always share a link of the original work!
What format is recommended to use for my artwork?
Section titled “What format is recommended to use for my artwork?”- If you don’t need to use the transparency, PNG and JPG are fine.
- If you need the transparency for your top-down token for example, PNG is recommend since it has an alpha channel.
How long is the animation?
Section titled “How long is the animation?”4 seconds at 24 frames per second for a total of 97 frames.
The animation has a black frame at the end of it.
Section titled “The animation has a black frame at the end of it.”If you are using Firefox, please consider using another internet browser such as Chrome, Edge or Vivaldi.
How can I preview the rendered webm file outside VTTs?
Section titled “How can I preview the rendered webm file outside VTTs?”Open the webm with your prefered internet browser. Avoid Firefox, it has know issue concerning webms. When a webm is opened with Chrome (for example), you can can make it loop by right clicking on the player to open the contextual menu and select the “Loop” option.
Can I add my own animations?
Section titled “Can I add my own animations?”It should be doable. Although I haven’t written a guide about it yet. If you know Blender enough to do it by yourself, there are a couple of things to know. The entire Blender file is setup for animations of 97 frames for a duration of 4 seconds at 24 frames per seconds. So if you want your animations to loop, it has to follow these requirements.
If you want to add an effect like those in the SHORTS tab, then it only needs less than 97 frames.
Can I use this commercially?
Section titled “Can I use this commercially?”Not at the moment no.
Troubleshooting
Section titled “Troubleshooting”Preview Panel
Section titled “Preview Panel”The Preview Panel is completely grey.
Section titled “The Preview Panel is completely grey.”This is because the shading mode of the preview panel is in “Solid Mode”. You’ll have to manually switch it to “Material Mode”.
The point of view of the Preview Panel is wrong.
Section titled “The point of view of the Preview Panel is wrong.”While having your cursor above the Preview Panel, press the Numpad 0 to return to the camera point of view.
The Preview Panel is hightlighted in Orange and Blender doesn’t behave as it used to.
Section titled “The Preview Panel is hightlighted in Orange and Blender doesn’t behave as it used to.”It must be because you switched inadvertently in “Edit Mode”. Press TAB once, to switch back to “Object Mode”.
Manager Panel
Section titled “Manager Panel”The point of view of the Manager Panel is wrong.
Section titled “The point of view of the Manager Panel is wrong.”While having your cursor above the Manager Panel, press the Numpad 7 to return to orthographic Top-View. Then use :
Mouse Wheelto zoom in or out the view to locate the corresponding Manager Panel.CTRL + Middle Mouse Buttonto pan the view to center the Manager Panel.
A slider in the Manager Panel is hightlighted in Orange and Blender doesn’t behave as it used to.
Section titled “A slider in the Manager Panel is hightlighted in Orange and Blender doesn’t behave as it used to.”It must be because you switched inadvertently in “Edit Mode”. Press TAB once, to switch back to “Object Mode”.
Shader Panel
Section titled “Shader Panel”I can’t seem to fing a way to edit the effect in the Shader Panel.
Section titled “I can’t seem to fing a way to edit the effect in the Shader Panel.”If you see a group of nodes inside a red frame called “Cursor Material” then you must first select with Left Mouse Button the corresponding cog of the effect you want, in the Manager Panel, to display its material inside the Shader Panel.
When I change values on a node, nothing is happening in the Preview Panel or it changes the wrong effect.
Section titled “When I change values on a node, nothing is happening in the Preview Panel or it changes the wrong effect.”Before editing values of a node in the Shader Panel, be sure to be in the right tab and, in the Manager Panel, you have selected with Left Mouse Button the right cog corresponding to the effect you are trying to edit.
Render Panel
Section titled “Render Panel”How to render an image sequence instead of a webm?
Section titled “How to render an image sequence instead of a webm?”Follow the instructions shown in the second part of the video.
The rendered webm has a black background. How can I make it transparent?
Section titled “The rendered webm has a black background. How can I make it transparent?”In the Render tab:
- Look at the Properties Panel, in the Output submenu.
- Below the “File Format” setting, make sure the “Color” setting is set to “RGBA” instead of “RGB”.
License
Section titled “License”All the content is registered under the Creative Commons License Attribution-NonCommercial CC BY-NC-SA.
This means anyone can use it, share it or modify it as long as we are credited in text with our name JB2A and a link to our website or Patreon page somewhere in the description of the content you’re distributing.
It cannot be used commercially.